Making a DIY fall wreath is a fun way to enhance your autumn decor. You can personalize your wreath with colorful leaves, pinecones, or even small pumpkins. With just a few simple materials and some creativity, you can craft a beautiful piece to welcome the fall season. This guide will walk you through how to make a fall wreath step-by-step.
Ready to start your autumn project? Learn what materials you need and the best techniques to use. By making your own fall wreath, you can add a unique touch to your home and enjoy the cozy feeling of handmade decorations.
Historical and Cultural Significance
Wreaths have a rich history that spans various cultures and epochs, symbolizing a multitude of sentiments and purposes. The circular shape of a wreath represents eternity, for it has no beginning and no end. In ancient times, wreaths made from leaves, twigs, and other natural materials were not only decorative but also held significant meaning.
Ancient Roots
The tradition of wreath-making can be traced back to the ancient civilizations of Europe, where they were first used as headbands that signified one's status and achievements. The Greeks and Romans, for example, awarded laurel wreaths to victors in athletic competitions, a practice that began at the original Olympic Games. This symbol of victory and honor was also adopted by scholars upon their successful graduation, a custom still observed in some parts of the world today.
Symbolism in Wreaths
Beyond their use in celebrations and as symbols of victory, wreaths have also been associated with the cycle of life. The evergreen materials often used in wreaths, such as holly, ivy, and laurel, represent growth and everlasting life. In Christianity, the Advent wreath is an emblem of anticipation for the coming of Christ, with each candle lit representing a step in the spiritual journey towards Christmas.
Mourning and Remembrance
In times of mourning, wreaths serve as a testament to remembrance and eternal love for the deceased. The act of placing a wreath on a door or at a grave is a public declaration of loss and signifies respect for those who have passed.
Cultural Adaptations
Throughout history, different cultures have adapted wreaths' significance, each infusing their own meanings and traditions. Today, wreaths continue to be a universal decoration, celebrated for their beauty and the diverse symbolism they carry.
Wreaths are more than seasonal decor; they are a timeless link to our past, full of stories of triumph, reverence, life, and memory. Hanging a wreath means partaking in a cherished millennia-old tradition.
Get all the tips and tricks you need in our next section to perfect your DIY fall wreath.
Gathering Your Materials
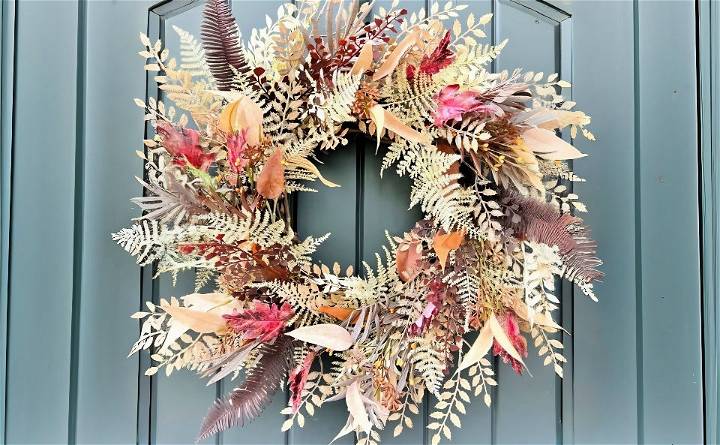
First things first, let's talk about what you'll need. Each material has been chosen for its unique contribution to the overall look and feel of the wreath.
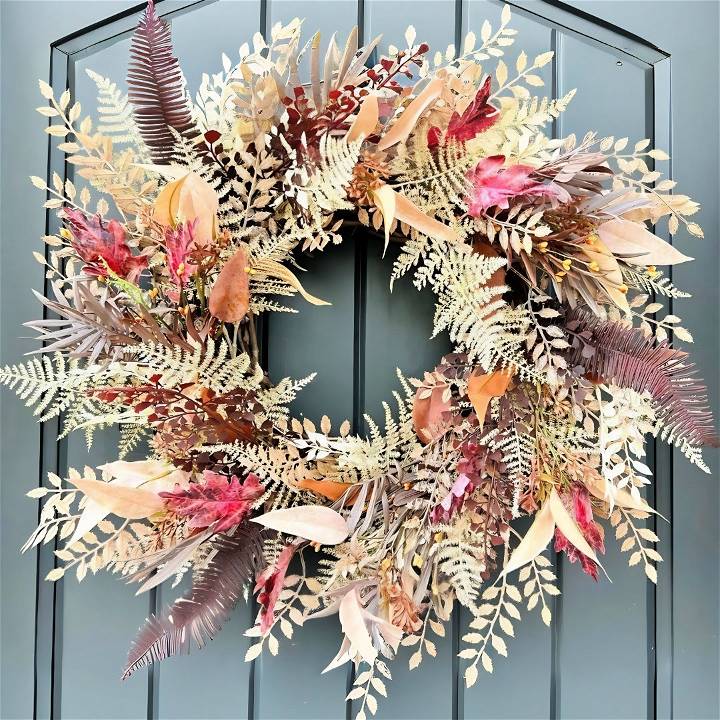
- 14-inch Grapevine Wreath: The base of your creation. It's sturdy and gives a natural, rustic charm.
- Asparagus Fern Spray: Adds a soft, delicate texture and a muted beige color that's absolutely lovely.
- Bridal Leaf Spray: With hints of blue, these add a whimsical touch and a bit of color contrast.
- Cream Leaf Stems: These brighten up the wreath and introduce a vibrant layer of texture.
- Fall Eucalyptus Stems: The orange and mauve hues bring in the classic fall colors and tie the design together beautifully.
- Hot Glue Gun and Glue Sticks: For securing your elements. Trust me, you want them stuck well!
- Wire Cutters: Essential for cutting stems to the right size.
Each material plays a role in the final product, whether it's contributing to the wreath's lush texture, introducing color, or adding structural support.
Step by Step Instructions
Discover DIY fall wreath step-by-step instructions: Prep your space, make the base layer, add dimension and color, and perfect the finishing touches.
Prepping Your Space and Materials
Clear a large workspace, and gather your tools and materials. Make sure your hot glue gun is heated and ready. Use the wire cutters to trim and segment your stems. Most items might be longer than necessary, so breaking them down into usable pieces is key. This step is about preparing your palette of greens and textures.
Making the Base Layer
- Begin with the Bridal Leaf Spray. Glue the stems onto your grapevine wreath, placing them to make a full circle. Think of this as laying down the canvas for your masterpiece.
- Asparagus Fern Addition. These stems add a beautiful texture against the more solid bridal leaf. Place them sporadically, facing mostly forward, for a layered effect.
Adding Dimension and Color
- Integrate the Cream Leaf Stems. These are your pops of light amid the greens, making spots that catch the eye and bring brightness to the composition.
- Incorporate Fall Eucalyptus. These items are the heart of your fall theme. Distribute them evenly around the wreath, ensuring the beautiful hues of orange and mauve are spread throughout.
The Finishing Touches
- Assess and Adjust. Step back and look at your wreath. Now is the time to fill in any gaps or adjust the placement for a balanced look.
- Hang and Admire. Use a sturdy hook or wreath hanger to display your creation. It's not just a decoration; it's a statement of your creativity and dedication.
Customization Ideas for DIY Fall Wreaths
Making a fall wreath is a delightful way to bring the warmth and colors of the season right to your doorstep. Here are some unique and practical ideas to customize your DIY fall wreath, making it a true reflection of your personal style.
Choose a Theme
Start by deciding on a theme that resonates with you. It could be anything from harvest bounty, featuring corn husks and wheat, to a woodland theme with pinecones and acorns. Your theme will guide your choice of materials and design.
Select a Base
The base of your wreath sets the stage. Common bases include grapevine, wire, foam, or even a simple embroidery hoop. Each offers a different look and feel, so pick one that complements your theme.
Add Texture and Color
Incorporate a variety of materials to add texture and depth. Burlap ribbon, yarn, or deco mesh can introduce a rustic touch, while silk leaves, vibrant berries, and felt flowers can add pops of color.
Personal Touches
Make your wreath stand out by adding elements that are uniquely you. Attach a monogram of your last name, or decorate with items that reflect your hobbies, like knitting needles for crafters or feathers for nature enthusiasts.
Seasonal Flair
Embrace the season by adding small pumpkins, gourds, or even dried apple slices to your wreath. These elements celebrate the essence of fall and give your wreath a festive touch.
Keep It Fresh
If you have a garden, consider using fresh herbs like sage or rosemary. Not only do they look great, but they'll also give off a pleasant aroma every time you pass by your wreath.
Lighting
For a magical evening glow, weave in some battery-operated LED lights. This will illuminate your wreath and make a cozy ambiance as the days get shorter.
The key to a great DIY project is to have fun and let your creativity shine. There's no right or wrong way to make a wreath, so enjoy the process and make something that brings you joy every time you see it.
Seasonal Trends and Color Palettes
As the leaves begin to turn and the air grows crisp, the fall season brings with it a new wave of color trends that can inspire your DIY projects. This year, the fall palette is all about embracing the richness of the season with a mix of earthy tones, vibrant highlights, and comforting neutrals.
Earthy Elegance
Earthy tones are a staple for fall, and this year is no exception. Deep, rich hues like espresso and terra-cotta offer a warm and inviting feel, perfect for making a cozy atmosphere in your home decor. These colors reflect the natural world around us and bring a sense of stability and comfort.
Vibrant Accents
To add a pop of color to your fall palette, consider incorporating buttery yellow or chartreuse. These vibrant tones can brighten up any space and pair beautifully with the darker, more subdued colors of the season. They provide a cheerful contrast to the more traditional fall colors and can make your wreath stand out.
Timeless Neutrals
Neutrals are always in style, and this fall, shades like lucent white and moonstruck gray are particularly trendy. These colors offer a clean and modern backdrop that allows other colors to shine. They're also incredibly versatile, making them a safe choice for those who prefer a more understated look.
Cool Blues
An influx of coastal-inspired blues, ranging from light pastels to bold teals, is making waves this fall. These hues can evoke a sense of calm and serenity reminiscent of the ocean. Incorporating these colors into your wreath can give it a fresh, contemporary feel.
Magical Purples
For a touch of mystery and magic, consider adding shades like Italian plum to your color scheme. This deep purple can add a luxurious and sophisticated touch to your fall decor.
Choose colors for your fall wreath based on the mood you want. Earthy tones offer comfort, vibrant accents add brightness, and cool blues bring tranquility. Mix and match to make a stylish wreath that reflects your taste.
Maintenance and Preservation Tips
Ensuring your DIY fall wreath remains as vibrant and beautiful as the day you made it requires some care. Here are straightforward tips to help maintain and preserve your fall wreath:
Choose Durable Materials
If your wreath will be exposed to the elements, opt for materials that can withstand the weather. Consider using weather-resistant fabrics, faux foliage, and sturdy bases like grapevine or metal.
Protective Coatings
Applying a clear protective spray can shield your wreath from moisture and sunlight. This is especially useful for wreaths that include natural elements like dried flowers or leaves.
Strategic Placement
Hang your wreath in a sheltered spot, such as under a porch or overhang, to protect it from direct sunlight and harsh weather. This will help prevent fading and damage.
Regular Dusting
Keep your wreath looking fresh by dusting it regularly. A soft brush or a hairdryer on a cool, low setting can be used to remove dust without damaging delicate parts.
Avoid Moisture
Moisture can be detrimental to your wreath, causing mold or decay. Ensure your wreath is completely dry before hanging it up, and try to keep it dry throughout the season.
Storage Solutions
When the season is over, store your wreath in a cool, dry place. A wreath storage bag or box can protect it from dust and pests until next year.
By following these simple maintenance and preservation tips, you can enjoy your fall wreath year after year. A little care goes a long way in keeping your seasonal decor looking its best.
FAQs About DIY Fall Wreath
Discover answers to common questions about DIY fall wreaths. Get tips, tricks, and inspiration to make stunning autumn decorations.
The most common place to hang your fall wreath is on the front door as a welcoming sign of autumn. However, you can also hang it over the mantle, on a living room wall, or even lay it flat on a table as a centerpiece with a candle in the middle.
Absolutely! There are many simple tutorials available that can guide you through the process step-by-step. Start with a basic design and as you gain confidence, you can try more complex arrangements. Remember, the beauty of DIY is in the personal touch you give it.
To preserve your wreath, keep it dry and avoid direct sunlight when displaying it. After the season, store it in a cool, dry place covered with a plastic bag or wrapped in tissue paper to prevent dust and damage. This will help maintain its appearance for years to come.
The size of your wreath should complement the space where it will be displayed. For a front door, a 14 to 18-inch wreath is standard, but if you have a larger door or want to make a statement, go for a 24-inch wreath. For indoor spaces, consider the wall space or the size of the table if it's being used as a centerpiece.
Get creative by incorporating themes like a harvest wreath with mini pumpkins and gourds or a woodland theme with pinecones and acorns. You can also use fresh sage or wheat for a natural look or add coastal colors and decorations for a unique twist. Remember, the key is to express your personal style and the spirit of the season.
Final Thoughts
In conclusion, making a DIY fall wreath is a fun and creative way to elevate your autumn decor. By following the steps outlined in how to make a fall wreath, you can personalize your home with seasonal charm. Gather your materials and enjoy the satisfaction of making a beautiful, unique wreath that celebrates the essence of fall.


