Making DIY faux beams can transform the look of your home easily. When I decided to add them to my living room, I was amazed at how much warmth and character they brought. The process was straightforward and didn't require specialized skills or tools. I measured the space, cut the beams to size, and mounted them securely.
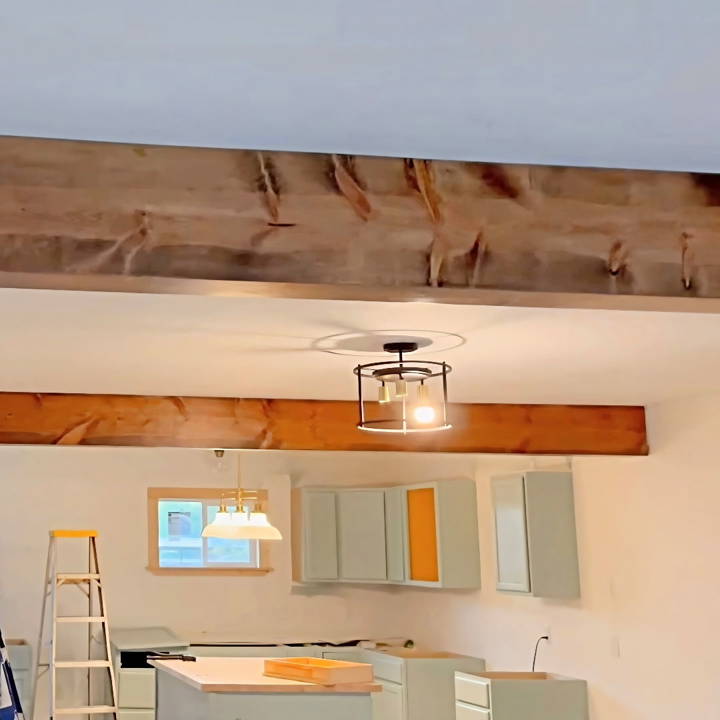
By following these steps, you'll learn how simple it is to add DIY faux beams to any room. Start by gathering the materials you need, which are usually budget-friendly and easy to find in most hardware stores. With patience and a little effort, you'll have beams that look like they were always a part of your space.
By sharing my experience, I hope you feel inspired to start your own DIY faux beam project. These tips and steps will guide you well.
Why Choose Faux Beams?
Faux beams come with several advantages:
- Aesthetic Appeal: They instantly enhance the visual interest of a room, adding a touch of rustic elegance or modern sophistication, depending on the design.
- Lightweight: Unlike real wood beams, faux beams are light and can be easily installed on most ceilings without needing structural modifications.
- Cost-Effective: They are generally more affordable than real wood beams and require less labor to install, making them a budget-friendly option.
- Versatile: Faux beams come in a variety of styles, colors, and textures, allowing you to choose the perfect match for your home's decor.
- Low Maintenance: They do not warp, rot, or require the same level of upkeep as real wood, making them a practical choice for long-term use.
How Are Faux Beams Made?
Most faux beams are crafted using molds taken from real wooden beams, which capture the wood's texture and grain. Materials like polyurethane are then poured into these molds to build beams that are virtually indistinguishable from solid wood. Some faux beams are hollow, allowing for easy handling and installation, while others are solid but still significantly lighter than wood.
Installation Overview
Installing faux beams: a simple DIY weekend project. Measure, cut, and secure, lightweight beams to your ceiling with ease. Ideal for solo installation.
Enhance your home with stylish and cost-effective faux beams. Perfect for cozy and modern spaces. Get tips on selecting and installing faux beams.
Materials Needed:
- 1x6 pine boards: Pine is lightweight and easy to work with. Its grain and texture offer a rustic charm.
- Wood glue: Essential for sturdy, long-lasting joints.
- Staples or nails: To secure the boards together.
- Wood filler: To smooth out any imperfections and nail holes.
- Sandpaper: For making a smooth finish.
- Stain and polyurethane: To give your beams a beautiful finish and protection.
Step by Step Instructions
Learn how to install DIY faux beams with our step-by-step instructions. Perfect for adding rustic charm to any room in your home.
Step 1: Designing Your Beams
First, measure your space. The room I worked on needed two beams, each stretching the length of the ceiling. Remember, faux beams are hollow, so no need to worry about them being too heavy to support.
Step 2: Cutting Your Boards
Using a miter saw, cut your pine boards to length. The key to professional-looking faux beams is to cut 45-degree angles (miters) on the ends of your boards, allowing them to fit together seamlessly. For my project, I cut two boards with two miters each and two additional boards for the sides of each beam.
Step 3: Assembly
Here's where patience pays off. Apply wood glue generously along each miter, pressing the boards together to form a hollow beam. I used staples to secure mine, but nails or screws work too. Ensure your corners align perfectly to avoid gaps.
Step 4: Wood Filler and Sanding
Once assembled, apply wood filler to any nail holes or imperfections. After it dries, sand your beams smooth. This step is crucial for a quality finish. Pay extra attention to smoothing out any filled holes and miters.
Step 5: Staining and Finishing
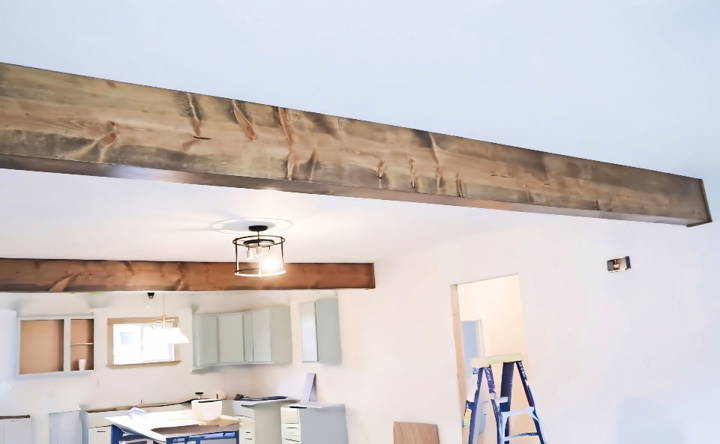
Staining brings your beams to life. Choose a stain that complements your room and apply it evenly. I went with a classic Early American for its timeless appeal. After drying, apply polyurethane for a durable, glossy finish. Sand lightly between coats for best results.
Step 6: Installation
Installing your beams may require a helper, given their length. My beams were set to frame the living room, so careful measurement was critical. We secured blocks to the ceiling, onto which the beams were mounted. This way, the beams were both decorative and did not bear any load.
Challenges and Solutions
One challenge I faced was ensuring the beams were long enough to span the room's width. Unfortunately, my beams were slightly short due to a miscalculation. The solution? I used scrap materials to craft decorative end caps, which not only solved the issue but added a unique design element.
Customization Tips for Faux Beams
When it comes to personalizing your faux beams, the possibilities are nearly endless. Customizing your faux beams allows you to match them perfectly with your home's style and decor. Here are some practical tips to help you tailor your faux beams for that bespoke look:
Choosing the Right Color and Finish
- Paint: You can paint your faux beams any color to complement your room. For a traditional look, classic wood tones like oak or walnut are popular choices. For a modern twist, consider bold colors or a sleek black or white.
- Stain: If your faux beams are made of a stainable material, applying a stain can enhance their natural wood-like appearance. Choose a stain that matches your existing woodwork for a cohesive look.
- Distressing: To give your beams an aged or weathered look, use distressing techniques. You can use tools to build marks and then apply a glaze to accentuate the details.
Texture and Detailing
- Adding Grain: Use a graining tool to build a wood grain effect on smooth beams. This can add depth and make them look more like real wood.
- Decorative Straps: Metal straps or brackets can add an industrial touch and make the beams appear more authentic. These can be purely decorative or used to hide seams.
Integration with Lighting
- Recessed Lighting: Installing recessed lighting within your faux beams can build a warm ambiance and highlight the beams' texture.
- Hanging Fixtures: Consider mounting light fixtures to the beams for a dramatic effect. This works especially well with rustic or industrial decor.
Thematic Consistency
- Match Your Decor: Ensure your customized beams align with the theme of your room. For a coastal vibe, whitewashed beams are perfect, while dark, rich tones suit a traditional study.
Practical Considerations
- Weight: Remember that adding materials to your beams increases their weight. Ensure your ceiling can support the extra load.
- Maintenance: Consider the long-term care of your customized beams. Choose finishes that are easy to clean and maintain.
Follow these tips to make your faux beams both stylish and practical. Be creative and keep it simple. Your faux beams will become a standout feature everyone admires.
Maintenance and Care for Faux Beams
Taking care of faux beams is straightforward and doesn't require much effort. Proper maintenance ensures they look great for years to come. Here's how you can keep your faux beams in top condition:
Regular Dusting
- Gentle Cleaning: Use a soft cloth or duster to remove dust from the surface of the beams. This prevents buildup and keeps the beams looking fresh.
- Frequency: Dusting once a month is usually enough, but you may need to do it more often if the beams are in a high-traffic area.
Dealing with Stains
- Immediate Action: If your beams get stained, it's best to clean them as soon as possible.
- Cleaning Solution: Use a mild soap and water solution for most stains. For tougher stains, you might need a specialized cleaner, but always test it on a small area first.
Avoiding Water Damage
- Moisture Control: Faux beams are generally resistant to moisture, but it's still a good idea to avoid getting them wet.
- Leaks and Spills: If your beams do get wet, dry them immediately to prevent any potential damage.
Inspection and Repair
- Regular Checks: Inspect your beams periodically for signs of wear or damage.
- Minor Repairs: Small nicks or scratches can often be touched up with paint or a repair kit designed for faux beams.
Long-Term Care
- UV Protection: If your beams are exposed to sunlight, consider using a UV protectant spray to prevent fading.
- Professional Help: For any significant issues, consult with a professional who has experience with faux beams.
Maintain the beauty and durability of your faux beams with regular care and quick attention to issues. Follow these simple steps for easy maintenance!
FAQs About DIY Faux Beams
Learn the basics of DIY faux beams with our comprehensive faqs, offering expert tips and insights for beautiful, cost-effective home decor.
Faux beams are decorative beams that mimic the look of real wood or structural beams. They are typically made from lightweight materials like high-density foam, wood, or polyurethane. You should consider them because they can add architectural interest and warmth to a room without the weight and cost of real wood beams.
Yes, with the right tools and a bit of patience, you can install faux beams yourself. The key steps include measuring and cutting the beams to fit your space, securing mounting blocks to the ceiling, and attaching the beams to these blocks. It’s important to ensure the beams are securely fastened to avoid any safety hazards.
Faux beams come in various styles to match different decor themes. You can choose from rustic, distressed beams for a farmhouse look, sleek and modern beams for a contemporary space, or even custom-designed beams to suit your specific taste. There are also ready-made options available for purchase if you prefer not to build them yourself.
Maintaining faux beams is relatively simple. Dust them regularly with a soft cloth or duster to prevent buildup. If they are made of wood or have a wood finish, you may occasionally need to touch up the stain or paint. For foam or polyurethane beams, gentle cleaning with a damp cloth should suffice.
To ensure your faux beams look authentic, select materials that closely resemble real wood in texture and color. If you're making the beams yourself, use techniques like distressing with a hammer or torch, and staining with an oil-based product to give them a rustic appearance. For a more modern look, consider using smooth, finished wood and applying a sleek stain or paint. When installing, make sure the beams align with the architectural style of your home and complement existing design elements for a cohesive look.
Conclusion
In conclusion, your room can look fantastic with DIY faux beams. It feels rewarding to build something beautiful with your own hands. Dive in and start your project; follow the steps carefully, and enjoy the process of transformation.


