Are you tired of plain, boring windows or want to add privacy to your space without sacrificing style? Faux-stained glass could be the perfect solution for you! This easy and affordable DIY project allows you to transform your windows or glass doors into beautiful works of art, and best of all, it's completely renter-friendly. In this article, we'll guide you through the process of making your own DIY faux stained glass using static cling window film. This method offers a customizable, non-permanent solution that adds both beauty and privacy to your home.
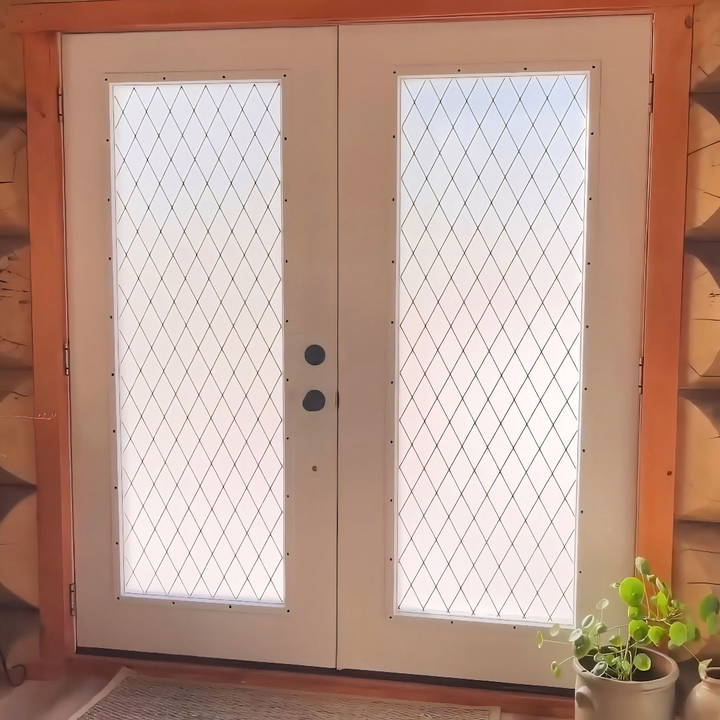
What is Faux Stained Glass?
Faux stained glass mimics the look of traditional stained glass without the cost and complexity. It typically involves using a window film that clings to the glass surface to make the effect of stained or frosted glass. Unlike real stained glass, this faux version is easy to install, remove, and reposition, making it perfect for renters or anyone who likes to frequently update their decor.
Why Choose Faux Stained Glass?
- Affordable: Real stained glass can be expensive. Faux stained glass offers the same beautiful look for a fraction of the cost.
- Easy to Install: There's no need for professional help. The window film can be applied by anyone with a few simple tools.
- Renter-Friendly: The static cling nature of this material means it can be easily removed without leaving any residue, making it perfect for rental spaces.
- Customizable: You can cut the film into different shapes and sizes to fit your specific needs.
- Privacy: Faux stained glass adds privacy to your home while still allowing light to filter through.
Now, let's walk through the step-by-step process of making your own faux stained glass masterpiece.
Materials You'll Need
Before starting, gather the necessary materials. Most of these items can be found at your local hardware store or ordered online.
- Window film (with stained glass pattern or frosted glass look)
- Measuring tape
- Sharp scissors or utility knife
- Spray bottle filled with soapy water
- Squeegee (or a similar tool, such as a credit card or shower squeegee)
- Scraper (optional, for removing air bubbles)
- Tape (to help peel off the backing of the film)
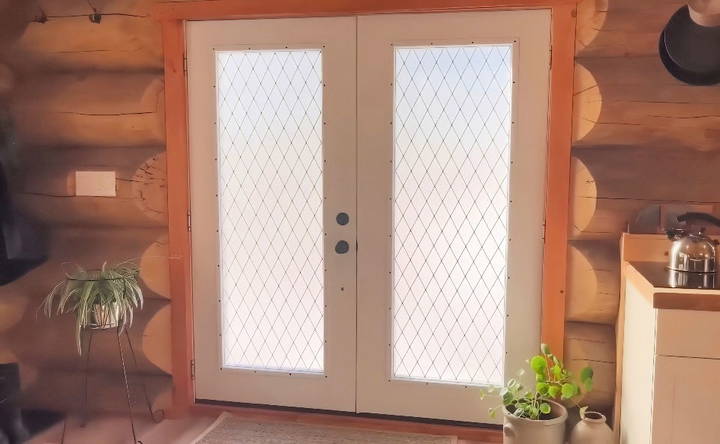
The film you choose will depend on your design preferences. For example, the creator in the tutorial used a frosted window film with a stained glass pattern. You can find a wide variety of designs, from colorful, intricate patterns to more simple frosted looks.
Step by Step Instructions
Learn how to make DIY faux stained glass with step-by-step instructions, perfect for transforming windows and cabinets easily and affordably.
1. Clean the Glass Surface
Start by thoroughly cleaning the window or glass door where you plan to install the faux stained glass. Any dirt, dust, or residue will prevent the film from adhering properly.
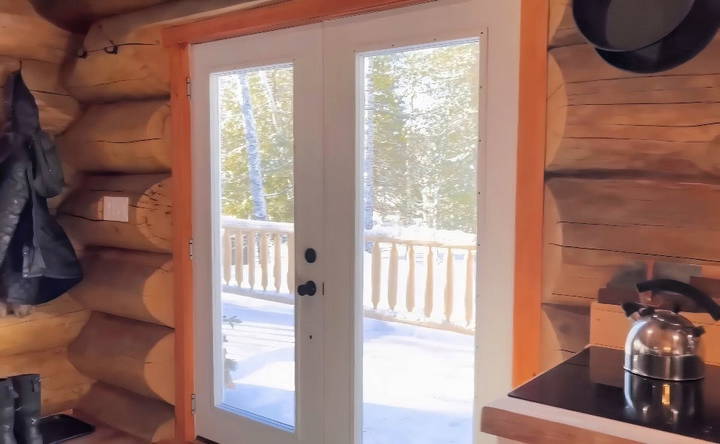
- Tip: Use a scraper to remove stubborn bits of glue, paint, or debris. A clean and dry surface is crucial for a smooth application.
2. Measure Your Window
Use a measuring tape to determine the dimensions of the window or glass door you want to cover. It's important to be accurate in this step because cutting the film too small can leave gaps, and cutting it too large can make installation difficult.
- Pro Tip: Measure twice, cut once! Add about half an inch on each side so you can trim off any excess after the film is applied.
3. Cut the Window Film
Once you've measured the window, use sharp scissors or a utility knife to cut the window film to the appropriate size. Ensure your cuts are straight and clean.
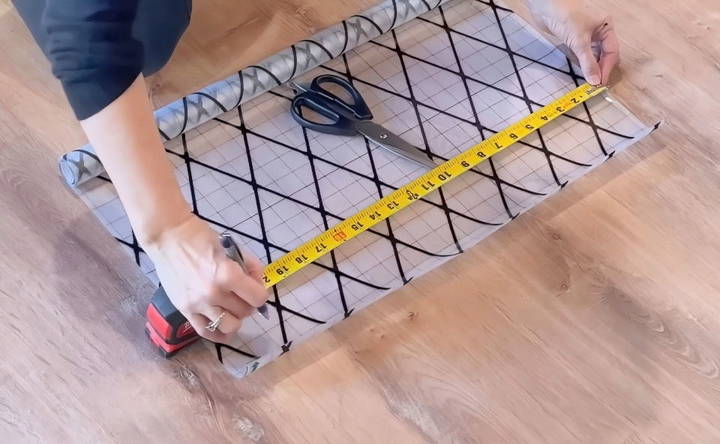
- Tip: If you have any leftover pieces, save them for future DIY projects. The excess film can be used on smaller windows or even to add decorative touches to mirrors or glass cabinets.
4. Prepare the Window for Application
Before applying the film, spray the glass generously with soapy water. The water acts as a lubricant, making it easier to position the film on the glass and preventing it from sticking too quickly.
- Tip: The more water, the better! Don't be afraid to soak the window surface; it will help you achieve a smooth application.
5. Apply the Film
Peeling off the backing from the window film can be tricky. One method to make it easier is to stick two pieces of tape—one on the front and one on the back of the film—then pull them apart to help separate the backing.
Carefully place the film onto the wet glass surface. Start at one corner and work your way across, ensuring the film is slightly larger than the window so you can trim the edges later.
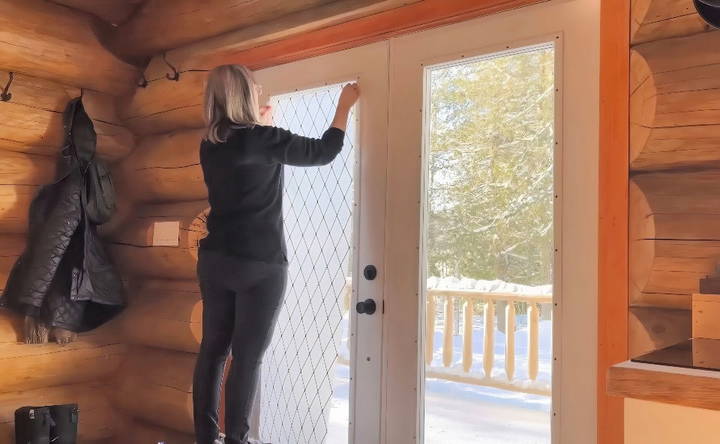
- Pro Tip: As you apply the film, spray additional soapy water on the back to prevent air bubbles from forming and to ensure the film sticks smoothly.
6. Smooth the Film
Once the film is in place, use a squeegee or scraper to remove any air bubbles and excess water. Work from the center of the window outward to the edges. This step is crucial for achieving a smooth, professional look.
- Alternative: If you don't have a squeegee, a credit card or even a shower squeegee will work just as well.
7. Trim the Edges
After smoothing out the film, take a utility knife or sharp scissors and carefully trim any excess around the edges of the window. Be precise here; any mistakes will be noticeable.
- Tip: Be patient! It's better to cut slowly and ensure clean edges than to rush and risk cutting too much.
Optional: Creative DIY Faux Stained Glass Ideas
While the basic installation of faux stained glass is simple, there are many creative ways to customize this project and make it your own. Here are a few ideas to spark your creativity:
1. Custom Shapes and Patterns
If you have a steady hand and a bit of creativity, you can cut the window film into custom shapes like flowers, geometric patterns, or even abstract designs. Use a utility knife and a ruler for precision.
2. Mix and Match Patterns
If you can't choose just one pattern, why not combine a few? You could make a patchwork effect by mixing different stained glass films for a unique, colorful window.
3. Use for Mirrors and Glass Cabinets
Faux stained glass doesn't have to be limited to windows! You can apply the same technique to glass-front cabinets or even mirrors to give them an updated look.
Benefits of Faux Stained Glass for Your Home
Faux stained glass offers several advantages beyond just aesthetics. Here are a few key benefits:
- Privacy: One of the main reasons people opt for faux stained glass is the added privacy. Whether you're installing it on a bathroom window or a glass front door, this decorative film prevents people from seeing inside while still allowing light to filter through.
- Energy Efficiency: Many faux stained glass films are designed to help with insulation. They can keep your home cooler in the summer and warmer in the winter by reducing the amount of direct sunlight that passes through the windows.
- Renter-Friendly: Since the film is static cling, it can be easily removed without damaging the glass or leaving behind any residue. This makes it an excellent option for renters who want to personalize their space without making permanent changes.
- Affordability: Compared to installing real stained glass, which can be costly and time-consuming, faux stained glass is a budget-friendly option. Most window films cost less than $20, making this a cost-effective way to enhance your home's decor.
Final Thoughts: Why You Should Try Faux Stained Glass
DIY faux stained glass is an easy, affordable, and renter-friendly way to upgrade your windows and glass doors. Whether you're looking to add privacy, beautify a plain window, or give your space a unique touch, this project is perfect for all skill levels. With minimal tools and a bit of patience, you can achieve stunning results that will elevate your home decor without breaking the bank.
So, if you're ready to transform your space, grab some window film, follow the steps outlined above, and enjoy your beautiful new faux stained glass windows. This simple project can make a big difference in any room!
FAQs About DIY Faux Stained Glass
Find answers to common questions about DIY faux stained glass. Learn tips, tricks, and techniques to make your stunning faux stained glass art.
Make sure to thoroughly clean the window before applying the film. Spray the glass with soapy water to act as a lubricant, which helps position the film. Press out air bubbles using a squeegee, working from the center outward for smooth application.
No, the film allows light to pass through while providing privacy. Depending on the design, some films may reduce brightness slightly, but they are generally designed to maintain a well-lit space.
Most faux stained glass films are designed to blur the view, offering privacy from the outside. However, you won't be able to see clearly through them, so consider placement depending on your needs for visibility.
To remove air bubbles, use a squeegee or even a credit card. Press the bubbles toward the edges of the film, and ensure the surface beneath is sufficiently wet to help them glide out smoothly.
Yes, faux stained glass window film is perfect for bathrooms. It withstands humidity well and provides privacy while letting natural light in, making it a great option for windows in high-moisture areas.
Some faux stained glass films come in vibrant, colorful designs. If you're looking for true stained glass effect, explore these options instead of frosted or neutral tones, which offer a subtler appearance.
Yes! Faux stained glass film is typically made from static cling material, which makes it removable and reusable. Carefully peel it off, keep it clean, and store it flat to use again.
High-quality window films can last for years without yellowing or peeling. Many users report keeping them up for over a decade, especially if properly installed and cared for.
Absolutely! Faux stained glass film is a renter-friendly option as it can be easily removed without leaving residue. It's an excellent way to personalize your space without permanent alterations.
You can cut the window film to any shape or size, making it flexible for partial coverage. Use a utility knife or sharp scissors to customize your design and cover the specific areas you want.


