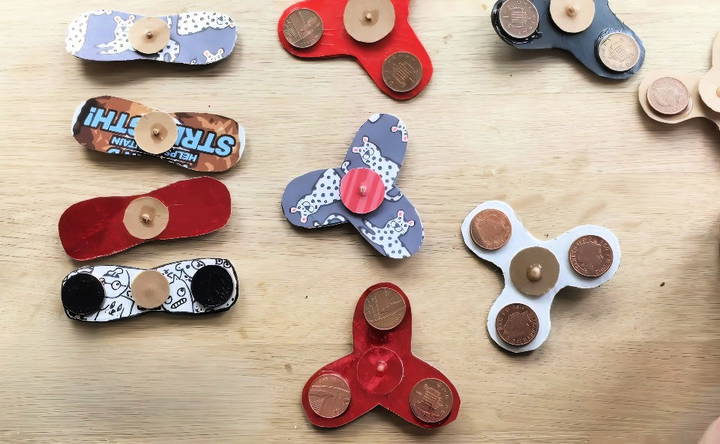
Making a DIY fidget spinner is simple and fun. I remember when I made my own. All it took were a few basic materials and a bit of time. I gathered some cardboard, pennies, glue, and a toothpick. It was amazing to see these simple items come together to make something so useful.
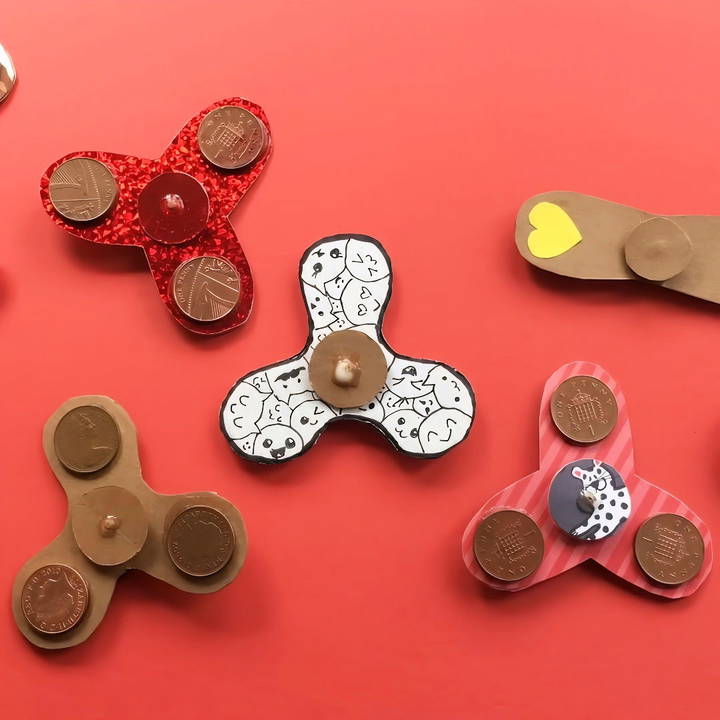
The whole process was relaxing and enjoyable. Cutting out the cardboard, gluing the pennies, and assembling everything gave me a sense of achievement. Plus, in the end, I had a handy stress reliever that I could use anytime. If you're looking for a quick, engaging project, try making your own fidget spinner. It's both rewarding and calming.
Materials You Will Need
Gathering the right materials is the first and most crucial step. Here's what you'll need:
1. Cardboard
Cardboard is the backbone of your fidget spinner. It's cheap, recyclable, and provides a decent amount of stiffness. I used recycled cardboard from cereal boxes for a lightweight spinner.
2. Coins
Coins provide the necessary weight to spin the fidget spinner effectively. Without them, you won't get that satisfying spin. You'll need three coins for balance. Ensure they are of the same type and size.
3. Toothpick
A toothpick will act as the axis on which your spinner rotates. Simple, functional, and something you likely already have at home.
4. Glue
Different types of glue can be experimented with, from standard PVA glue to hot glue guns. I found that a strong, fast-drying glue works best. Also, have some glue sticks handy for sticking cardboard pieces together.
5. Scissors and Craft Knife
You will need these for cutting out the cardboard shapes accurately.
6. Pens/Markers/Decoration Supplies
While optional, these will help you personalize your fidget spinner. I used markers to give mine a vibrant touch.
Step by Step Instructions
Learn how to make a DIY fidget spinner with our step-by-step instructions. Follow these easy steps to make your own spinner at home!
Step 1: Draw the Pattern
The first step is to draw your fidget spinner pattern on the cardboard. You can find templates online, or you can draw your own. A triangular shape with rounded edges works best. Make sure to draw two layers to make it sturdy.
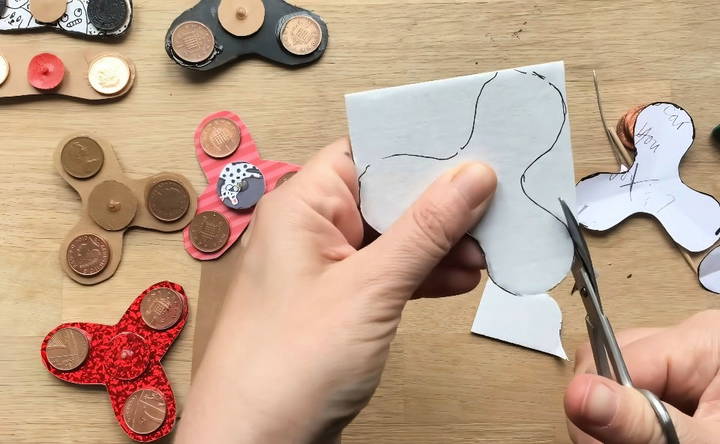
Step 2: Cut Out the Shapes
Using scissors or a craft knife, carefully cut out your shapes. Take your time to ensure precision, as any unevenness can affect the spinner's performance.
Step 3: Strengthen the Spine
If you're using cereal box cardboard, glue two cutouts together to increase stiffness. Spread the glue evenly and press the pieces together. Allow them to dry completely before moving on.
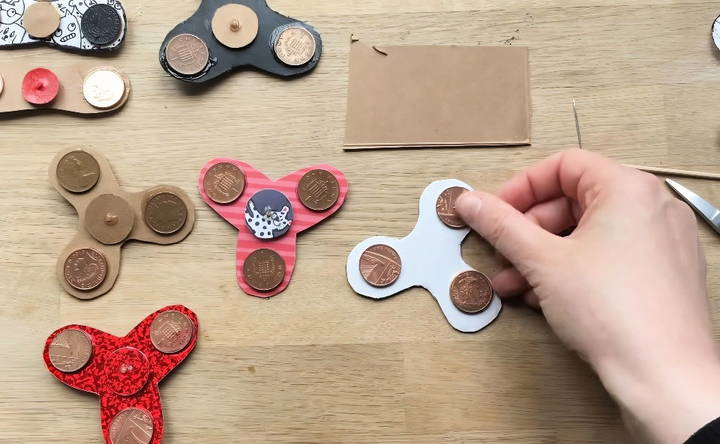
Step 4: Place the Coins
Decide where you'll glue the coins. Typically, placing them at the three points of the triangle works best. Use a strong glue to secure each coin. This step is critical, as the weight of the coins aids the spinning motion by making centrifugal force.
Step 5: Make the Center Hole
This step requires precision. Find the exact center of your spinner and carefully pierce it with a needle to make a starting hole. Enlarge it slightly so that the toothpick can fit snugly but freely.
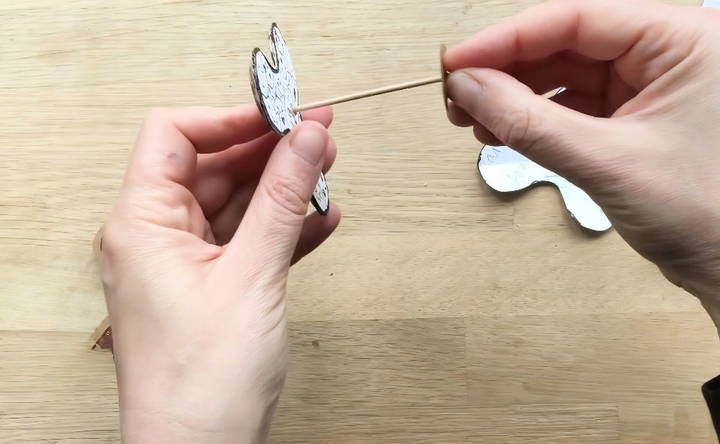
Step 6: Attach the Toothpick
Insert the toothpick through the center hole. It should move freely, allowing the spinner to spin. If the movement is restricted, use the needle to adjust the hole size. Ensure the toothpick is straight and firmly in place.
Step 7: Make Holding Discs
Cut out two small circular discs from the cardboard. These will be the holding mechanism for your spinner. These discs should have a tight fit around the toothpick to ensure stability.
Step 8: Assemble the Spinner
Slide one holding disc onto the toothpick, push it to the center, and add a dab of glue to secure it in place. Repeat this with the second disc on the other side, ensuring they are tightly fixed but allowing the spinner to rotate freely.
Step 9: Let It Dry
Allow all the glued parts to dry completely. Patience is key here. While it might be tempting to try it out immediately, letting the glue dry ensures your spinner stays intact.
Step 10: Final Adjustments
Once everything is dry, trim the ends of the toothpick so that it doesn't stick out too much. Make sure all parts are securely attached.
Testing and Troubleshooting
Learn essential testing and troubleshooting tips, including how to test the spin and effective troubleshooting steps for optimal performance.
Test the Spin
Give your fidget spinner a whirl! It might not spin as long as store-bought versions, but it should still provide a decent spin. If it wobbles or doesn't spin well, check the following:
- Central Hole: Ensure it's centered and smooth.
- Coin Placement: They should be evenly spaced and securely glued.
- Toothpick: Ensure it's straight and free to rotate.
Troubleshooting Tips
- If the coins are sliding off, ensure that the glue used is sufficiently strong.
- If friction is high, consider adding a small piece of straw in the center hole to reduce friction.
- Uneven spin can be corrected by re-centering the toothpick or adjusting the weights.
Design Customization Ideas
Making your own fidget spinner is not just about the thrill of making something with your hands; it's also an opportunity to express your personality and style. Here are some ideas to customize your DIY fidget spinner that are both fun and easy to do.
- Choose Your Materials Wisely: Start by selecting materials that reflect your personal taste. You can use everything from plastic and wood to metal and recycled materials. Plastic is ideal for a lightweight spinner, while metal can provide a more substantial feel.
- Color It Your Way Coloring your fidget spinner is one of the simplest ways to make it uniquely yours. Use spray paint for a smooth finish, or hand-paint designs with acrylics for a more artisanal touch. If you're using wood, staining can bring out the natural beauty of the grain.
- Add Some Shine Who doesn't like a little sparkle? Glue on some rhinestones, sequins, or use metallic markers to add shimmering details that catch the light as your spinner twirls.
- Stickers and Decals Stickers are a quick and easy way to personalize your spinner. From your favorite bands to cool graphic designs, the possibilities are endless. Just make sure they're securely adhered so they don't fly off during use.
- Texture for Touch: Incorporate textures into your design for a sensory experience. Materials like silicone, rubber, or textured paints can add a new dimension to your fidget spinner.
- Make It Glow Glow-in-the-dark paint or tape can make your spinner stand out, especially in low-light conditions. It's not just visually appealing but also adds a fun element to the spinning experience.
- Balance and Bearings While customizing, remember that the balance of your spinner is key. Make sure any additions don't interfere with the spinner's performance. Also, consider upgrading the bearings for a smoother, longer spin.
By following these tips, you'll have a fidget spinner that's not only fun to use but also a reflection of your creativity and style. The best customization is the one that makes you happy every time you see it spin.
Advanced Techniques
For those who have mastered the basics of making a fidget spinner and are looking to take their skills to the next level, here are some advanced techniques to enhance your spinner's performance and aesthetics.
- Balancing for Perfection A well-balanced spinner will rotate smoothly and for longer periods. Use a balancing tool or simply trial and error to add or remove weight from the arms until you achieve a balanced spin. Precision is key, so take your time with this step.
- Bearing Upgrades: The bearing is the heart of your spinner. Consider upgrading to a ceramic or hybrid bearing for a quieter and more efficient spin. These high-quality bearings can reduce friction and increase spin time significantly.
- Aerodynamic Design: Experiment with the shape of your spinner's arms to make it more aerodynamic. Streamlined designs can reduce air resistance and increase spin time. Use software to simulate airflow and refine your design.
- Customized Weights Adding weights to the ends of the spinner arms can increase the gyroscopic effect, making the spinner more stable. Experiment with different materials and shapes to find the perfect balance between weight and design.
- Magnetic Add-Ons: Incorporate small magnets into your design to make a unique tactile experience. Magnets can also be used to attach additional spinners or metal objects, adding another level of interaction.
- Engraving and Etching: For a truly personalized touch, engrave or etch designs onto your spinner. This can be done with a laser cutter or by hand for those with a steady hand and an eye for detail.
- Dynamic Lighting: Integrate LED lights into your spinner for a mesmerizing effect, especially in low-light conditions. Programmable LEDs can be used to make patterns or even display messages as it spins.
- Multi-Functional Spinners Think beyond spinning. Your fidget spinner can double as a bottle opener, a carabiner, or even a compact toolset. Design your spinner to be not just a toy but a handy gadget.
Enhancing your spinner boosts its performance, appeal, and functionality. More effort and creativity lead to more enjoyment.
Troubleshooting Common Issues
When crafting your DIY fidget spinner, you might encounter a few hiccups along the way. Here's a helpful guide to troubleshooting common issues, ensuring a smooth and enjoyable making process.
- Spinner Won't Spin If your spinner isn't spinning freely, check the center bearing. It might need cleaning or lubrication. Use a mild solvent to clean out any debris, and apply a drop of light oil to reduce friction.
- Wobbly Spinner A wobbly spinner often means it's unbalanced. Make sure all the weights are evenly distributed. You can add or remove material from the arms until you achieve a balanced rotation.
- Noisy Bearing Bearings can become noisy over time. This can be due to dirt or lack of lubrication. Clean the bearing with a solvent and apply a light oil. If the noise persists, consider replacing the bearing with a high-quality one.
- Difficulty in Assembly: If you're finding it hard to assemble the spinner, ensure all parts fit together properly. Sand down any rough edges and use adhesives sparingly to avoid excess buildup that can hinder movement.
- Paint or Decor Peeling Off For paint or decorations that are peeling off, make sure you're using the right type of paint for the material. Apply a clear sealant over the paint or stickers to protect them from wear and tear.
- Spinner Doesn't Spin Long To increase spin time; you can upgrade to a better-quality bearing or adjust the design to reduce air resistance. Make sure the spinner is clean, as even a small amount of dirt can reduce spin time.
- Parts Keep Falling Off If parts are falling off, it's likely an issue with the adhesive. Use stronger glue or consider redesigning the part to fit more snugly without the need for glue.
By addressing these common issues, you'll enhance the performance and durability of your DIY fidget spinner.
FAQs About DIY Fidget Spinner
Discover answers to the most common FAQs about DIY fidget spinners and learn how to craft your own unique stress-relieving gadget at home.
For your fidget spinner to spin properly, it must be balanced. Use a stencil to trace the shape onto your material to ensure symmetry. When adding the center piece, measure and mark the exact center of your spinner before inserting the toothpick or bolt.
Yes, you can make a simple fidget spinner without a bearing. Instead of a bearing, you can use a toothpick or a small bolt to allow the spinner to rotate around the center point. Ensure the hole in the center is smooth and the toothpick or bolt fits snugly.
You can decorate your fidget spinner by:
Painting or coloring the cardboard or foam
Gluing on decorative paper or stickers
Using markers to make patterns or designs
Adding weights on the ends for a unique spin effect
Always be cautious when using sharp objects like scissors or craft knives. Cut away from your body and work slowly to avoid accidents. If you’re making a spinner for a child, ensure all parts are securely attached to prevent choking hazards.
To add weight to your fidget spinner, which can help it spin faster and longer, you can:
Attach coins or metal washers to the ends of the spinner arms using strong glue or double-sided tape.
Use nuts from a hardware store that fit snugly onto your center bolt or toothpick.
Embed small magnets into the arms if you're using a material like foam board, which can be easily cut into.
Conclusion
Give it a shot! Making your own DIY fidget spinner is fun and practical. These steps will help you make your own stress reliever.


