I love 3D printing, and there's nothing quite like experimenting with different types of filament to bring my creations to life. Over the years, I've faced a few challenges with managing my filament storage. My filament has fallen off various holders more times than I can count, gathered dust, and, worst of all, absorbed moisture. This can be a big problem, especially for filaments like nylon and TPU.
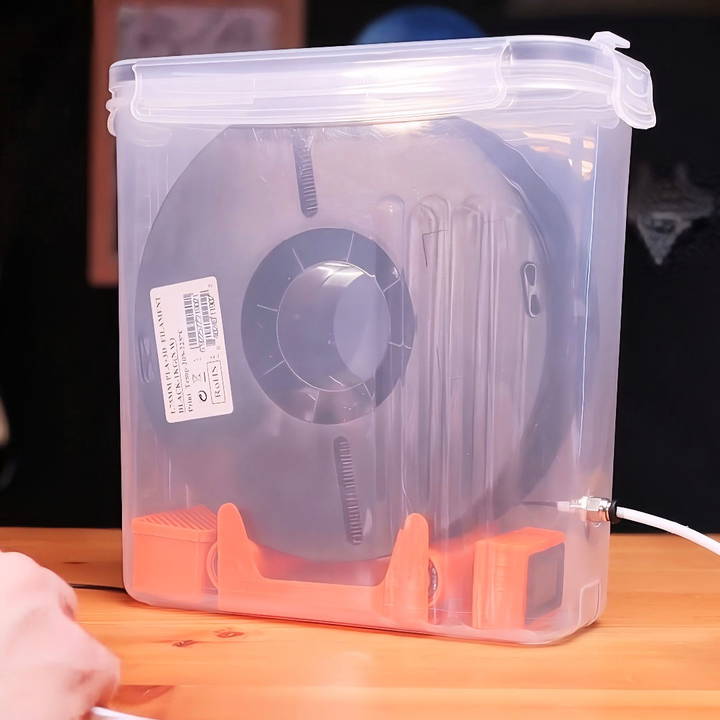
To solve these issues, I set out to build a DIY 3D printer filament dry box that not only addresses these challenges but also offers a couple of extra handy features. Let me guide you through the process of making your own filament dry box.
Understanding the Challenges of Filament Storage
Before jumping into the steps, it's important to understand why we need a filament dry box in the first place. Here's a quick rundown of the primary issues:
- Filament Falling Off: Traditional filament holders can be unreliable, causing the filament to fall off, tangle, and potentially damage your prints.
- Dust and Dirt: When left uncovered, filament can collect dust and dirt, which can clog the nozzle of your 3D printer.
- Moisture Absorption: Most significantly, filaments like nylon and TPU are highly hygroscopic, meaning they absorb moisture from the air. This can lead to poor print quality with defects and brittleness.
Making a dry box tackles all these problems and allows your 3D printing to remain consistent and high-quality.
Materials Needed for the 3D Printer Filament Dry Box
Here's what you'll need to build your dry box:
Essential Items
- Cereal Container: This will serve as the airtight storage unit for the filament. Make sure it's large enough to fit your filament spools, ideally up to 70 millimeters wide. The container should have a reliable seal to keep moisture out.
- 608 Bearings (4 pieces): These will be used in the roller system to allow your spool to rotate smoothly without jamming.
- Desiccant: This is crucial for keeping the environment inside the box dry. You can use silica gel packs or any available desiccant.
- PTFE Tube Adapter: This component helps guide the filament out of the dry box smoothly, reducing friction that could otherwise damage the filament.
- PTFE Tube: You'll need about 500 millimeters of PTFE tube with a 2mm inner diameter. The tube should be slightly loose to ensure smooth feeding.
3D Printed Parts
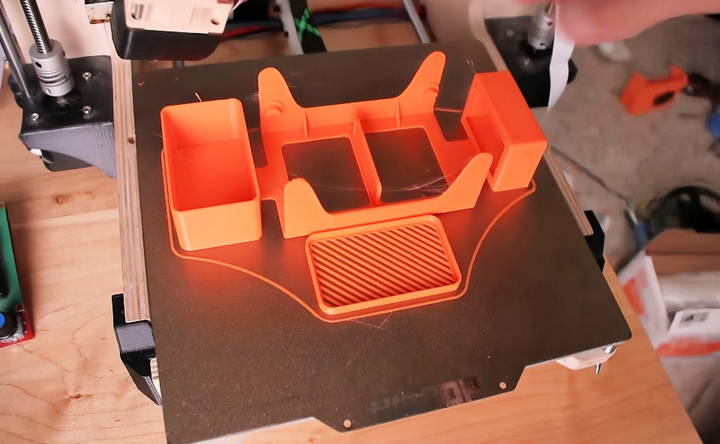
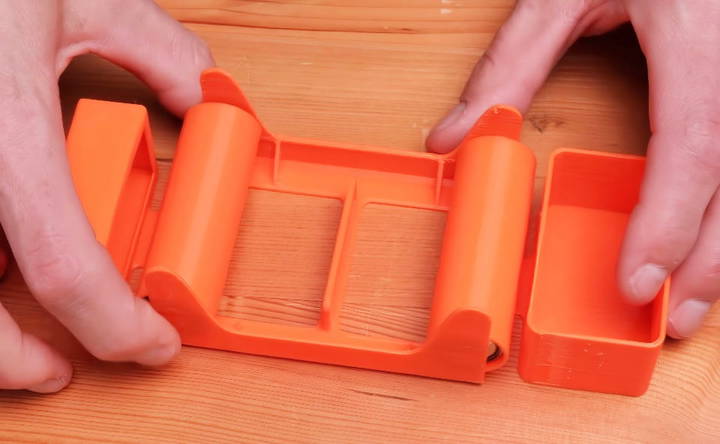
- Base: To hold the roller system.
- Desiccant Lid: To house the desiccant securely.
- Two Rollers: For the roller assembly to facilitate easy filament movement.
Optional Features
- Temperature and Humidity Sensor: For those who like to monitor the conditions inside the box, a sensor can provide valuable data on how well the dry box is maintaining a low-humidity environment.
Tools Needed
The tools required for this project are pretty basic:
- Drill: To make a hole in the cereal container for the tube adapter.
- Drill Bit (8.5 mm or 11/32 inch): For making the precise opening for the PTFE tube adapter.
- 10 mm Socket or Wrench: To secure the PTFE tube adapter in place.
- 3D Printer: For printing the roller assembly, base, and desiccant lid.
Step by Step Instructions
Learn to build a DIY 3D print filament dry box with our step-by-step guide. Follow these simple instructions to keep your 3d printing filament dry and effective.
Step 1: Print the Required Parts
Begin by printing the necessary components. Ensure your 3D printer is set up with a 0.3mm layer height for optimal results, and use either a 0.4 or 0.6 nozzle. Print the base, the desiccant lid, and the two rollers. No support is needed for the base or the desiccant lid, but enable support for the rollers.
Step 2: Prepare the Bearings
If you want your bearings to run smoother, consider cleaning them. Here's how:
- Soak them in acetone for about 30 minutes.
- After drying, apply a light machine oil like sewing machine oil for lubrication.
Step 3: Assemble the Roller System
Insert the bearings into the rollers—one on each side. Once installed, they should fit snugly onto the tabs in the base.
Step 4: Add the Desiccant
Fill the desiccant compartment with your chosen desiccant and securely snap on the desiccant lid.
Step 5: Install the PTFE Tube Adapter
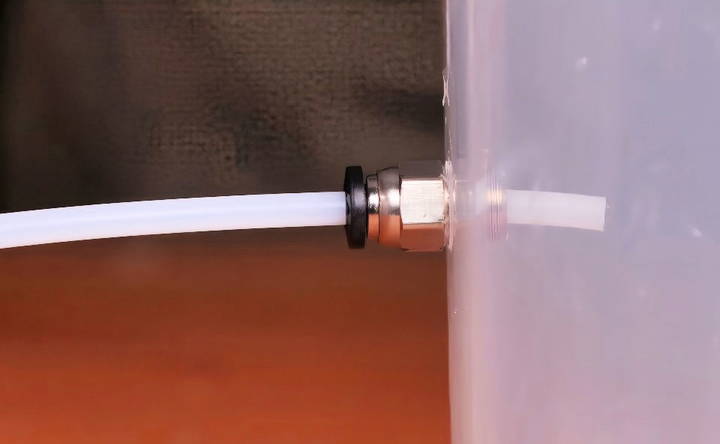
Measure and mark a spot about 50mm or two inches from the base of your cereal container, preferably on the side with serrated grips. Drill a hole using an 8.5mm or 11/32 inch drill bit. Insert and secure the PTFE tube adapter with your socket or wrench. Ensure the threads are tight for a good seal.
Step 6: Insert the PTFE Tube
Slide the PTFE tube into the adapter, allowing about 12mm of the tube to stick out the back. This helps to prevent the filament from rubbing against any metal.
Step 7: Final Assembly
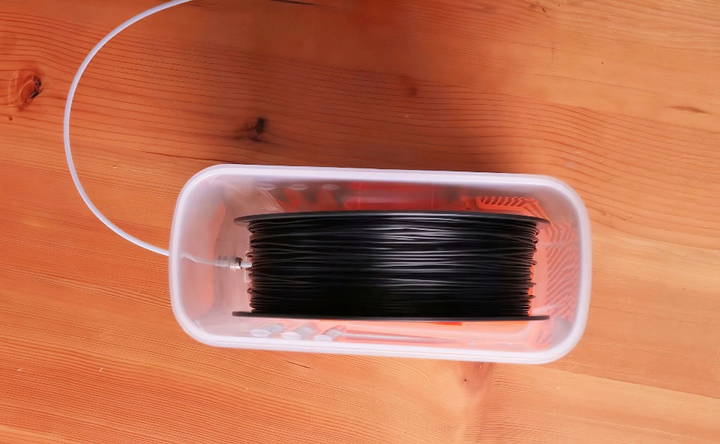
Place the assembled roller system into the cereal container. Ensure it's snug and aligns with the square tabs, preventing it from shifting around.
Step 8: Optional Sensor Installation
If you've opted for a temperature and humidity sensor, place it at the front of the box. It will help you monitor and ensure the dry box is maintaining the desired low-humidity conditions.
Step 9: Load and Test
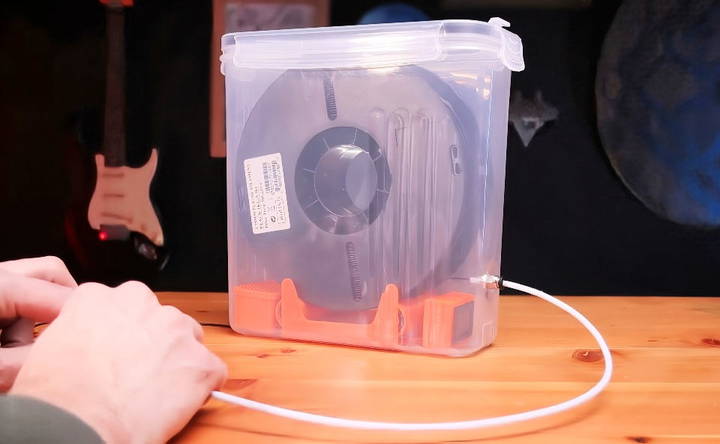
Once everything is assembled, place your filament spool onto the rollers, thread it through the PTFE tube, and close the container. Keep an eye on the conditions inside if you installed a sensor and adjust the amount of desiccant as necessary.
Advanced Features
Adding advanced features to your DIY filament dry box can significantly enhance its functionality and efficiency. Here are some innovative features you can incorporate:
Humidity Sensors
Integrating a humidity sensor, such as a hygrometer, allows you to monitor the moisture levels inside the dry box. This helps ensure that your filament remains dry and ready for use. You can find digital hygrometers that display real-time humidity levels, making it easy to keep track.
Temperature Control
Adding a temperature control system can help maintain an optimal environment for your filament. Some advanced dry boxes use heating elements to keep the temperature steady, which can be particularly useful in humid climates. You can use a simple thermostat to regulate the temperature inside the box.
Automated Drying Cycles
Automated drying cycles can save you time and effort. By incorporating a programmable timer, you can set specific intervals for the drying process. This ensures that your filament is always in the best condition without manual intervention.
Desiccant Regeneration
Using reusable desiccant packs is a cost-effective way to keep your filament dry. Some advanced setups include a regeneration system that heats the desiccant to remove absorbed moisture, allowing it to be reused multiple times. This feature can be automated to activate when humidity levels rise.
Filament Feeders
A built-in filament feeder can make it easier to use the filament directly from the dry box. This feature ensures that the filament remains dry during printing. You can use PTFE tubing to guide the filament from the dry box to the printer, reducing exposure to moisture.
Multiple Spool Storage
If you use different types of filament, consider designing your dry box to store multiple spools. This can be achieved by adding additional rods or brackets inside the box. Each spool can have its own feeder, making it convenient to switch between filaments without compromising their dryness.
Clear Viewing Panels
Adding clear panels to the sides or top of the dry box allows you to see the filament without opening the box. This helps maintain the internal environment and reduces the risk of moisture entering. Acrylic or polycarbonate sheets can be used for this purpose.
Smart Connectivity
For the tech-savvy, integrating smart connectivity features like Wi-Fi or Bluetooth can provide remote monitoring and control. You can receive alerts on your smartphone if humidity levels rise or if the drying cycle needs to be activated. This adds a layer of convenience and ensures your filament is always in optimal condition.
By incorporating these advanced features, you can make a highly efficient and user-friendly filament dry box. This will not only improve the quality of your 3D prints but also extend the lifespan of your filament.
Common Mistakes and How to Avoid Them
Building a DIY filament dry box can be a rewarding project, but there are some common mistakes that can affect its performance. Here are some of the most frequent errors and how to avoid them:
Using Non-Airtight Containers
One of the most common mistakes is using a container that is not airtight. If the container is not sealed properly, moisture can seep in and defeat the purpose of the dry box. To avoid this, use containers with rubber gaskets or add weather stripping to ensure a tight seal.
Inadequate Desiccant
Another mistake is not using enough desiccant to absorb moisture. Desiccants like silica gel are essential for keeping the filament dry. Make sure to use an adequate amount based on the size of your container. You can also use reusable desiccant packs that can be recharged by heating.
Improper Placement of Desiccant
Placing the desiccant in the wrong location can reduce its effectiveness. It should be evenly distributed or placed in areas where air circulation is good. Avoid placing it directly on the filament spools, as this can lead to uneven drying.
Ignoring Temperature Control
Temperature plays a crucial role in maintaining a dry environment. Some users overlook the importance of temperature control. Using a heating element or a temperature-controlled environment can help maintain optimal conditions. Ensure the temperature is not too high to avoid damaging the filament.
Lack of Humidity Monitoring
Not monitoring the humidity levels inside the dry box is a common oversight. Without a hygrometer, you won't know if the conditions inside the box are optimal. Install a digital hygrometer to keep track of humidity levels and ensure they stay below 10%.
Poor Filament Feeding Mechanism
A poorly designed filament feeding mechanism can cause tangling or breakage. Ensure that the filament can move smoothly from the dry box to the printer. Using PTFE tubing can help guide the filament and prevent it from getting tangled.
Overloading the Dry Box
Overloading the dry box with too many spools can reduce its effectiveness. Each spool needs adequate space for air circulation. Avoid cramming too many spools into the box and ensure there is enough room for air to circulate around each spool.
Neglecting Regular Maintenance
Regular maintenance is crucial for the longevity of your dry box. Neglecting to replace desiccant packs or clean the box can lead to reduced performance. Set a schedule for regular maintenance checks to ensure everything is functioning correctly.
Using Incompatible Materials
Using materials that are not compatible with the filament can cause issues. For example, some plastics can off-gas and affect the filament quality. Use materials that are safe and compatible with the type of filament you are storing.
Not Testing the Setup
Finally, not testing the setup before using it can lead to problems. Once you have built your dry box, test it with a small amount of filament to ensure it works as expected. Check for any leaks, monitor humidity levels, and make adjustments as needed.
By avoiding these common mistakes, you can build an effective DIY filament dry box that keeps your filament in optimal condition. This will help improve the quality of your 3D prints and extend the life of your filament.
FAQs About DIY Filament Dry Box
Find answers to common questions about making your own DIY filament dry box. Learn how to maintain filament quality easily at home!
A filament dry box is a storage container designed to keep 3D printing filament dry. Filament can absorb moisture from the air, which can cause printing issues like stringing, poor layer adhesion, and even nozzle clogs. A dry box helps maintain the filament’s quality by keeping it dry and ready for use.
Maintaining your filament dry box is straightforward:
Check the Hygrometer: Regularly monitor the humidity level. It should be below 10%.
Replace Silica Gel Packets: When they become saturated, either replace them or dry them out in an oven.
Inspect the Seal: Ensure the container’s seal is intact to prevent moisture from entering.
Yes, you can use common household items to make a filament dry box:
Plastic Containers: Any airtight container can work.
Silica Gel: You can find these in shoe boxes or buy them online.
Vacuum Bags: These can also be used to store filament and keep it dry.
Wet filament often shows several signs during printing:
Popping or Hissing Sounds: Moisture in the filament can cause these noises as it evaporates during extrusion.
Stringing and Oozing: Excess moisture can lead to filament oozing out of the nozzle, causing stringing between parts.
Brittle Filament: Filament that snaps easily when bent might be wet.
Poor Print Quality: Layers may not adhere well, and the surface finish can be rough or uneven.
Yes, you can dry filament that has absorbed moisture. Here are a few methods:
Oven: Place the filament in an oven at a low temperature (around 50°C to 60°C) for a few hours. Be careful not to exceed the filament's glass transition temperature.
Food Dehydrator: A food dehydrator can also be used to dry filament. Set it to a low temperature and let it run for several hours.
Filament Dryer: There are commercial filament dryers available that are specifically designed to dry 3D printing filament.
The Benefits
By completing this DIY 3d printer filament dry box project, you'll have maked a secure, dust-free, and dry environment for your filaments. This solution ensures that your filaments are ready for printing at any time without the risk of degradation. You'll enjoy smoother, more reliable 3D prints with fewer errors and more professional results.
Additional Insights
One might wonder why there's no heating element included. After thorough research and trial, I realized that if filaments are pre-dried, the desiccant alone is sufficient to maintain low humidity inside. Most times, I print at room temperature, and this method works perfectly fine for me.
Sharing and Feedback
I believe the best part of DIY projects is sharing the joy and learning with others. If you decide to make your own filament dry box, I would be thrilled to see your results. Feel free to share them with me on Instagram at @builditmakeit.
Building your own dry box can seem daunting at first, but with the right materials and a bit of patience, it's a rewarding project that pays off in high-quality prints. I hope this guide is helpful, and I encourage you to give it a try.


