Constructing a DIY floating dock is an exciting project that offers both fun and practical benefits. I started by researching various designs and materials to find the best approach. Measuring and gathering all the tools, wood, and floats was the next step. Cutting and assembling the dock pieces felt satisfying, knowing I was making something sturdy and useful.
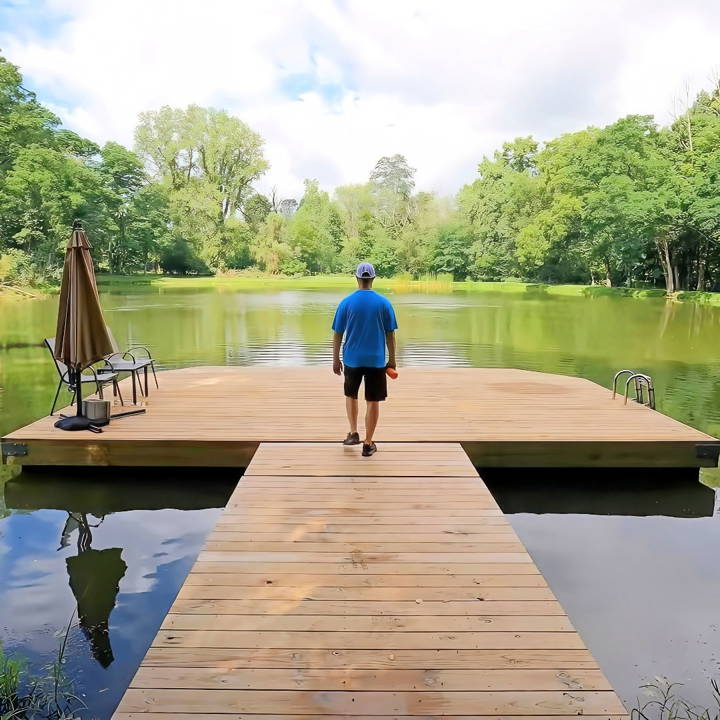
With my project complete, I anchored the dock by the lake and tested its stability. It was incredibly fulfilling to see it float smoothly on the water. If you're planning to build a floating dock, detailed steps will make the process easier and much more fun.
Here's what worked for me, and I hope it helps you get started on your own DIY floating dock adventure.
What is a Floating Dock?
A floating dock is a platform or ramp supported by pontoons. It's tethered to the shore with a flexible system that allows it to adjust to water levels. This adaptability makes it perfect for lakes, rivers, and coastal areas where water levels can vary due to tides, rainfall, or seasonal changes.
Benefits of Floating Docks
- Accessibility: They provide stable access to watercraft, even in fluctuating water conditions.
- Durability: Made from materials like plastic, aluminum, or wood, they're designed to withstand harsh marine environments.
- Ease of Installation: Floating docks can be easier and less expensive to install than fixed docks, as they often don't require extensive underwater construction.
- Flexibility: Owners can easily reconfigure, expand, or relocate them as needs change.
Choosing the Right Floating Dock
When selecting a floating dock, consider the following:
- Purpose: Determine whether it's for personal use, like swimming and kayaking, or for mooring larger boats.
- Material: Choose materials that balance durability, maintenance needs, and environmental impact.
- Design: Look for designs that offer stability, ease of use, and complement the surrounding environment.
Floating docks are practical and adaptable for waterfronts, offering easy access and cost-effective alternatives. Prioritize safety, functionality, and sustainability for a lasting benefit.
Gathering Materials: The Foundation of Success
Before diving into construction, let's talk materials. Every piece played a crucial role, underscoring the need for meticulous planning.
- Concrete Pillars and Sona Tubes: These were essential for establishing a sturdy, stationary walkway to anchor the floating dock securely, keeping the wood out of the water for enhanced longevity.
- Rebar and Post Caps: I used these to reinforce the pillars and attach the walkway frame, respectively. Attention to detail here was pivotal for stability.
- Pressure-Treated Wood: For the frames and deck boards. Its resilience against decay and insects was a non-negotiable, given the dock's constant exposure to moisture.
- Dock Floats: The crux of the floating aspect. I chose 12-inch tall floats for their buoyancy, ensuring the dock would comfortably support weight while remaining close to the water.
- Joist Hangers and Lag Screws: These added structural integrity and securely fastened the floats to the frames.
- Deck Boards: Selecting five-quarter inch boards offered the ideal blend of durability and aesthetics for the walking surface.
Step by Step Instructions
Learn how to build a DIY floating dock with step-by-step instructions, from constructing the stationary walkway to decking and final touches for a perfect finish.
The Stationary Walkway: A Solid Start
The project began with the stationary walkway during a lake-drained state—an opportunity I couldn't pass up. My wife and I wrestled with a two-person auger on a steep incline, a memory that embodies perseverance. Though we fumbled with the alignment slightly—eyeballing post caps certainly taught me a lesson—it was a crucial foundation step.
Constructing the Floating Frames
On a hard, flat driveway, I framed two 12x12 boxes for the dock's base. This decision traded the ease of assembly for the challenge of transporting the frames to the lake. Yet, with help from friends and a bit of elbow grease, we managed to maneuver them into place.
Installing the Floats: Ensuring Buoyancy
Choosing the right floats required calculations to ascertain the dock's load. Attaching them to the frames was a straightforward affair, though reaching some of the mounting holes proved to be a test of creativity. The floats not only needed to support the dock but also align with my vision of having it sit close to the water.
The Final Assembly: Bringing It All Together
Joining the stationary walkway with the floating dock was a defining moment. We built a transitional piece with hinges, allowing the floating part to adapt to water level changes. This required precision—a lesson learned hard through initial miscalculations.
Decking and Finishing Touches
Laying the deck boards was laborious but satisfying, especially with my youngest son lending a hand. His presence reminded me of the project's broader purpose: making a space for family enjoyment. Lastly, we installed a swim ladder, an essential feature for accessibility and safety.
This journey taught me more than building a dock: it stressed preparation, community, and learning by doing. Frustrations with the auger or post caps were minor compared to the satisfaction of completion. The dock stands as a symbol of resilience, teamwork, and family.
Troubleshooting Common Floating Dock Issues
Building and maintaining a floating dock can come with its set of challenges. Here's a straightforward guide to troubleshooting common issues, ensuring your dock remains a safe and enjoyable place for years to come.
- Leaking Docks Sometimes, water may seep onto the dock surface. This usually happens when the sections of the dock become loose or damaged. To fix this, inspect the connections and replace any faulty parts. Regular checks can prevent leaks from worsening.
- Instability: If your dock feels unstable, it might be due to rough water conditions or inadequate anchoring. Adding weight or adjusting the anchors can help stabilize the dock. Always wait for calm weather before making any adjustments.
- Rusting and Water Logging Metal parts can rust, and wooden components can absorb water over time. To combat rust, use corrosion-resistant materials. For wood, apply a waterproof sealant and choose high-quality, treated lumber to prevent water logging.
- Freezing Conditions In cold climates, ice can damage your dock. If possible, remove the dock during winter to avoid this issue. Otherwise, use materials and designs that can withstand freezing and thawing cycles.
- Fading and Wear Sunlight and constant use can fade and wear down your dock. Use UV-resistant materials and perform regular maintenance, like cleaning and resealing surfaces, to keep your dock looking new.
- Pest Infestation Wooden docks can attract pests like termites. Use pest-resistant materials or treat the wood with eco-friendly repellents to protect your dock's integrity.
- Loose Fasteners Check for loose bolts and screws during your regular maintenance. Tighten them as needed to ensure the dock's stability and safety.
- Algae and Moss Buildup: Algae and moss can make your dock slippery. Clean the surface regularly with appropriate cleaners to maintain a safe, non-slip dock.
- Wave and Tidal Forces Strong waves and tides can shift your dock. Ensure your anchoring system is robust enough to handle these natural forces.
- Electrical Malfunctions If your dock has electrical components, such as lights, inspect them regularly for any signs of malfunction. Always use waterproof fixtures and have a certified electrician perform any electrical work.
Resolve common issues quickly to keep your floating dock safe and functional. Regular checks and maintenance ensure uninterrupted waterfront enjoyment.
Maintenance and Upkeep
Proper maintenance is crucial for ensuring the longevity and safety of your floating dock. Here's a comprehensive guide to keeping your dock in top condition:
Regular Cleaning
Keep your dock clean by regularly washing it down with fresh water. This will remove any dirt, salt residue, and prevent the growth of algae or moss that can build slippery surfaces. For docks with aluminum decking, a mild detergent and a soft brush can be used for a more thorough cleaning.
Inspection and Repairs
Twice a year, inspect your dock for signs of wear or damage. Look for issues like loose connections, damaged flotation devices, or deteriorating decking. Addressing these problems early can prevent them from becoming major issues.
Material Care
Different materials require different care:
- Plastic and Composite: Apply a UV protectant to prevent sun damage.
- Wood: Seal the decking annually with a waterproof sealer to protect against rot and decay.
- Metal: Consider anti-corrosion coatings, especially if your dock is in salt water.
Seasonal Adjustments
If you live in an area with freezing winters, it's important to take steps to protect your dock from ice damage. This may include removing the dock during winter months or using materials that can withstand the freeze-thaw cycle.
Pest Control
For wooden docks, ensure you're using treated lumber or apply eco-friendly repellents to deter pests like termites that can compromise the dock's structure.
Hardware Maintenance
Regularly check and tighten bolts and screws to ensure stability. Replace any rusted or corroded metal parts promptly to maintain the integrity of the dock.
Environmental Responsibility
Be mindful of the cleaning products you use. Avoid harsh chemicals that can harm the aquatic ecosystem. Opt for eco-friendly options that are effective yet gentle on the environment.
Follow these maintenance tips to keep your floating dock functional and beautiful for years. Regular care extends its life and enhances your waterfront experience.
Safety Measures and Compliance
Ensuring the safety of everyone who uses your floating dock is paramount. Additionally, compliance with local regulations is essential to avoid legal issues and fines. Here's a detailed guide to help you navigate these important aspects:
Understanding Local Regulations
Before you begin building your floating dock, it's crucial to understand the local regulations. These rules can vary greatly depending on your location and might include restrictions on size, materials, and location of your dock. It's often necessary to obtain a permit before construction begins.
Designing for Safety
Your dock should be designed with safety in mind. This includes:
- Non-slip Surfaces: To prevent slips and falls, especially when the dock is wet.
- Visible Markings: Clearly mark the edges of the dock to prevent accidental falls into the water.
- Adequate Lighting: Ensure the dock is well-lit to avoid accidents at night or during poor visibility conditions.
- Life-saving Equipment: Equip your dock with life rings, ropes, and ladders for emergency situations.
Compliance with the ADA
If your dock is open to the public, it must comply with the Americans with Disabilities Act (ADA). This includes providing accessible routes for people with disabilities and ensuring that the dock's design accommodates all users.
Environmental Considerations
Your dock should not harm the local ecosystem. Use materials and construction methods that minimize the impact on the water and surrounding wildlife. This may include using eco-friendly materials and ensuring that the dock's anchoring system does not disrupt the seabed.
Regular Inspections
Once your dock is built, regular inspections are necessary to maintain safety and compliance. Check for any wear and tear, loose parts, or damage that could pose a risk to users. Make repairs promptly to keep the dock safe for everyone.
Emergency Preparedness
Have a plan in place for emergencies. This includes training on how to use safety equipment and what to do in case someone falls into the water. Ensure that all users of the dock are aware of these procedures.
Follow these guidelines to build a safe, functional floating dock that meets regulations. Regular maintenance and safety commitments will keep it secure for relaxation and recreation.
FAQs About DIY Floating Dock
Get answers to all your questions about DIY floating docks. Learn about materials, construction, and maintenance in our comprehensive faq guide.
A DIY floating dock is a dock that floats on the water's surface and can be built by individuals using readily available materials. It's a versatile and cost-effective solution for extending your waterfront property and can be used for activities like boating, swimming, and fishing.
Floating docks are best suited for water bodies with relatively calm conditions and where water levels may fluctuate, such as lakes and protected bays. They are not recommended for areas with strong currents or waves.
Maintenance for a floating dock includes:
Regularly checking and tightening any loose hardware
Inspecting the floats for damage or leaks
Cleaning the decking surface to prevent slipping hazards
Applying water-resistant sealant to the wood components as needed to prolong their lifespan.
Selecting the right location is crucial for the safety and longevity of your dock. Consider the following:
Water depth: Ensure the water is deep enough to accommodate the fluctuation in levels without grounding the dock.
Sheltered area: Choose a spot protected from strong winds and waves to minimize wear and tear.
Accessibility: Make sure the location is easily accessible from your property and complies with local regulations.
Before starting your project, be aware of the following legal aspects:
Permits: Check with local authorities to see if you need a permit to build and install your dock.
Environmental impact: Ensure your dock does not harm the local ecosystem or violate environmental protection laws.
Property rights: Confirm that the water body is within your property rights or that you have permission to build there.
Conclusion:
Building your own DIY floating dock is a rewarding task that turns out well if you follow clear steps. By using easy instructions, you, too, can build a stable and useful dock.


