Making a floral centerpiece for your wedding can seem intimidating, but it doesn't have to be. I remember when I first started out, I was overwhelmed by all the floral arrangements I saw online and wondered how I could ever remake something like that myself. But through experience and a few helpful techniques, I've learned that it's all about simplifying the process and focusing on a few key elements.
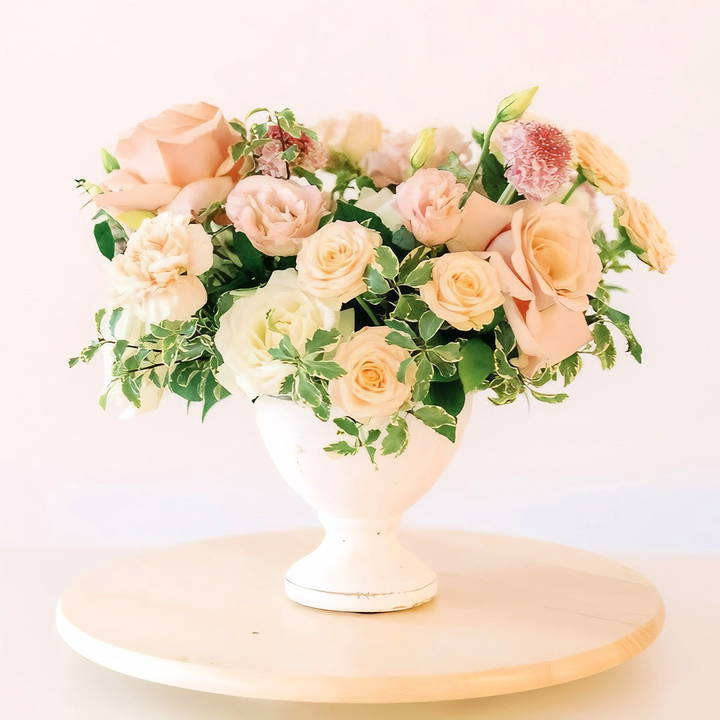
Today, I'll walk you through the steps to make a soft, simple DIY floral centerpiece that will look beautiful at any wedding or event.
Materials You'll Need
To start, let's gather everything you'll need. The right materials make a big difference and help set the foundation for your floral arrangement.
- Compote: This is your base, the vessel that holds everything together. I like using a compote because it adds a touch of elegance and makes the arrangement feel more elevated.
- Floral Foam or Chicken Wire: I started with floral foam when I was a beginner. It helps keep the stems in place and gives structure to your arrangement. However, as I gained more experience, I moved to chicken wire for its sustainability and flexibility. If you're new to this, floral foam is a good place to start, but chicken wire is better for the environment and allows for more natural movement in your design.
- Waterproof Floral Tape: This is essential for securing your foam or chicken wire to your compote. You don't want your flowers to shift once they're in place.
- Greenery: I often use baby eucalyptus and Israeli ruscus. They are great for establishing the shape and size of the centerpiece and provide a natural flow that works as a backdrop for your flowers.
- Flowers: Choose a variety of flowers that differ in size and texture. For this arrangement, I like to use larger blooms like Mother of Pearl roses and Eskimo roses as focal points, complemented by smaller spray roses and delicate lisianthus and scabiosa for a dynamic look.
Step by Step Instructions
Learn how to make stunning DIY flower centerpieces with our step-by-step guide, featuring tips for wedding florists and floral arrangement techniques.
Step 1: Set Up Your Structure
First things first, secure your floral foam or chicken wire in the compote using waterproof floral tape. Make sure it's tight and secure. This foundation will hold everything in place. If you're using floral foam, remember to soak it in water beforehand to keep your flowers hydrated throughout the event.
If you're more experienced or want a challenge, try using chicken wire. I prefer chicken wire now because it's more eco-friendly and provides flexibility to adjust the flowers easily. There is a bit of a learning curve, but once you get the hang of it, it gives you more control over your design.
Step 2: Define the Boundaries with Greenery
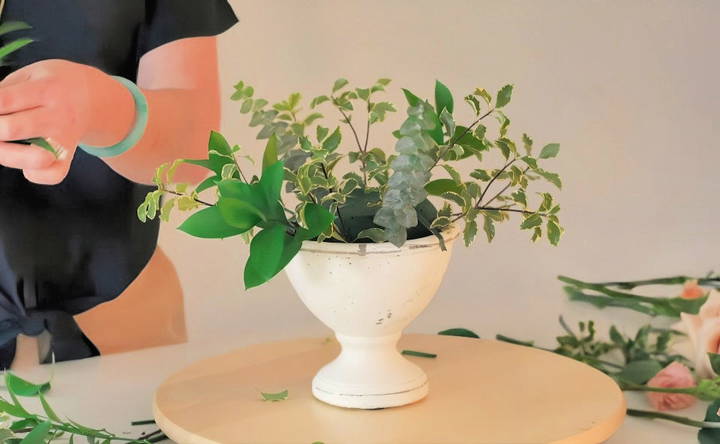
When I start my centerpiece, I like to use greenery to define the boundaries and make a base. I work from the outside in, using baby eucalyptus and Israeli ruscus to set the parameters. This step is crucial because it establishes the size and shape of your arrangement.
Start by inserting your greenery around the edge of the foam or chicken wire. Think of this as setting the framework for your flowers. This technique also helps you visualize the flow and movement of your arrangement. Remember, it's not about perfection; it's about making a natural look that feels organic.
Step 3: Add Larger Blooms First
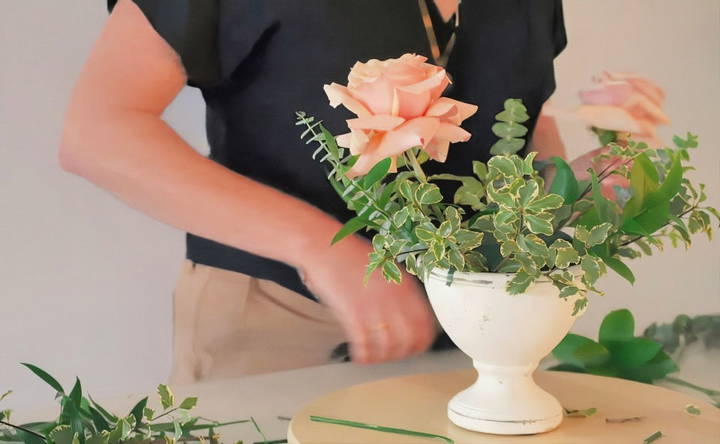
Once you have your greenery in place, it's time to add the larger blooms. I like to start with the Mother of Pearl roses, as they are full and provide a strong focal point. Place the first one slightly off-center and then work around it, making a skeleton of sorts with the larger flowers.
A tip from my own experience: avoid placing them all at the same height or in a line. This can make your arrangement look flat and unnatural. Instead, stagger them at different heights to add depth and interest. I call this making a "skeleton" because it forms the basic structure that you'll build upon.
Step 4: Fill In with Medium-Sized Flowers
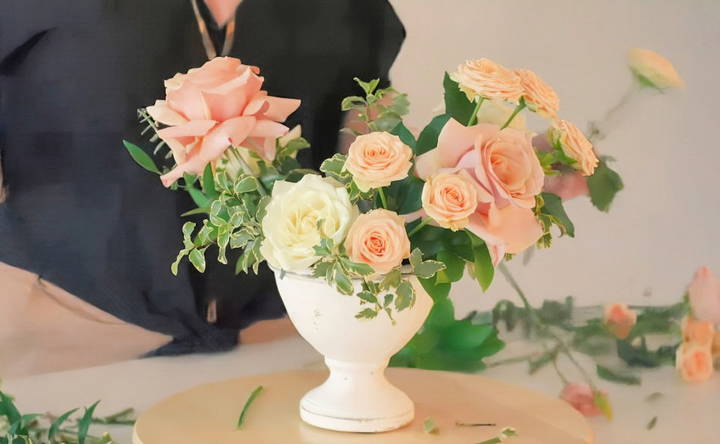
Next, fill in with medium-sized flowers like Eskimo roses. These should be nestled slightly lower than your focal flowers. The key here is to make layers and ensure each flower has its own space to shine. Turn your arrangement around (using a lazy Susan if you have one) to check all sides. I've found that designing on a lazy Susan is incredibly helpful for achieving a balanced look.
Step 5: Incorporate Smaller, Delicate Flowers
Now comes the fun part—adding the delicate, airy flowers like spray roses, lisianthus, and scabiosa. These are your “dancing” flowers, as I like to call them. They add movement and a whimsical feel to the arrangement. Don't be afraid to let them flow out a bit and make soft lines. This is what gives the centerpiece its organic and natural look.
When adding these flowers, make sure they don't overpower the larger blooms. They should complement the arrangement by filling in gaps and adding texture without stealing the show. I often cut lisianthus into smaller segments to use both the open blooms and the buds for added variety.
Step 6: Keep an Eye on Balance and Flow
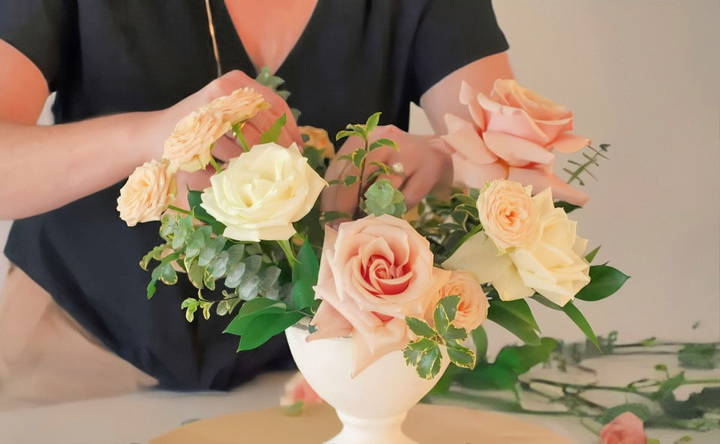
As you add more flowers, keep an eye on the overall balance and flow of the arrangement. Step back and look at it from different angles. If you see a “hole” or an area that feels empty, fill it in with a smaller flower or some extra greenery.
One mistake I made early on was packing in too much greenery at the start. This made the arrangement look heavy and required more flowers to fill it out. Start light with your greenery and add more as needed to keep things balanced and airy.
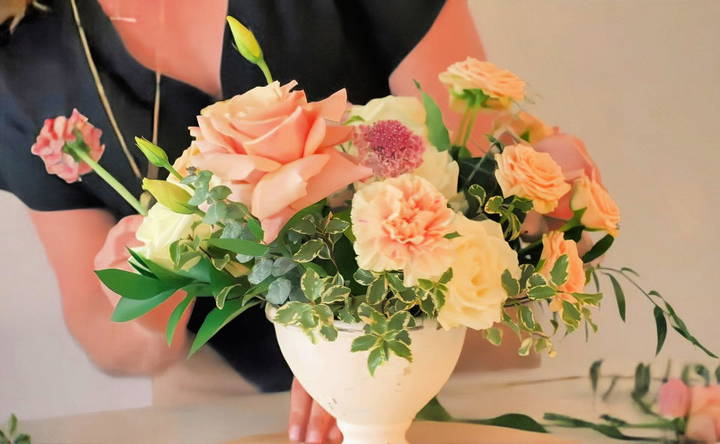
Step 7: Fine-Tune and Adjust
Once you're happy with the shape and fullness, it's time for some fine-tuning. Adjust any flowers that may look out of place or too bunched together. If you're using chicken wire, this step is much easier since you can move stems around without disturbing the rest of the arrangement.
Get down to table level and look at the centerpiece as a guest would. Make sure there are no big gaps or awkward spots. This little trick helps me catch areas that need a bit more tweaking.
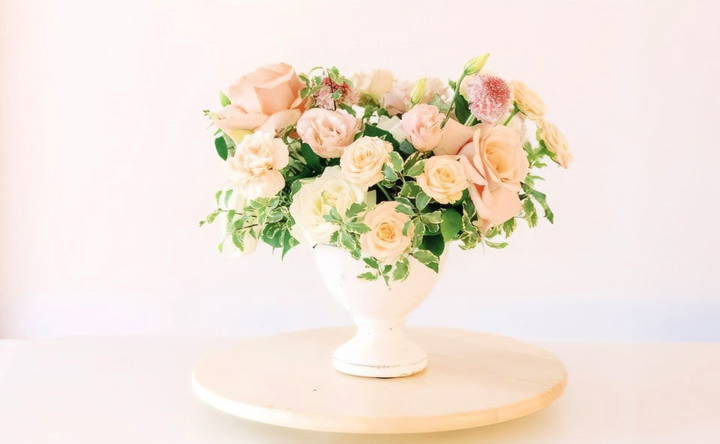
Tips for DIY Wedding Florists
- Practice Makes Perfect: Before your big day, do a practice run with some inexpensive flowers. This will help you get a feel for the process and figure out any adjustments you might need to make.
- Timing is Key: If you're using floral foam, remember it dries out quickly. You can start greening your arrangements a few days in advance, but make sure to keep them hydrated and top up the water as needed.
- Stay Relaxed: It's easy to get caught up in making everything perfect, but remember, floral arrangements are meant to be enjoyed, not stressed over. I've found that the more relaxed I am, the better the arrangement turns out. Trust your instincts!
- Experiment with Movement: Let some flowers extend beyond the arrangement to make movement and flow. This technique adds visual interest and makes the centerpiece look more natural.
- Less is More: Don't overdo it with too many types of flowers. Stick to a few varieties and let them shine. This approach simplifies the process and makes a more cohesive look.
Seasonal Themes
Making flower centerpieces that reflect the changing seasons can add a special touch to your home decor or event. Here are some ideas for each season:
Spring
Spring is all about renewal and fresh beginnings. Use bright, pastel colors like pink, yellow, and lavender. Popular flowers for spring centerpieces include tulips, daffodils, and hyacinths. You can also add greenery like ferns or ivy for a lush look. Consider using a rustic basket or a clear glass vase to showcase the vibrant colors.
Summer
Summer centerpieces should be bold and vibrant. Think of bright colors like red, orange, and hot pink. Sunflowers, daisies, and zinnias are great choices. You can also incorporate elements like seashells or small pieces of driftwood for a beachy vibe. Mason jars or colorful ceramic pots make excellent containers for summer arrangements.
Autumn
Autumn is all about warm, earthy tones. Use flowers in shades of orange, red, and yellow. Chrysanthemums, marigolds, and dahlias are perfect for this season. Add elements like small pumpkins, gourds, or dried leaves to enhance the fall theme. A wooden box or a copper pot can serve as a charming container.
Winter
Winter centerpieces should evoke a sense of coziness and festivity. Use flowers in white, red, and green. Poinsettias, holly, and white roses are excellent choices. You can also add pinecones, evergreen branches, or even small ornaments for a festive touch. Consider using a silver or gold vase to add a bit of sparkle.
Tips for All Seasons
- Mix and Match: Don't be afraid to mix different types of flowers and greenery. This adds texture and interest to your centerpiece.
- Height Variation: Use flowers of varying heights to make a dynamic arrangement. Taller flowers can go in the center, with shorter ones around the edges.
- Water and Care: Make sure to keep your flowers hydrated and trim the stems every few days to prolong their freshness.
By tailoring your flower centerpieces to the seasons, you can make beautiful, timely decorations that enhance any space.
Budget-Friendly Options
Making beautiful flower centerpieces doesn't have to break the bank. Here are some tips and ideas to help you craft stunning arrangements on a budget:
Use Seasonal Flowers
Seasonal flowers are often more affordable and fresher. Visit local markets or flower shops to find what's in season. For example, tulips and daffodils are cheaper in spring, while sunflowers and marigolds are more affordable in summer and autumn.
Buy in Bulk
Purchasing flowers in bulk can save you money. Wholesale flower markets or online bulk flower retailers offer significant discounts. You can split the cost with friends or use the extra flowers for other decorations.
Incorporate Greenery
Greenery is usually less expensive than flowers and adds volume to your arrangements. Use leaves, ferns, or even herbs like rosemary and mint. These can fill out your centerpiece and make it look lush without spending much.
Repurpose Household Items
Get creative with containers. Use mason jars, old teapots, or even tin cans as vases. These items can add a unique touch to your centerpiece and save you the cost of buying new vases.
DIY Flower Food
Make your own flower food to keep your arrangements fresh longer. Mix one teaspoon of sugar, one teaspoon of vinegar, and a few drops of bleach in a quart of water. This homemade solution can help extend the life of your flowers.
Shop at Discount Stores
Check out discount stores for affordable supplies. Stores like dollar stores or thrift shops often have vases, ribbons, and other decorative items at low prices. You can find hidden gems that add charm to your centerpiece.
Use Fewer Flowers
Less can be more. Instead of using a large number of flowers, focus on a few statement blooms and complement them with greenery or filler flowers. This approach can make an elegant look without a high cost.
Grow Your Own
If you have a garden, consider growing your own flowers. This is a long-term investment that can provide you with a steady supply of fresh flowers for your centerpieces. Even a small balcony garden can yield beautiful blooms.
Reuse and Recycle
Reuse flowers from other arrangements. If you have flowers from a previous event or bouquet, repurpose them into a new centerpiece. This not only saves money but also reduces waste.
Simple Arrangements
Sometimes, a minimalist approach can be the most elegant. A single type of flower in a simple vase can look stunning and sophisticated.
By following these budget-friendly tips, you can make beautiful flower centerpieces without spending a lot of money.
Troubleshooting Tips
Making flower centerpieces can be a fun and rewarding activity, but sometimes things don't go as planned. Here are some common issues you might encounter and how to solve them:
Flowers Wilting Too Quickly
Problem: Your flowers start to wilt soon after arranging them.
Solution:
- Hydrate Properly: Make sure to cut the stems at a 45-degree angle under water. This helps the flowers absorb water more efficiently.
- Use Flower Food: Add flower food to the water. You can make your own by mixing one teaspoon of sugar, one teaspoon of vinegar, and a few drops of bleach in a quart of water.
- Change Water Regularly: Replace the water every two days to keep it fresh and prevent bacteria growth.
Flowers Not Staying in Place
Problem: The flowers in your arrangement keep shifting or falling over.
Solution:
- Use Floral Foam: Soak floral foam in water and place it in your container. Insert the flower stems into the foam to keep them in place.
- Make a Grid: Use clear tape to make a grid pattern over the top of your vase. This will help hold the stems in position.
- Use Filler: Add filler flowers or greenery to provide support and structure to your arrangement.
Uneven Arrangement
Problem: Your centerpiece looks lopsided or unbalanced.
Solution:
- Start with a Focal Point: Begin with a central flower or group of flowers and build around it. This helps make a balanced look.
- Vary Heights: Use flowers of different heights to add dimension. Place taller flowers in the center and shorter ones around the edges.
- Rotate as You Arrange: Turn your arrangement as you work to ensure it looks good from all angles.
Flowers Not Opening
Problem: Some flowers remain closed and don't open fully.
Solution:
- Warm Water: Place the stems in warm water to encourage the buds to open.
- Remove Outer Petals: Gently remove the outer petals of flowers like roses to help them open up.
- Give Them Time: Some flowers take longer to open. Be patient and give them a few days.
Water Getting Cloudy
Problem: The water in your vase becomes cloudy quickly.
Solution:
- Clean Vase: Make sure your vase is clean before adding water and flowers.
- Use Filtered Water: If possible, use filtered water to reduce impurities.
- Add a Few Drops of Bleach: This can help keep the water clear and prevent bacterial growth.
Flowers Drooping
Problem: Some flowers start to droop even though they are in water.
Solution:
- Re-cut Stems: Re-cut the stems at a 45-degree angle under water to improve water uptake.
- Remove Leaves Below Water Line: Leaves submerged in water can rot and cause bacteria, which affects the flowers.
- Support Drooping Stems: Use floral wire to support drooping stems and keep them upright.
By following these troubleshooting tips, you can ensure your flower centerpieces stay fresh and beautiful for as long as possible.
FAQs About DIY Flower Centerpieces
Discover answers to FAQs about DIY flower centerpieces, offering tips and ideas for making stunning flower arrangements at home.
Selecting the right flowers depends on several factors:
Theme and color scheme: Match the flowers to your event’s theme or color palette.
Seasonality: Choose flowers that are in season for better availability and cost.
Flower longevity: Opt for flowers that last longer, such as roses, lilies, or carnations.
Personal preference: Pick flowers that you love and that fit the occasion.
To extend the life of your flower centerpiece:
Change the water regularly: Replace the water every 2-3 days.
Trim the stems: Re-cut the stems every few days to allow better water absorption.
Keep it cool: Place the centerpiece in a cool area, away from direct sunlight and heat sources.
Use floral preservatives: Add floral food or a homemade preservative (like a mix of sugar, vinegar, and bleach) to the water.
Here are a few creative ideas to inspire your DIY flower centerpieces:
Mason jar arrangements: Use mason jars for a rustic look.
Submerged flowers: Submerge flowers in water-filled vases for a unique effect.
Floating candles: Combine flowers with floating candles for a romantic touch.
Seasonal themes: Incorporate seasonal elements like pinecones for winter or seashells for summer.
Recycled containers: Use teapots, pitchers, or even old wine bottles as vases for a quirky twist.
Yes, you can use artificial flowers for your DIY centerpiece. Here are some benefits:
Longevity: Artificial flowers last indefinitely, making them a great option for long-term displays.
Cost-effective: They can be reused for multiple events, saving money in the long run.
Low maintenance: No need to worry about watering or wilting.
Variety: Available in a wide range of colors and styles, regardless of the season.
Transporting a flower centerpiece can be tricky, but here are some tips to ensure it arrives safely:
Secure the arrangement: Use floral foam to keep the flowers in place.
Use a sturdy container: Choose a container that won't tip over easily.
Protect the flowers: Cover the arrangement with a plastic bag or wrap to shield it from wind and debris.
Keep it cool: Transport the centerpiece in a cool, shaded area of your vehicle.
Drive carefully: Avoid sudden stops and sharp turns to prevent the arrangement from shifting.
Final Thoughts
Making your own DIY floral centerpiece can be an incredibly rewarding experience. It's a chance to add a personal touch to your big day and express your style. I've learned that with a bit of planning, practice, and a relaxed mindset, anyone can make a beautiful floral arrangement that will impress your guests and bring your vision to life.
Whether you're a beginner or have some experience with flowers, the key is to enjoy the process and not get bogged down by the details. Remember, flowers are naturally beautiful, and your arrangement will be too! If you have any questions or need more tips, feel free to reach out—I'm always here to help.


