Pressing flowers is a timeless hobby that allows you to preserve the beauty of nature for crafts, home décor, or as keepsakes. While you can purchase pre-made flower presses, making your own DIY flower press is both budget-friendly and rewarding. With a few materials, some basic tools, and a bit of time, you can craft a sturdy and functional flower press that will serve you for years. This guide will walk you through the entire process of creating a 12" x 12" flower press, perfect for beginners or experienced crafters alike.
Materials Needed to Build a Flower Press
Discover the essential materials and tools needed to build a flower press, including wood, hardware, hex bolts, carriage bolts, and additional supplies.
Wood and Substrates
Your flower press needs to be made from sturdy materials to apply enough pressure to press flowers without warping or bending. Here are some commonly used options for wood:
- Baltic Birch Plywood (3/4"): A favorite among DIY enthusiasts for its durability and smooth finish. Comes in large 5' x 5' sheets and can be stained for a refined look.
- Sanded Plywood (3/4"): Readily available at hardware stores like Home Depot or Lowe’s. A great, affordable option.
- Medium-Density Fiberboard (MDF) (3/4"): Inexpensive and easy to work with, though heavier than plywood. MDF was used in the original demonstration because it was available on hand.
- Hardwood (3/4"): Offers an elegant finish but is significantly more expensive.
Pro Tip: While you can use 1/2" thick wood, 3/4" thick wood is highly recommended for better durability and resistance to bending.
Hardware
You’ll need the following hardware to construct a basic flower press:
For the Hex Bolt Method:
- (4) 5/16" x 6" Zinc-Plated Hex Bolts (longer bolts, like 8", allow for more room in the press)
- (12) 5/16" Stainless Steel Flat Washers
- (4) 5/16" Zinc-Plated Hex Nuts
- (4) 5/16" Zinc-Plated Wing Nuts
For the Carriage Bolt Method:
- (4) 5/16" x 6" Zinc-Plated Carriage Bolts
- (8) 5/16" Stainless Steel Flat Washers (or 4, if not recessing bolts)
- (4) 5/16" Zinc-Plated Hex Nuts
- (4) 5/16" Zinc-Plated Wing Nuts
Additional Materials
- Chipboard or Cardboard: Used to sandwich between layers of flowers.
- Absorbent Paper: Blotter paper, newspaper, or any absorbent material will be essential for drying the flowers.
Tools You'll Need
Having the right tools is essential for creating your flower press efficiently. Here’s a list of tools to gather:
- Pencil: For marking your measurements.
- Measuring Tape: To ensure precise cuts and hole placements.
- Drill (Cordless preferred): To create holes for bolts. A 5/16" drill bit is ideal for the bottom plate, while a 1/2" drill bit should be used for the top plate.
- Circular Saw or Hand Saw: To cut the wood down to size. Optional saws include a Japanese Pull Saw or Irwin Hand Saw.
- Crescent Wrench (1/2"): To tighten nuts and bolts.
- Bar Clamps: To hold your wood securely while cutting or drilling.
- Safety Goggles: For eye protection during cutting or drilling.
If you're building multiple presses or doing this as a business, consider investing in a Drill Press for consistent, straight holes.
Step by Step Instructions
Learn how to make a DIY flower press with our step-by-step instructions. From cutting wood to assembling and applying pressure, follow our thorough guide now!
1. Cut Your Wood to Size
Most presses are made from two square plates. For a standard press, 12” x 12” plates are ideal:
- Start by measuring two 12" x 12" squares on your chosen wood using a straight edge and pencil.
- Cut the squares using a circular saw or hand saw. Make sure to clamp the wood securely while cutting for safety.
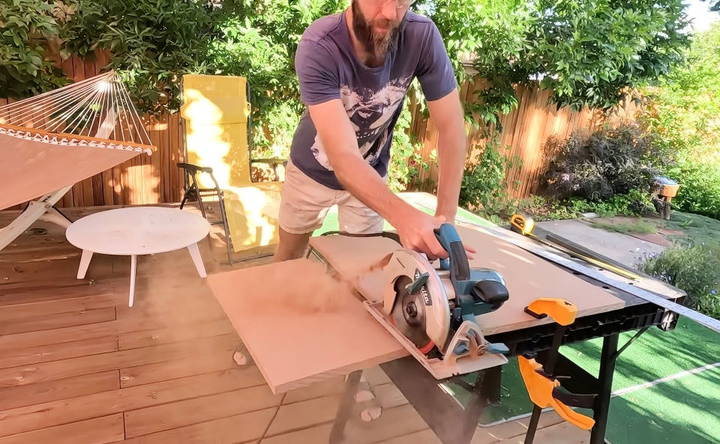
Tip: Some hardware stores may cut the wood for you if you don’t have a saw.
2. Mark and Drill the Holes for the Bolts
The key to an even press is drilling the holes symmetrically. Here’s how to do it:
Bottom Plate
- Measure 1 inch inward from each corner of the 12” x 12” square and mark the intersections.
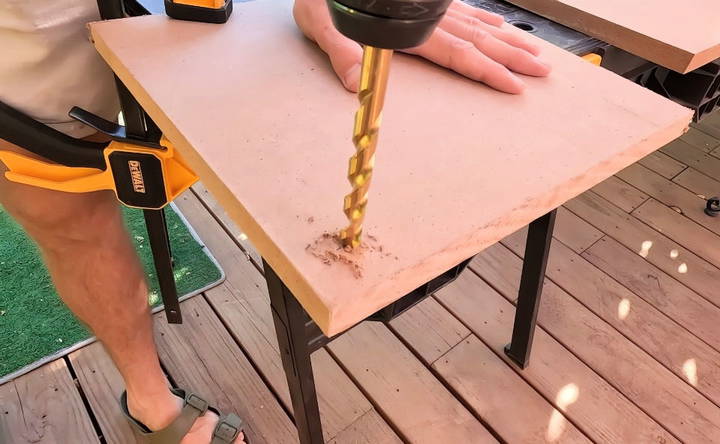
- Using a 5/16” drill bit, drill four holes at the intersections. These will be where your bolts go through.
Top Plate
- Place the bottom plate on top of the top plate and mark the corresponding spots for the bolts.
- Use a 1/2" drill bit to make the holes in the top plate slightly larger, allowing the top plate to be easily removed without friction.
3. Install the Bolts
There are two methods to secure the bolts in place, depending on whether you’re using hex bolts or carriage bolts.
Method 1: Hex Bolt Installation
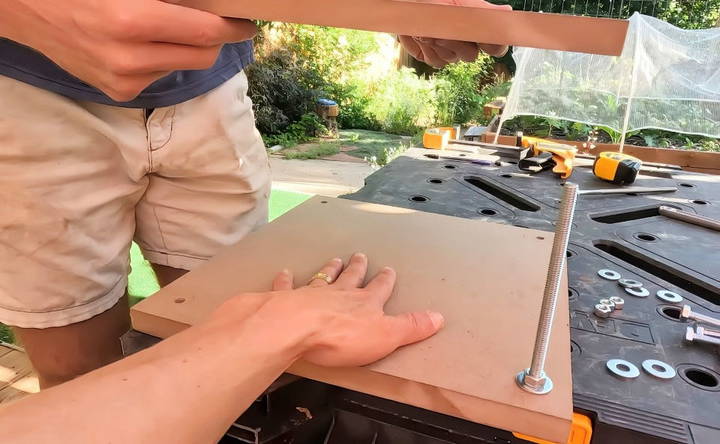
- Insert a 5/16" hex bolt through each hole in the bottom plate, placing a washer on both sides of the wood.
- Secure the bolt in place by tightening a hex nut underneath. Use two wrenches to prevent the bolt from spinning while tightening the nut.
Method 2: Carriage Bolt Installation
- Insert the 5/16" carriage bolt into each hole in the bottom plate. The square neck of the bolt will recess into the wood, holding it firmly in place.
- To ensure the bolt stays secure, tighten a washer and hex nut on the bottom side. Use a wrench to prevent movement.
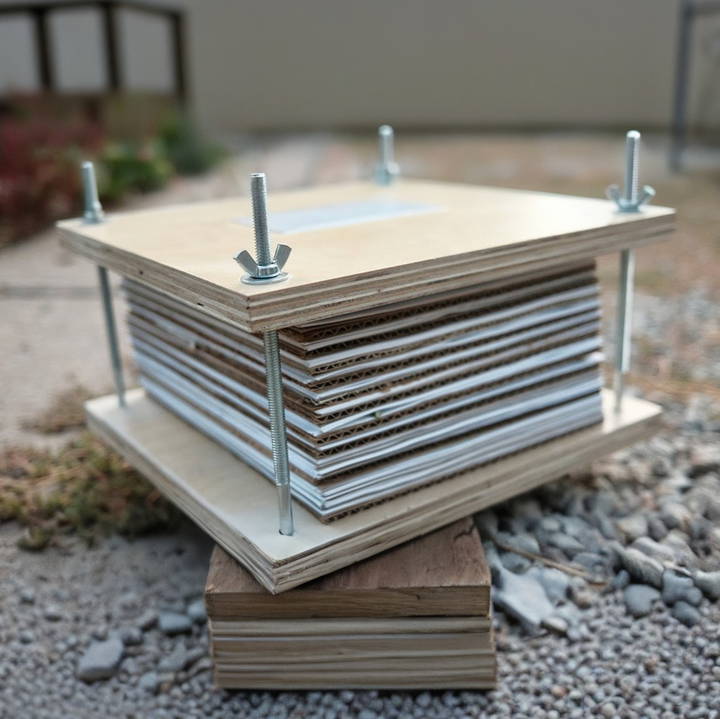
4. Assemble the Flower Press
Now that the bolts are in place, it’s time to assemble your press:
- Lay the bottom plate on a flat surface.
- Layer chipboard or cardboard on the bottom plate.
- Place absorbent paper (such as blotter paper) over the chipboard.
- Arrange your flowers on the paper. Make sure the flowers are clean and dry before pressing.
- Add another layer of absorbent paper and chipboard.
- Continue this layering process, placing flowers between sheets of paper and cardboard until you’ve stacked all the flowers you want to press.
5. Apply Pressure to the Press
Once your flowers are sandwiched between layers:
- Place the top plate over the bolts.
- Add washers on top of the plate, followed by wing nuts.
- Tighten the wing nuts evenly on all four corners to apply uniform pressure. You don’t need to overtighten—just enough to ensure the layers are pressed together snugly.
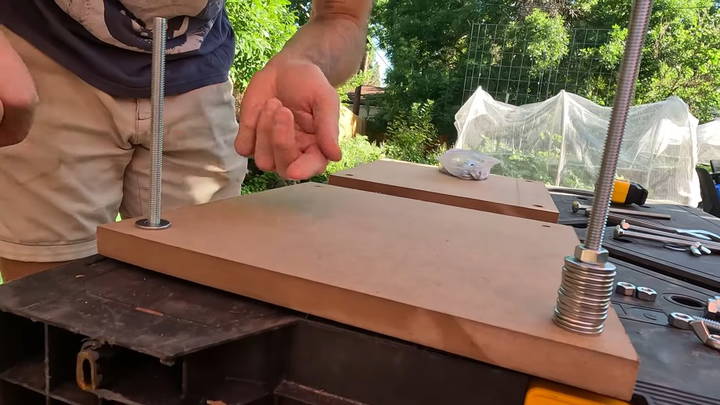
Tip: The bolts should be long enough to accommodate the layers of chipboard and flowers. If you plan to press many flowers at once, use 8-inch bolts instead of 6-inch.
Tips for Effective Flower Pressing
- Avoid Overstuffing: Don’t press too many flowers at once, as this can cause uneven pressure and damage the flowers.
- Change Absorbent Paper Frequently: For the best results, change the absorbent paper every few days to prevent mold and help the flowers dry evenly.
- Be Patient: Flowers typically take two to four weeks to fully press, depending on their thickness and moisture content.
- Store the Press in a Cool, Dry Place: Humidity can affect the drying process, so store your press in a dry environment.
Final Thoughts
Making your own flower press is a straightforward and rewarding project that allows you to enjoy the art of flower pressing at a fraction of the cost of purchasing a pre-made press. With just a few materials and tools, you can craft a durable press that will help you preserve the beauty of flowers for years to come. Whether you're pressing flowers for a scrapbook, a framed display, or homemade greeting cards, this DIY press is an essential tool for any nature lover or crafter.
By following this guide, you’ll not only save money but also gain the satisfaction of building something with your own hands. Happy pressing!
FAQs About DIY Flower Press
Discover answers to common questions on DIY Flower Press, techniques, and tips for creating your own flower art at home.
While the standard size is 12" x 12", you can create larger presses to accommodate bigger flowers or stems. Presses can be made in sizes like 15" x 24" or even 4' x 2" for extra-long stems. Keep in mind, larger presses may require additional bolts for even pressure.
To avoid indentations on flowers, layer cardboard, chipboard, paper, flowers, paper, and repeat. Chipboard is used to prevent the texture of the corrugated cardboard from transferring to the flowers.
This is a common issue with softer woods like thin birch plywood. Sanding the holes smooth and using 3/4" wood, like MDF or hardwood, can help prevent tearing and splintering.
Yes, pine is fine for a press as long as it does not warp over time. The last thing you want is uneven pressure caused by warping.
Generally, flowers should be left in the press for 6-8 weeks to ensure they are fully dried and pressed.
Recessing bolts is optional but recommended for carriage bolts. It prevents the bolts from spinning and tearing the wood during use. Hex bolts are an alternative that don’t require recessing.
Blowing out or vacuuming drill dust is important to maintain accuracy. Using a shop vacuum can help keep your workspace clean and your wood aligned.
While 1/2" wood can be used, 3/4" wood offers better durability and prevents bending or cracking under pressure.
Yes, regular copy paper works well for pressing flowers and can be reused. Blotter paper also works but is more expensive.
You can press multiple layers, but be cautious not to overstuff the press. Too many flowers can cause uneven pressure, leading to poor results.


