Building a DIY food dehydrator was an engaging weekend project for me. I wanted to preserve my garden produce and avoid food waste. I used simple materials like wood, wire mesh, and a small fan to make a basic dehydrator. The most satisfying part was seeing my fruits and vegetables dry perfectly, ready for long-term storage.

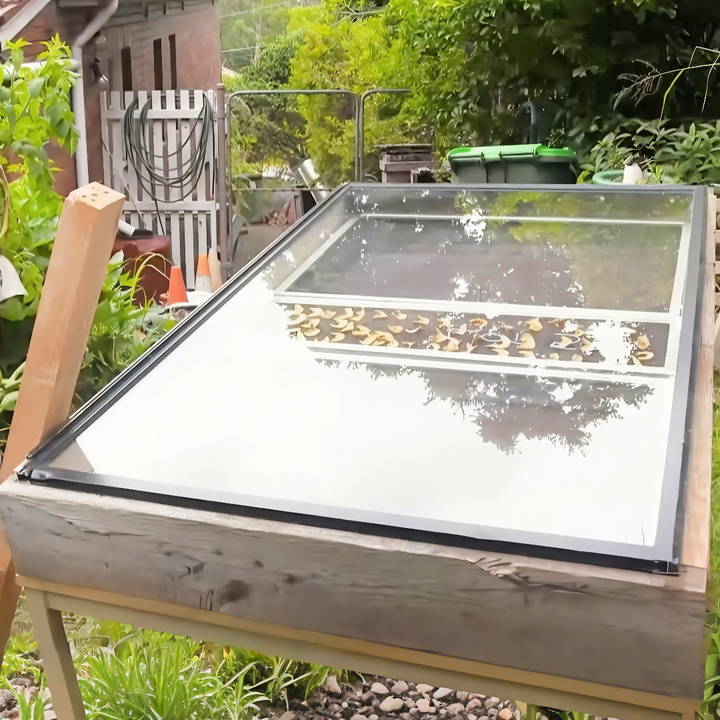
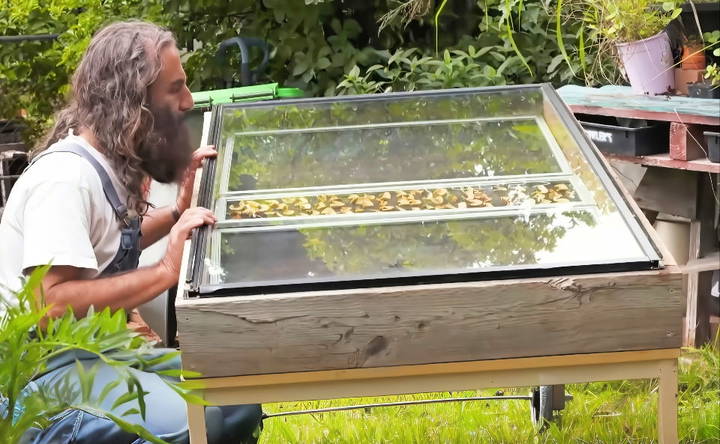
Making a DIY solar dehydrator was another interesting project. I followed a straightforward guide and used an old window frame, plastic sheets, and black paint to build it. The sun's heat dried the food efficiently, and I loved that it was eco-friendly. Seeing the dried results encouraged me to try more DIY projects.
Materials Needed and Why
- Second-Hand Table: Acts as a sturdy base. I chose a table with steel legs for durability.
- Timber Off-Cuts: Used for framing. These can be easily sourced from leftovers or scrap piles.
- Galvanized Screws: For assembling the frame securely. Their rust-resistant quality is crucial for outdoor projects.
- Corrugated Iron: Serves as the heat absorber. Its dark color maximizes heat retention which is vital for dehydration.
- Fly Screen Netting: Keeps insects out while allowing airflow.
- Old Architraves and Fly Screens: Used for building the drying platform. They're light and allow for easy air circulation around the produce.
- Glass Pane: The cover. It traps heat inside while letting the sunlight through.
- Hinges and Wheels: For ease of access and mobility. The ability to move the dehydrator into direct sunlight is imperative.
- Rubber or Brush Seal: Ensures a tight seal around the glass to prevent insect intrusion.
Step by Step Instructions
Learn how to build a DIY food dehydrator with step-by-step instructions. Follow our guide for laying the foundation, constructing the frame, and more.
Step 1: Laying the Foundation
My first step was to repurpose a second-hand table that I found. Its steel legs offered the perfect foundation—sturdy and level. Placing the table outside, I envisioned how it would soon transform into a solar powerhouse.
Step 2: Constructing the Frame
Using timber off-cuts, I began constructing a frame to house the corrugated iron and drying racks. The irreplaceable clamp held everything tight, ensuring a level and secure structure despite the timber's imperfections. I anchored my vision with galvanized screws, which promised resilience against the elements.
Step 3: Installing the Corrugated Iron
I slotted a piece of corrugated iron into the frame. Its dark surface, critical for absorbing and radiating heat, lay gleaming in anticipation. I opted not to fasten it down, thinking ahead to future cleanings.
Step 4: Enhancing Airflow
Drilling ventilation holes was my next step, a simple action that would prevent humidity buildup. Covering these with fly screen netting, I secured our harvest against curious insects, making sure the staples were flush against the tough hardwood.
Step 5: Crafting the Drying Platform
Old architraves found a new life as rails for the drying platform. On these, I placed modified fly screens, which now feature fresh mesh for optimal airflow. This level would cradle fruits and vegetables, guiding them gently through their moisture-shedding journey.
Step 6: Sealing the Deal with Glass
The glass pane was perhaps the most nerve-wracking to install. A symbol of vulnerability amidst robustness. Carefully, I attached it with hinges, and fortified our contraption against unwanted guests with a rubber seal. The addition of wheels transformed the dehydrator into a mobile unit, following the sun's path across the sky.
Step 7: Angle Adjustment
Adjusting the front legs for an optimal angle ensured efficient air circulation, the final touch on my solar dehydrator. This tilt was pivotal, facilitating the natural rise of warm air and preventing any humidity from lingering.
Day of Harvest
On a sunny day, armed with thinly sliced fruits, I set my creation to the test. The warmth that greeted me upon opening the glass lid after a day's sun exposure was a testament to success. The dehydrated fruits, with their leathery texture, were proof of concept.
Storing the Bounty
The end result was more than just dehydrated fruits. It was the culmination of a journey from surplus to sustainability. My airtight containers, now filled with naturally preserved produce, were a testament to the power of DIY and solar energy.
Innovative Design Features
When building a DIY dehydrator, incorporating innovative design features can significantly enhance its efficiency and functionality. Here's a detailed look at some creative ideas you can implement:
Temperature Control
Temperature control is crucial for effectively dehydrating different types of food. Consider adding a thermostat to your dehydrator to monitor and adjust the heat. This will ensure that foods dry evenly and retain their nutritional value. For a simple DIY approach, use a bimetallic thermostat from an old oven or purchase a digital one from a hardware store.
Optimizing Airflow
Airflow is another key factor in dehydration. Your dehydrator should have a fan to circulate warm air and remove moisture. Position the fan so that it distributes air evenly across all trays. You can also make vents that can be opened or closed to control the air movement.
Expandable Design
An expandable design allows you to increase the dehydrator's capacity as needed. Build your dehydrator with stackable trays or adjustable shelves. This way, you can add more space for larger batches of food without constructing a new unit.
Use of Safe Materials
Ensure all materials used are food-safe and can withstand high temperatures. Avoid materials that could off-gas harmful chemicals when heated. Stainless steel, food-grade plastics, and certain types of wood like maple are good choices.
Energy Efficiency
To make your dehydrator more energy-efficient, insulate the walls with reflective materials like Mylar or aluminum foil. This will keep the heat inside and reduce energy consumption.
By focusing on these innovative design features, you'll make a dehydrator that's not only effective but also adaptable to your needs.

Maintenance and Troubleshooting
Keeping your DIY dehydrator in top condition is essential for its longevity and performance. Here's a straightforward guide to maintaining and troubleshooting common issues:
Regular Cleaning
Clean your dehydrator after each use to prevent food particles from building up. Use a damp cloth to wipe down the interior surfaces and trays. For tougher residues, a mild soap solution can be used, but ensure everything is dry before the next use.
Inspecting Components
Periodically inspect all components of your dehydrator, such as the fan, heating element, and thermostat. Check for any signs of wear or damage. If you find any issues, replace the parts as needed to avoid malfunction.
Dealing with Overheating
If your dehydrator is overheating, it could be due to a malfunctioning thermostat or an obstructed fan. First, turn off the device and let it cool down. Then, check the thermostat for accuracy and ensure the fan is free of debris.
Managing Humidity
Excessive humidity can affect the drying process. If you live in a humid area, consider using a dehumidifier in the room where you operate your dehydrator, or add silica gel packets inside the dehydrator to absorb moisture.
Electrical Safety
Always practice electrical safety. Ensure your dehydrator is plugged into a grounded outlet, and avoid using extension cords. If you're not experienced with electrical repairs, seek professional help for any wiring issues.
Follow these maintenance tips to keep your DIY dehydrator efficient and safe for years. Regular care and prompt attention to issues ensure smooth operation.
Troubleshooting
When it comes to maintaining your DIY dehydrator, being able to troubleshoot potential problems is key to ensuring its longevity and effectiveness. Here's a guide to help you identify and fix common issues:
Uneven Drying
If you notice that some foods are not drying evenly, check the placement of your trays and the distribution of food. Make sure there's enough space for air to circulate freely. It might also be helpful to rotate the trays periodically during the drying process.
Temperature Fluctuations
Should the dehydrator's temperature fluctuate, first verify the accuracy of the thermostat. If it's not reading correctly, it may need to be recalibrated or replaced. Also, check for any drafts that could be affecting the internal temperature.
Excessive Noise
A noisy fan could indicate a blockage or a mechanical issue. Turn off the dehydrator and inspect the fan for debris. If it's clear, but the noise persists, the fan might need to be repaired or replaced.
Power Issues
If your dehydrator doesn't turn on, ensure it's properly plugged in and that the outlet is functioning. Check the power cord for any damage. If everything looks good but it still won't power up, the issue might be internal and require professional repair.
Odors
Unusual smells can arise from leftover food particles or bacterial growth. Clean your dehydrator thoroughly with a solution of vinegar and water to eliminate any lingering odors.
Follow these tips to fix common DIY dehydrator issues. Regular maintenance and quick problem-solving will keep it running well. If unsure, consult a professional to stay safe.
FAQs About DIY Dehydrator Machine
Discover answers to common questions about DIY dehydrator machine. Learn how to build, use, and maintain your own dehydrator efficiently.
A DIY dehydrator machine is a homemade device used to remove moisture from food, which helps in preserving it. You can make one using common household items or simple materials purchased from a hardware store. There are two main types: electric and solar dehydrators.
To make a simple electric DIY dehydrator, you’ll need a heat source like a light bulb or heating coil, a fan for air circulation, trays for placing the food, and a box or enclosure to hold everything together. The key is to ensure even airflow and temperature control to effectively dry the food.
Yes, you can build a solar-powered dehydrator. It uses the sun's energy to heat air inside the dehydrator, building a chimney effect that draws moisture away from the food. This type of dehydrator is cost-effective and environmentally friendly but is dependent on sunny weather to function properly.
The benefits of using a DIY dehydrator include cost savings, as commercial dehydrators can be expensive. It also allows for customization to fit your specific needs and preferences. Additionally, it can be a fun and rewarding DIY project that provides you with a useful tool for food preservation.
When designing your DIY dehydrator, consider the following:
Ventilation: Ensure there's enough airflow to evenly dry the food.
Tray design: Trays should be easy to load, unload, and clean.
Temperature control: Maintain a consistent temperature to prevent cooking the food instead of dehydrating it.
Durability: Choose materials that can withstand regular use and, for solar dehydrators, outdoor conditions.
Reflecting on the Project
In conclusion, making a DIY food dehydrator is a satisfying and practical project. By following the steps outlined, you can preserve your food efficiently and sustainably. Remember, the DIY solar dehydrator is an excellent eco-friendly option. Enjoy the benefits of dehydrated foods while saving money and reducing waste.


