Building a garden cart can be a rewarding project that adds practicality and charm to your gardening routine. In this guide, I'll walk you through the steps to build a sturdy and functional DIY garden cart that will stand up to the elements and be used daily. I've made a few of these myself and learned a lot in the process. Here, I'll share not only the step-by-step instructions but also tips and insights that I've picked up along the way.
Why Build Your Own Garden Cart?
A garden cart is an essential tool for any serious gardener. It helps you transport heavy tools, soil, plants, and other materials around your garden with ease. You might ask, "Why not just buy one?" Well, the answer is simple: building your own garden cart allows you to customize it to your specific needs and save money while adding a personal touch to your gardening gear. I decided to build my own after looking at some commercial options that either didn't fit my needs or were too expensive. Plus, it's a fun weekend project!
Materials Needed for Your Garden Cart
Before diving into the building process, let's talk about the materials you'll need and why they're essential:
- 3/4-inch Treated Plywood: This will be the main body of your cart. Treated plywood is weather-resistant, which is crucial since the cart will spend a lot of time outdoors. I had my plywood cut to size at Home Depot, which made it easier to work with.
- Aluminum Trim: This adds durability to the edges of your cart and gives it a more polished look. I used a miter saw to cut the trim to length and mitered the corners for a clean finish.
- Heavy-Duty Construction Adhesive: Used for attaching the aluminum trim to the plywood. This provides a strong bond that keeps the trim securely in place.
- Screws: You'll need various sizes for attaching the plywood, trim, and other components. I used screws in combination with adhesive for extra strength.
- Treated 2x4 Lumber: This will be used for the cart's handles and base. Treated wood is essential for any outdoor project to prevent rot and increase longevity.
- 1-inch Wooden Dowel: This will be used to build the handlebar for the cart. I chose a dowel because it's comfortable to grip and easy to install.
- Metal Conduit, All-Thread Rod, Washers, and Lock Nuts: These components will make up the axle for the wheels. The metal conduit adds stability, while the washers and lock nuts secure the wheels in place.
- Wheels: You can purchase new wheels or save money by repurposing old bicycle tires. I chose sturdy, large wheels that could handle rough terrain in my garden.
Step by Step Instructions
Learn how to build a durable DIY garden cart with our step-by-step instructions, from cutting plywood to adding final touches and adjustments.
Step 1: Cutting the Plywood and Assembling the Base
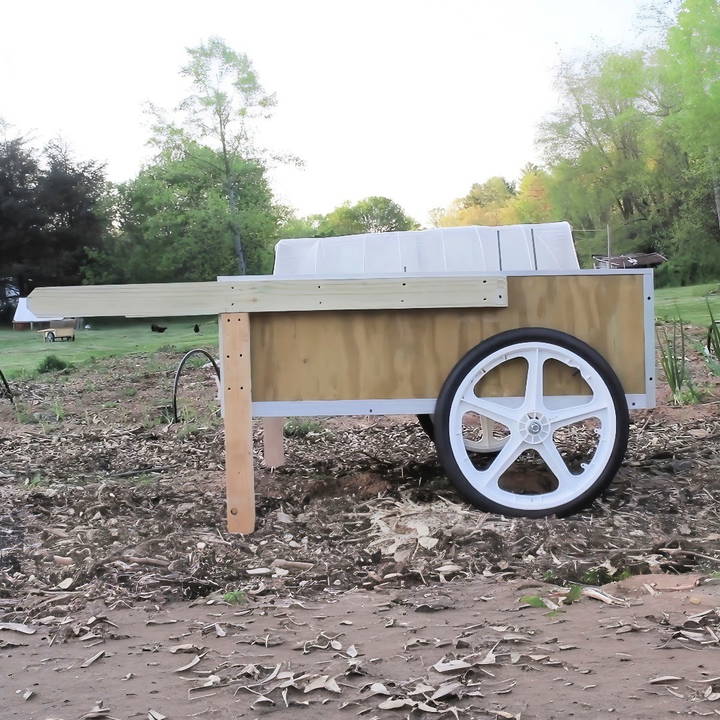
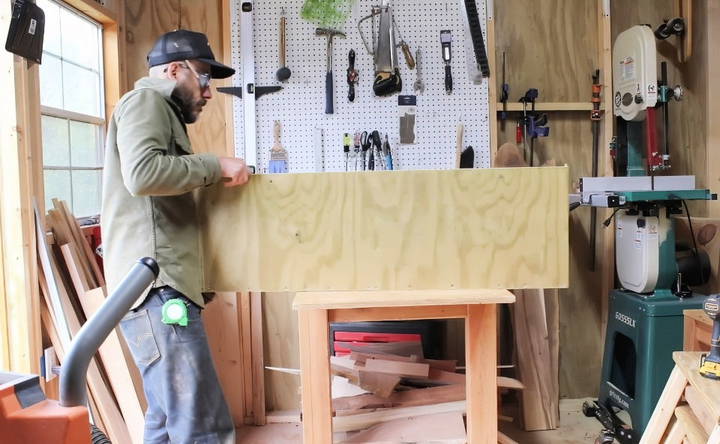
The first step is to cut your plywood to size. I made my garden cart 31 inches wide. This width works perfectly for my garden, as it allows the cart to roll smoothly between the rows. I suggest measuring the space between your garden rows to customize the width of your cart accordingly.
Once you have your plywood cut to size, assemble the base by making a simple box shape. You could stop here and add wheels to the bottom, but I wanted something more durable, so I decided to reinforce the edges with aluminum trim.
Step 2: Adding Aluminum Trim for Durability
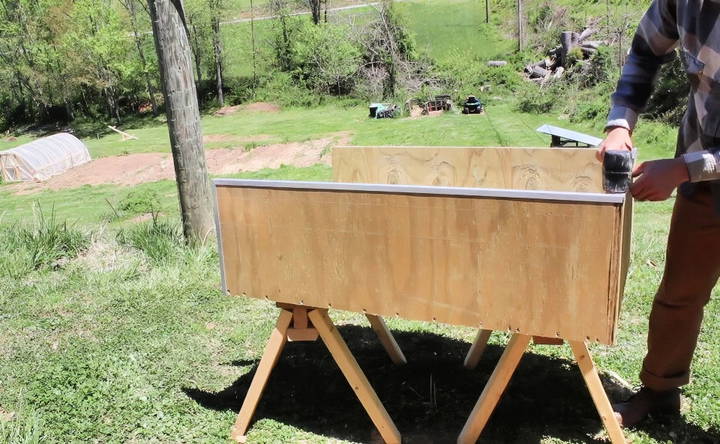
After assembling the base, I decided to add aluminum trim to protect the edges. Aluminum trim not only protects the plywood but also gives the cart a polished, finished look. Here's what I did:
- Cutting the Trim: I used a miter saw to cut the aluminum trim to the correct lengths and mitered the corners to make everything fit neatly.
- Dry Fitting: Before gluing, I dry-fit all the pieces to make sure they fit snugly along the edges of the plywood.
- Attaching the Trim: I used heavy-duty construction adhesive to secure the trim in place and then reinforced it with screws. This combination ensures that the trim stays put even under heavy use.
Step 3: Building the Wheel Axle
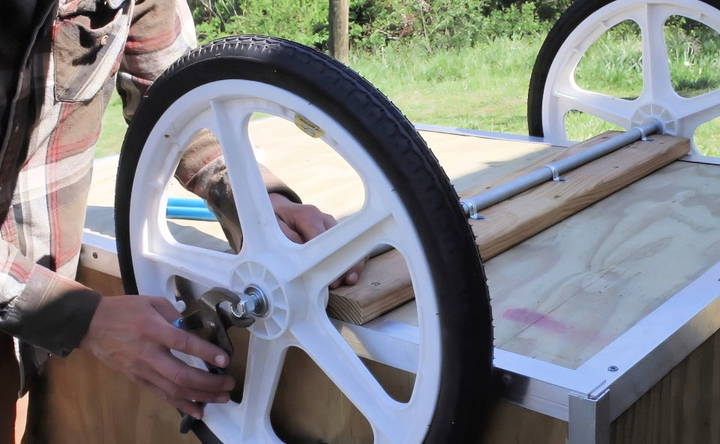
To give the cart stability and mobility, the wheels are crucial. I built a robust axle system using metal conduit, an all-thread rod, washers, and lock nuts.
- Adding Treated Wood for Support: First, I added some treated wood underneath the base to provide additional support for the axle.
- Building the Axle: I slid the all-thread rod through the metal conduit and secured it with washers and lock nuts. This setup provides a stable axle that can handle heavy loads.
- Mounting the Wheels: Finally, I mounted the wheels onto the axle. If you're on a budget, you can repurpose old bicycle tires instead of buying new wheels. This not only saves money but also adds a bit of recycling to the project!
Step 4: Installing the Handles
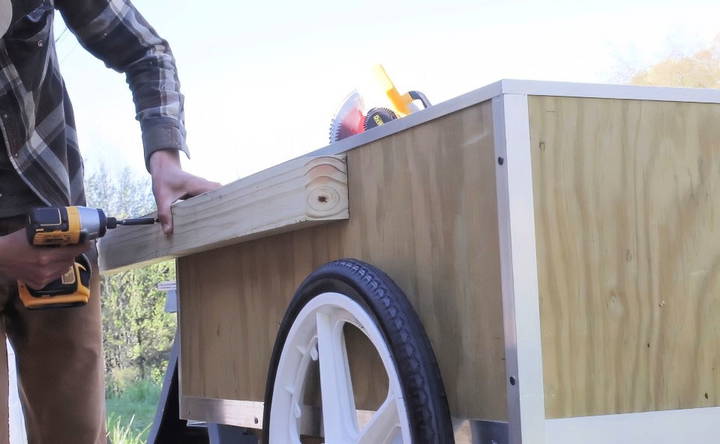
A cart isn't very useful without handles, so I built sturdy handles using treated 2x4 lumber.
- Cutting the 2x4s: I cut the 2x4s to size, trimming off the rounded edges to give them a square look. This is purely aesthetic, but I think it gives the cart a more refined appearance.
- Attaching the Handlebar: I drilled holes in the top of the 2x4s and inserted a 1-inch wooden dowel to serve as the handlebar. Gluing and screwing the handlebar in place ensures it won't come loose over time.
Step 5: Final Touches and Sanding
Once everything was assembled, I noticed a few sharp edges where the aluminum trim met. To avoid any potential injuries, I used a grinder to smooth these edges down. This step is essential for safety, especially if you have kids or pets around.
Step 6: Testing and Adjustments
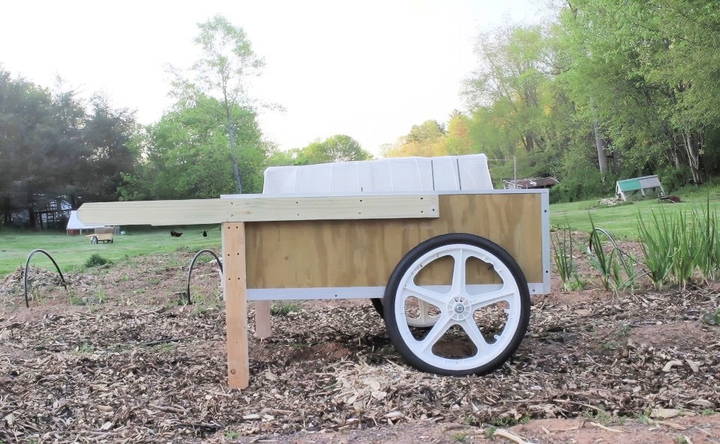
With the garden cart fully assembled, I took it for a test run in the garden. The width worked perfectly between my garden rows, and the wheels handled the terrain with ease. The cart is sturdy but not too heavy, which makes it easy to maneuver. If you want a lighter cart, you could use untreated plywood, but I opted for treated wood to ensure longevity.
Tips and Tricks I Learned Along the Way
- Dry Fit Everything First: Before committing to glue or screws, always dry-fit your pieces. This helps you catch any misalignments or fitting issues before they become a problem.
- Choose the Right Wheels: If your garden has rough terrain, invest in larger, more durable wheels. This will save you a lot of hassle down the road.
- Don't Skimp on the Trim: The aluminum trim not only looks good but also protects the cart from damage. It's worth the extra effort to install it properly.
- Consider Weatherproofing: Even with treated wood, adding a coat of sealant can help extend the life of your cart. This is especially important if it will be exposed to the elements frequently.
Customization Ideas
Customizing your DIY garden cart can make it more functional and personal. Here are some easy and creative ideas to help you get started:
1. Paint and Finish
- Choose Colors: Pick colors that match your garden or personal style. Use weather-resistant paint to protect the cart from the elements.
- Add Patterns: Use stencils or tape to build patterns like stripes, polka dots, or floral designs.
2. Storage Solutions
- Tool Holders: Attach hooks or small shelves to the sides of the cart to hold gardening tools.
- Compartments: Add dividers inside the cart to separate different types of garden supplies.
3. Wheels and Handles
- Wheel Types: Choose wheels based on your garden terrain. Larger wheels are better for rough ground, while smaller ones work well on smooth surfaces.
- Handle Design: Customize the handle height and grip for comfort. You can wrap the handle with foam or tape for a better grip.
4. Additional Features
- Foldable Design: Make the cart foldable for easy storage when not in use.
- Removable Tray: Add a removable tray on top for carrying smaller items or tools.
5. Personal Touches
- Name Plate: Attach a small nameplate with your name or a fun garden-related quote.
- Decorative Elements: Add decorative elements like stickers, decals, or even small solar lights to make your cart unique.
6. Functional Upgrades
- Waterproofing: Apply a waterproof sealant to protect the cart from rain and moisture.
- Cushioned Base: Add a cushioned base inside the cart to protect delicate plants or tools.
7. Eco-Friendly Options
- Recycled Materials: Use recycled wood or metal to build your cart. This is not only eco-friendly but also adds a rustic charm.
- Natural Finishes: Opt for natural finishes like beeswax or linseed oil instead of synthetic varnishes.
8. User Contributions
- Share Your Ideas: Encourage readers to share their customization ideas and photos. Feature the best ones in your post to inspire others.
By incorporating these customization ideas, you can build a garden cart that is not only practical but also a reflection of your personal style and needs.
Common Mistakes to Avoid
Building a DIY garden cart can be a rewarding project, but there are some common mistakes that can make the process more difficult or result in a less functional cart. Here are some pitfalls to watch out for and how to avoid them:
1. Incorrect Measurements
- Problem: Using incorrect measurements can lead to parts that don't fit together properly.
- Solution: Double-check all measurements before cutting materials. Use a tape measure and a square to ensure accuracy.
2. Using the Wrong Materials
- Problem: Choosing materials that are not durable or suitable for outdoor use can shorten the lifespan of your cart.
- Solution: Select weather-resistant materials like treated wood or metal. Avoid using materials that can easily rust or rot.
3. Poor Assembly Techniques
- Problem: Improper assembly can make the cart unstable and unsafe to use.
- Solution: Follow step-by-step instructions carefully. Use the right tools and fasteners, and ensure all joints are secure.
4. Ignoring Weight Capacity
- Problem: Overloading the cart can cause it to break or become difficult to maneuver.
- Solution: Be mindful of the weight capacity of your cart. Use sturdy wheels and a strong frame to support the load.
5. Skipping the Finishing Touches
- Problem: Neglecting to finish the cart properly can leave it vulnerable to weather damage.
- Solution: Apply a protective finish like paint, varnish, or sealant to protect the cart from moisture and UV rays.
6. Lack of Customization Planning
- Problem: Adding custom features without proper planning can lead to a cluttered or impractical design.
- Solution: Plan your customizations in advance. Consider how each feature will be used and ensure it doesn't interfere with the cart's functionality.
7. Forgetting Safety Precautions
- Problem: Not taking safety precautions can result in injuries during the building process.
- Solution: Wear protective gear such as gloves and safety glasses. Work in a well-ventilated area and keep your workspace organized.
8. Overlooking Maintenance Needs
- Problem: Failing to maintain the cart can lead to wear and tear over time.
- Solution: Regularly check for loose screws, rust, or other signs of damage. Clean and store the cart properly when not in use.
By being aware of these common mistakes and taking steps to avoid them, you can ensure your DIY garden cart project is successful and enjoyable.
FAQs About DIY Garden Carts
Find answers to common queries about DIY garden carts. Learn tips on building, materials needed, and troubleshooting in our comprehensive FAQs.
Choosing the right wheels is crucial for the functionality of your garden cart. Consider the following:
Size: Larger wheels (10-12 inches) are better for rough terrain.
Material: Pneumatic (air-filled) tires provide better cushioning and grip.
Load Capacity: Ensure the wheels can support the weight you plan to carry.
You can customize your garden cart to suit your needs:
Add Storage: Include compartments or shelves for tools and supplies.
Use Different Materials: Try using metal or plastic for different durability and weight.
Paint or Stain: Personalize the cart with paint or stain to match your garden decor.
Add Accessories: Install hooks, bungee cords, or a canopy for added functionality.
Building a DIY garden cart offers several benefits:
Cost-Effective: Often cheaper than buying a pre-made cart.
Customization: Tailor the cart to your specific needs and preferences.
Satisfaction: Enjoy the sense of accomplishment from building something yourself.
Durability: Use quality materials to ensure the cart lasts longer.
Maintaining your DIY garden cart ensures it lasts longer and performs well. Here are some tips:
Regular Cleaning: Remove dirt and debris after each use.
Check for Rust: If your cart has metal parts, inspect and treat any rust spots.
Lubricate Wheels: Apply lubricant to the wheel axles to keep them rolling smoothly.
Tighten Screws and Bolts: Periodically check and tighten any loose hardware.
Yes, you can convert an old wheelbarrow into a garden cart with a few modifications:
Remove the Wheel: Take off the single wheel and replace it with a set of four wheels for better stability.
Add a Handle: Attach a handle for easier maneuvering.
Reinforce the Frame: Strengthen the frame with additional wood or metal supports if needed.
Customize: Add any other features you need, such as storage compartments or a flatbed.
Conclusion
Building a garden cart is a practical project that can be completed in a weekend. By customizing the cart to your specific needs, you ensure it will be a helpful tool for years to come. Whether you're hauling soil, tools, or plants, a sturdy DIY garden cart makes gardening tasks more manageable and enjoyable. With the tips and insights I've shared, I hope you feel confident to tackle this DIY project and add a new, useful tool to your garden arsenal.


