I found a great way to upgrade my kitchen for just $45. One weekend, I tackled a DIY granite countertop project. It was a fun experience and surprisingly easy to do. First, I cleaned the old countertops and then applied an adhesive primer. I chose a beautiful granite pattern contact paper. It gave my counters a sleek, modern look.
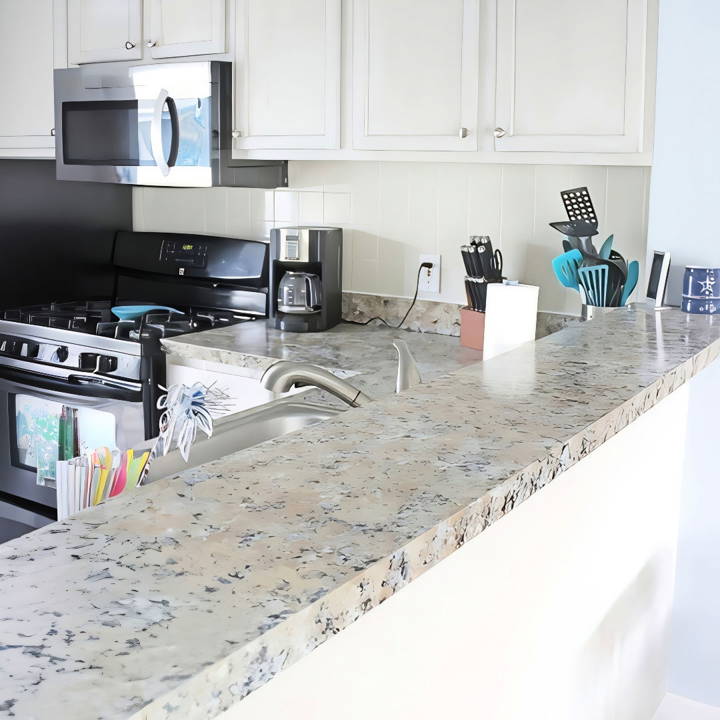
Working on this project saved me so much money. I didn't need professional help. In just a few hours, my kitchen had a fresh new look. I'm thrilled with the outcome. If you're thinking about updating your kitchen, give this DIY granite countertop project a try. It's an easy and budget-friendly solution.
Materials Needed and Why
- Primer: Essential for ensuring the paint adheres properly to the countertops.
- Roller Set: For applying the primer smoothly and evenly.
- Sponges with Holes: Key to building the natural, varied texture of granite. (Tip: You can DIY these from regular sponges.)
- Small Paintbrush: For reaching the edges and corners where the roller can't.
- Acrylic Paints in Various Colors: I chose shades of gray and white to emulate light granite. It's crucial to pick colors that complement your kitchen's color scheme.
- Polyacrylic Sealer: This seals the paint, protects your work, and adds a shining, finishing touch.
- Glitter (Optional): For that subtle sparkle found in some granite.
- Disposable Lids or Paper Plates: Handy for mixing and dabbing paint.
Step by Step Instructions
Learn how to DIY granite countertops with our step-by-step guide! From prep work to sealing, follow our instructions for a stunning granite effect.
Prep Work
I began by thoroughly cleaning the countertops to remove any debris and residue. Then, I taped off the edges around the sink and walls to protect them from stray paint strokes.
Priming
With everything prepped, I applied two coats of primer with the roller. This step was crucial for building a solid base. It's important to allow each layer to dry completely before proceeding.
Building the Granite Effect
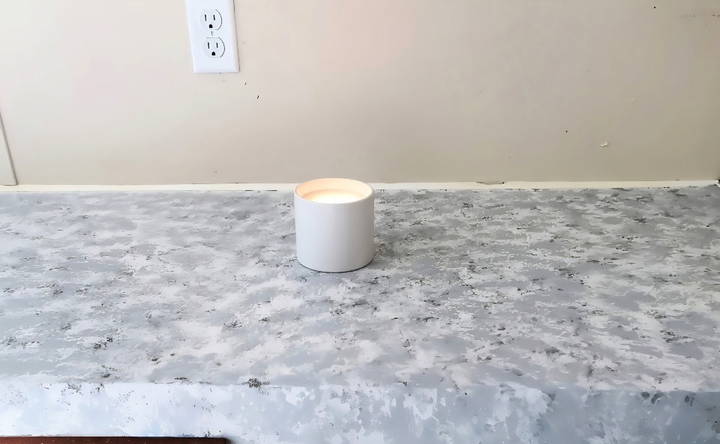
After the primer dried, the real fun began. I started with the darkest shade of gray paint. Dipping my sponge into the paint, I blotted it lightly on the lid to avoid excess paint before dabbing it onto the countertop randomly. The key here is randomness to mimic natural granite.
As the process continued, I layered on the lighter gray paint, followed by white, using the same dabbing technique. At this stage, the countertops might look a mess, but trust the process. Granite doesn't follow a strict pattern, and the beauty comes from the variations and layering of colors.
If any area felt too dark or too light, I didn't panic. I simply went back with a contrasting color to adjust. The acrylic paints are forgiving, making it easy to tweak the design as needed.
Sealing the Deal
Once satisfied with the granite effect, and after allowing the paint to dry thoroughly, I applied two coats of polyacrylic sealer. This not only protected the paint but also gave the countertops a glossy finish that really mimicked real granite. The sealer is a bit pricey compared to the other materials, but it's worth every penny for the durability and shine it adds.
Optional Sparkle
For a final touch, I sprinkled a bit of glitter over the paint before sealing. This step is optional but adds a subtle shimmer that many granite countertops have.
Afterthoughts and Tips
This DIY project turned out to be surprisingly straightforward and incredibly rewarding. The countertops transformed from bland and outdated to modern and chic, all for less than $50 and a few hours of work. Here are some parting tips for anyone considering this project:
- Practice First: If you're nervous, try the technique on a piece of cardboard first.
- Layer Colors Gradually: Start with darker colors and add lighter shades progressively for a more natural look.
- Be Patient: Allow paint and sealer to dry completely between coats.
- Have Fun: There's no right or wrong way to build the granite effect. Embrace the uniqueness of your creation!
Troubleshooting Common Problems
When working with granite countertops, you might encounter a few challenges along the way. Here's a helpful guide to troubleshoot some of the common problems you may face:
- Chips or Cracks Granite is durable, but it can chip or crack if hit with enough force. If you find a small chip or crack, you can fill it with a color-matched epoxy or resin available at hardware stores. For larger issues, it might be best to consult a professional.
- Stains Granite is porous and can absorb liquids, leading to stains. To remove stains, build a paste of baking soda and water for oil-based stains, or baking soda and hydrogen peroxide for water-based stains. Apply the paste to the stain, cover with plastic wrap, and leave overnight. Wipe away the paste with a soft cloth.
- Dullness Over time, granite can become dull. Usually, this is due to a buildup of cleaning products. To restore shine, clean your countertop with a mixture of warm water and mild dish soap, then rinse thoroughly. You can also use a granite polish for extra shine.
- Seams Separating If your countertop has seams, they may separate over time. This is often due to the house settling or cabinets shifting. You can fill small separations with a color-matched epoxy. For larger gaps, it's advisable to contact the installer.
- Water Spots Hard water can leave spots on granite. To remove them, use a soft cloth dampened with a mixture of half water and half white vinegar. Wipe the spots gently and follow with a water rinse. Avoid using vinegar if your granite is sealed, as it can damage the sealant.
Maintain regularly to prevent issues. Seal granite as advised, clean spills quickly, and use coasters and trivets.
Maintenance and Long-Term Care
Keeping your granite countertops in top condition requires regular maintenance. Here's a straightforward guide to help you care for your countertops effectively:
- Daily Cleaning For everyday cleaning, use a soft cloth and a mild dish soap with warm water. Wipe down the surfaces to remove any spills or residues. Avoid using harsh chemicals or abrasive cleaners as they can damage the granite.
- Sealing Your Countertops Granite is naturally porous, so it's important to seal it to prevent stains. Seal your countertops once a year or as needed. You can tell if it's time to reseal when water no longer beads on the surface. Apply a sealant designed for granite, following the manufacturer's instructions.
- Dealing with Spills Spills should be wiped up immediately, especially acidic substances like wine, coffee, or fruit juices. These can etch the surface if left unattended. Blot the spill with a paper towel and clean the area with a damp cloth.
- Protecting the Surface Use coasters under glasses, especially if they contain alcohol or citrus juices. Hot pots and pans should be placed on trivets or hot pads to avoid thermal shock, which can crack the granite.
- Avoiding Scratches While granite is scratch-resistant, it's not scratch-proof. Cut and chop on cutting boards, not directly on the countertop. This will also help to keep your knives sharp.
- Long-Term Care Inspect your countertops regularly for any changes in the stone or sealant. If you notice any cracks or chips, address them promptly to prevent further damage. For deep cleaning or to address serious issues, consider hiring a professional.
By following these simple steps, you can ensure that your granite countertops remain a beautiful and functional part of your home for many years to come.
FAQs About DIY Granite Countertops
Get answers to common questions about DIY granite countertops. Learn installation tips, cost factors, and maintenance advice to enhance your space.
The initial steps involve planning and measuring. Use kraft paper or cardboard to build a template of your countertop space. This template should include precise measurements and locations for sink holes or other cuts. Decide on the size of the overhang you prefer, typically 1.5 inches beyond the cabinet face, and include this in your template.
Selecting the right granite slab involves considering the color and style that match your kitchen or bathroom. Granite is available in various colors and patterns, so it’s essential to browse selections either online or in-store. Prices can range from $75 to over $250 per square foot, depending on the type and color of the granite.
Before laying the granite, you need to reinforce the countertop with a 0.75-inch plywood base. This plywood should match the size of your countertop template, including the overhang. Secure the plywood to the cabinets using screws to provide a stable foundation for the granite.
Yes, with the right tools, such as a wet saw for cutting and a grinder for smoothing edges, you can cut and fit the granite. However, it requires careful planning and precise measurements. If you're not comfortable with this step, consider pre-finished edges or professional help.
Maintaining granite countertops involves regular cleaning with mild soap and water. Avoid using abrasive cleaners that can damage the surface. Sealing the granite periodically can also protect against stains and prolong the life of your countertops.
Conclusion
I'm helping with this DIY granite countertops project by showing how simple and affordable it can be to do it yourself. Give it a go – you'll be surprised how easy it is to modernize your kitchen.


