Constructing your own DIY grill station can transform your outdoor space into a functional and stylish cooking area. This guide will help you understand the essentials of making a DIY outdoor grill station step-by-step. From planning the layout to selecting materials, the process can be simple and rewarding. Building a grill station not only enhances your backyard but also provides a focal point for gatherings and outdoor activities.
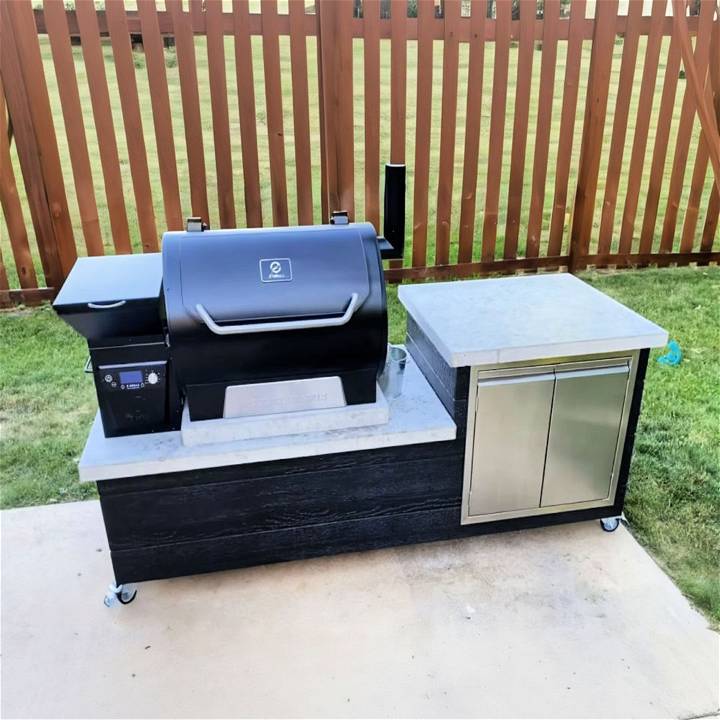
Our instructions cover everything you need to know about tools, design, and placement for your grill station. You'll learn about building a sturdy base, incorporating storage, and ensuring safety features. The detailed guidelines and useful tips will make your project manageable and enjoyable. Follow along to start your own DIY outdoor grill station and make the most of your outdoor cooking experiences.
Keep reading to discover the next steps in making the perfect DIY grill station that suits your needs and style.
Getting Started: The Right Materials Make the Project
Discover the right materials for your project with 'Getting Started: The Right Materials Make the Project.' learn essential materials and their importance.
The Plan
Before diving into the build, I had to get my materials and plans in order. Having a clear, color-coded set of plans was crucial. It outlined everything from the cut list to the step-by-step assembly instructions. This preparation phase was integral to ensuring a smooth build. Partnering with Z Grills provided not only the cornerstone of this project, the 700 D3 model, but also a sense of excitement about what this grill station could become.
Materials Needed and Why
- Lumber (Two-by-Fours) - The skeleton of our station, providing structure and strength.
- Concrete Mix - For our countertops, offering durability and a sleek look.
- Hardie Board - Used for siding, it's affordable, weathers well, and is ideal for outdoor applications.
- Exterior Grade Screws and Pocket Hole Screws - These hold everything together securely, suitable for outdoor conditions.
- Stainless Steel Doors - They provide a clean, modern look that complements the sturdy grill station.
- Exterior Paint - To protect and personalize the station.
- Casters - For mobility, ensuring the station can move as needed.
Step by Step Instructions
Build your own DIY grill station with step-by-step instructions: framing, adding the exterior, countertops, painting, doors, and mobility. Perfect for any backyard!
Day One: Framing
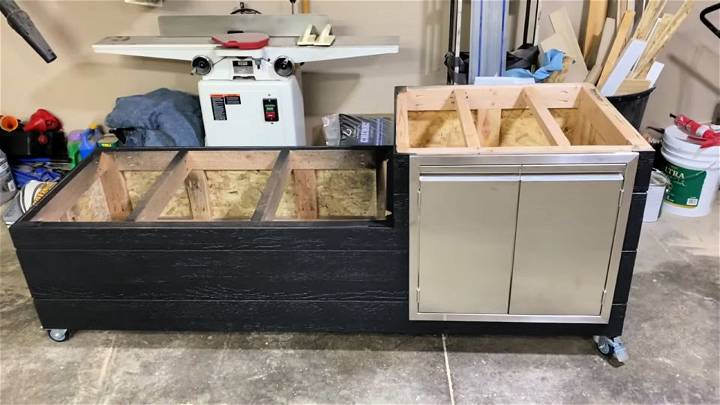
The first day was all about framing. Cutting the lumber to size and using both deck screws and pocket hole screws, I constructed the base frame. It was essential to label each part with blue tape for easy assembly. This process required accuracy and patience, especially ensuring everything was square and aligned.
Adding the Exterior
Choosing Hardie Board as the siding material proved to be a cost-effective and visually appealing option. Cutting and fitting this board around the frame involved precision, but the result was a sturdy, attractive exterior ready for painting.
Countertops: The Concrete Challenge
Mixing and pouring concrete countertops was a new endeavor for me. Achieving the right consistency and ensuring no air pockets were trapped required vigilance. After filling the molds and ensuring they were vibrated enough to release air bubbles, I let them cure, excited but nervous about how they would turn out.
The Finishing Touches
The finishing touches: expert painting, door installations, countertops, and professional grill setups for a flawless home finish.
Painting
Choosing a tricorn black paint, my wife and I applied two coats using an HVLP sprayer, transforming the look of the station into something modern and striking.
Doors and Mobility
Installing the stainless steel doors was straightforward, and the casters I added had a dual purpose: ease of movement and protecting the station from direct contact with the ground, ensuring longevity.
Countertops Installation
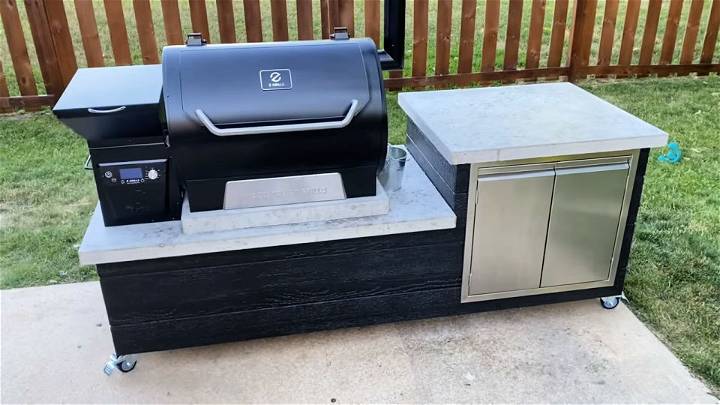
Heavy lifting was an understatement when it came to installing the concrete countertops. The larger one required teamwork, and despite the logistical challenges, we positioned them perfectly on the frame, ensuring a seamless fit all around.
The Grill
Fitting the Z Grills 700 D3 model was the culmination of this project. However, I encountered a hiccup with the grill’s electrical cord and the concrete countertop. Drilling through concrete to make a passage for the cord was a task I hadn’t anticipated, but after some effort, it worked out, securing the grill safely on its new station.
Reflections and Tips
My journey to build a DIY grill station was filled with learning curves, from planning and assembly to dealing with unexpected challenges like the electrical cord issue. Here are some takeaways:
- Always Double-Check: Whether it's measurements before cutting or ensuring materials are level and square, this step can save a lot of time and materials.
- Research and Prepare: Understanding the process and potential pitfalls in advance is invaluable, especially if trying something new, like concrete countertops.
- Patience is Key: Taking your time, especially with drying, curing, or setting processes, ensures a better final product.
- Have Help Ready: Some tasks require more than two hands. Don't hesitate to ask for help when needed.
Customization Ideas for Your DIY Grill Station
Building a DIY grill station is not just about functionality; it’s also an opportunity to add a personal touch to your outdoor cooking space. Here are some customization ideas that can make your grill station uniquely yours:
- Choose Your Style: Start by deciding on the overall look of your grill station. Do you prefer a modern, sleek design with stainless steel surfaces or a rustic, traditional style using reclaimed wood? Your choice will set the tone for the rest of the customization.
- Surface Options: The work surface is crucial for food preparation. Consider using materials like granite or marble for a durable and heat-resistant countertop. If you’re on a budget, a high-quality wood butcher block can also be a great choice.
- Storage Solutions: Consider what you need to store and how you want to access it. Drawers for utensils, cabinets for pots and pans, and shelves for spices and condiments can be customized to fit your cooking style. To save space, use magnetic strips for knives and hooks for hanging tools.
- Add a Bar Top: If you enjoy entertaining, consider adding a bar top to your grill station. This can provide a place for guests to sit and chat while you cook, enhancing the social experience of your outdoor space.
- Lighting: Good lighting is essential for evening grilling. Install LED strips under the countertop or above the cooking area for better visibility. Solar-powered lights can be an eco-friendly option.
- Mobility: If you want to move your grill station easily, add lockable wheels to the base. This way, you can easily relocate it depending on the occasion or weather conditions.
- Tech Upgrades: For the tech-savvy griller, incorporate a Bluetooth thermometer to monitor your cooking from a distance or install speakers to enjoy music while you cook.
- Decorative Touches: Finally, add some decorative elements that reflect your personality. This could be anything from a custom paint job to decorative tiles or even a small herb garden on the side.
Personalize your DIY project with these ideas. Get creative to enhance your grilling experience and fit your lifestyle.
Maintenance and Care Tips for Your DIY Grill Station
Keeping your DIY grill station in top shape is essential for ensuring it lasts through many seasons of barbecues and gatherings. Here are some straightforward maintenance and care tips to help you preserve your outdoor culinary centerpiece:
- Regular Cleaning: After each use, let the grill cool down and then brush off any food particles or grease. This prevents buildup and keeps your grill ready for the next cookout.
- Protective Covering: Invest in a good-quality grill cover to shield your station from rain, dust, and sun damage. Make sure the cover fits snugly and is made of durable, waterproof material.
- Inspect for Wear and Tear: Periodically check for any signs of rust or damage, especially if your grill station includes metal parts. Treat rust spots early to prevent them from spreading.
- Wood Care: If your grill station has wooden elements, treat the wood with a sealant or stain to protect it from moisture and UV rays. Reapply as recommended by the product instructions.
- Check Gas Connections: For gas grills, regularly inspect the gas lines and connections for leaks. You can do this by applying soapy water to the connections and watching for bubbles when the gas is on.
- Season Cast Iron: If your grill has cast iron grates, season them by coating them with cooking oil and heating the grill. This makes a non-stick surface and prevents rust.
- Winterizing: If you live in an area with harsh winters, take extra steps to winterize your grill station. This might include thorough cleaning, disconnecting gas lines, and storing accessories indoors.
- Annual Deep Clean: At least once a year, give your grill station a deep clean. Dismantle what you can and soak the parts in soapy water, scrubbing away any stubborn grime.
Using these easy maintenance tips, you can keep your DIY grill station reliable and inviting for years. A bit of effort preserves its quality and functionality.
Safety Regulations and Compliance
Building a DIY grill station can be a rewarding project, but it’s important to prioritize safety and adhere to regulations. Here’s a guide to help you navigate the essentials of safety compliance:
- Local Building Codes: Before you start constructing your grill station, familiarize yourself with local building codes. These regulations may dictate the safe distance required between your grill station and other structures or property lines to prevent fire hazards.
- Fire Safety: Keep a fire extinguisher within arm’s reach whenever you’re grilling. In case of flare-ups, you’ll be prepared to act quickly and safely.
- Proper Placement: Your grill station should be placed away from any flammable materials, including your house, trees, and outdoor furniture. Following guidelines from organizations like the NFPA can help you determine a safe location.
- Non-Combustible Materials: For areas close to the heat source, choose materials that won’t catch fire easily. This could include certain metals or treated stones.
- Gas Grill Precautions: If you’re using a gas grill, check the hoses and connectors regularly for leaks. A simple test is to apply soapy water to the connections; if you see bubbles when the gas is on, there’s a leak that needs fixing.
- Ventilation: Make sure your grill station is in an open area with plenty of air circulation. Good ventilation prevents the buildup of harmful fumes and smoke.
- Child and Pet Safety: Always supervise children and pets around the grill station, especially when it’s in use or still hot.
- Maintenance Checks: Regularly inspect your grill station for signs of wear or damage. Replace any worn parts immediately to maintain safety.
By following these straightforward tips, you can enjoy your DIY grill station while keeping safety at the forefront.
FAQs About DIY Grill Station
Discover essential faqs about DIY grill station construction, materials, and design tips to make your perfect outdoor cooking space.
Ensure your grill station is safe by using Hardiebacker cement boards or similar fire-resistant materials that won’t ignite or contribute fuel to a fire. Always research and follow safety guidelines specific to the materials you’re using.
Yes, you can build a DIY grill station for a charcoal grill. You’ll need to make a frame with an opening to fit your grill and ensure it’s supported properly with additional 2x4s.
Customize your grill station by deciding on the size, choosing whether to include storage or prep areas, and selecting materials that match your outdoor decor. You can also add doors, wheels for portability, or additional countertops for convenience.
The space required for a built-in grill area depends on the size of your grill and any additional features you want to include, like countertops or storage. A good rule of thumb is to allow at least 24 inches of counter space on one side of your grill and 12 inches on the other side to ensure enough workspace.
Yes, you can convert a portable grill into a permanent grill station. You’ll need to build a sturdy frame to hold the grill and include a countertop or work area. Ensure the grill is securely anchored and that the materials used are fire-resistant.
Conclusion:
Wrapping up, building a DIY grill station can transform your outdoor space into a functional, delightful cooking area. With just some basic tools and creativity, your DIY outdoor grill station will soon be the heart of many gatherings. So start today and make a personalized DIY grill station that will bring both satisfaction and great meals for years to come.


