Starting a homemade DIY guitar stand project was an exciting idea for me. I wanted a guitar stand that was both sturdy and unique, but I didn't want to spend a lot of money. So, I decided to build one myself. It was fantastic to know that I could build something useful with my hands. I felt proud and motivated to get started.
I found several guitar stand plans online and picked one that seemed simple and clear. The instructions were easy to follow, and I used materials I already had at home. Making a homemade guitar stand was not only cost-effective but also a fun and satisfying experience.
Now, you can start making your own guitar stand with these helpful tips I've shared.
Materials Needed and Their Importance
Before diving into the construction, it is crucial to gather all the necessary materials. Here's what you'll need:
- 3/4-inch plywood: Provides the sturdiness needed for the stand and serves as the primary structure.
- 1/4-inch craft foam: Offers a soft resting place for your guitars, protecting them from scratches.
- 1/4-inch T-nuts and screws (1 and 1/2-inch): These secure the structure together, ensuring a solid build.
- 1 and 1/2-inch drywall screws: These are used for additional reinforcement.
- Spray glue: Utilized to adhere the foam to the plywood, making a snug fit for the guitars.
- Tools (circular saw, band or jigsaw, sander, drill): Essential for cutting, shaping, and assembling the stand.
Having gathered all the materials, the real work begins. While power tools are beneficial for precision and ease, manual alternatives exist for those without access to such equipment.
Step by Step Instructions
Learn how to build your own guitar stand with our easy, step-by-step guide. From making the template to finishing touches, get detailed DIY instructions here.
Step 1: Building the Template
Using the maple plywood, I embarked on tracing the template for the stand. Accuracy is not paramount at this stage since sanding later refines the shape. This flexibility catered perfectly to my slightly less-than-stellar sawing skills.
Step 2: Cutting and Sanding
After cutting out the traced pieces with a circular saw, I taped the bottom pieces together to uniformly cut the curves on the band saw. A jigsaw could also achieve this, but the band saw's platform facilitated straighter, more perpendicular cuts.
Step 3: Shaping and Angling
I then clamped and sanded the triangular pieces together. This ensured that the front curve of the stand, which would support the guitars, was symmetrical — an essential aesthetic and functional factor. Setting the table saw to an 8-degree angle, though not necessary, allowed the back piece to sit at an angle, preventing the guitars from resting directly on the edge.
Step 4: Drilling and Assembling
Next came drilling. Initially, I marked and drilled the holes to align the pieces, employing a drill press for precision. However, a regular hand drill is a viable alternative. I then glued and screwed everything together, ensuring to test-fit beforehand to avoid any misalignments.
Step 5: Finishing Touches
Wood plugs were added to the holes, and a wipe-on polyurethane coat was applied with a sponge brush for a smooth finish. Finally, the craft foam, cut to size and secured with spray glue, provided a soft resting surface for the guitars.
The Final Product
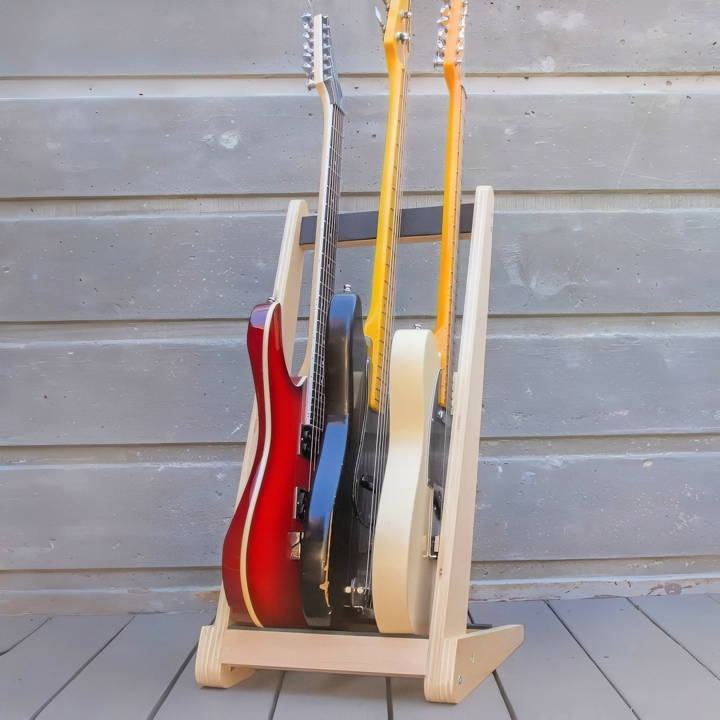
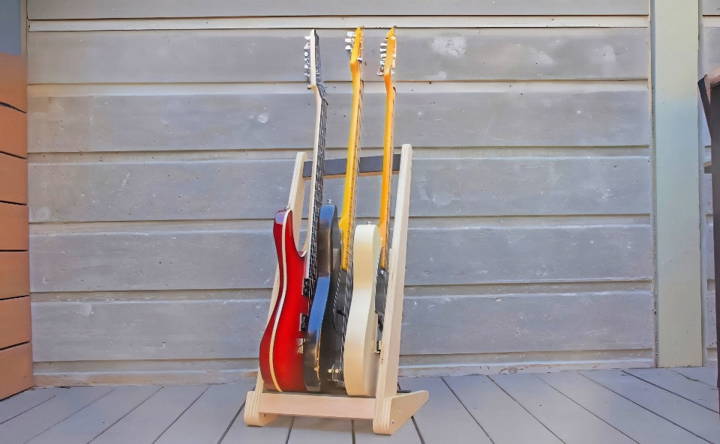
The outcome was a sleek, modern guitar stand that not only met but exceeded my expectations. Its narrow design allowed it to fit snugly against the wall, holding three electric guitars without taking up excessive space. The project, though time-consuming, was a testament to the fact that with some effort, creativity, and basic materials, making functional, stylish solutions is within reach.
Customization Ideas for Your DIY Guitar Stand
Building a DIY guitar stand is not just about functionality; it's also an opportunity to express your personal style and add a unique touch to your space. Here are some customization ideas to inspire you:
Choose Your Material Wisely
Start by selecting a material that resonates with your aesthetic. Whether it's the warm tones of wood, the sleek look of metal, or the versatility of PVC, each material offers different customization options. For example, wood can be carved, stained, or painted, while PVC can be easily shaped and painted in vibrant colors.
Paint and Finish
A fresh coat of paint can transform your stand from a simple structure to a statement piece. Consider using non-toxic paints as an eco-friendly option. You can also apply a finish to protect the stand and give it a polished look. Whether it's a glossy, matte, or satin finish, choose one that complements your guitar and room decor.
Add Decorative Elements
Incorporate decorative elements like inlays, decals, or stencils to make your stand pop. If you're using wood, try adding a beautiful inlay of a different wood type or color. For a more modern look, use vinyl decals or stencils to build patterns or images that reflect your personality.
Personalize with Engravings
Engraving your name, a favorite quote or a simple design can add a personal touch to your stand. This can be done professionally or, if you're feeling adventurous, with a DIY engraving kit. Just make sure to practice first if you're new to engraving.
Functional Add-Ons
Think about adding functional elements that enhance the usability of your stand. Hooks for hanging accessories, a shelf for your music books, or a compartment for your guitar picks can make your stand not only beautiful but also practical.
Eco-Friendly Options
Those who are environmentally conscious should consider using reclaimed wood or recycled materials. Not only does this help the planet, but it also gives your stand a story and character that new materials can't match.
Lighting Effects
Adding LED lights or small spotlights can highlight your guitar and stand, especially in a dimly lit room. Choose lights that complement the color of your stand and guitar, and consider using battery-operated lights for a cleaner look without wires.
Incorporate these ideas to make a guitar stand that reflects your creativity and style. Aim for a stand you're proud to display and that inspires daily play.
Advanced Techniques for Your DIY Guitar Stand
When you're ready to take your DIY guitar stand to the next level, advanced techniques can help you build a stand that's not only functional but also a work of art. Here are some sophisticated methods to consider:
Incorporating Multi-Guitar Storage
If you have more than one guitar, consider building a stand that can hold multiple instruments. Use dividers to protect each guitar from scratches and ensure they don't knock against each other. You can design a tiered stand that holds guitars at different levels, making it easy to grab the one you want to play.
Foldable and Portable Designs
For musicians on the go, a foldable guitar stand is a perfect solution. Design a stand with hinges and joints that allow it to collapse flat. This makes it easy to transport and store when not in use. Ensure the folding mechanism is sturdy and secure to prevent any accidents.
Integrated Storage Solutions
Add compartments or drawers to your stand to store picks, capos, tuners, and other accessories. This keeps all your guitar-related items in one place and makes it convenient when you're ready to play. Consider felt lining for the compartments to protect your accessories from scratches.
Adjustable Features
Build a stand with adjustable parts to accommodate different guitar sizes and shapes. This could include movable neck supports and height-adjustable bases. This versatility ensures that your stand can hold a range of guitars, from electric to acoustic to bass.
Enhanced Stability
For added stability, design a stand with a weighted base or non-slip feet. This prevents the stand from tipping over if bumped. You can use heavier materials for the base or add rubber pads to the feet for extra grip.
Aesthetic Enhancements
Experiment with different shapes and designs to make your stand visually appealing. Consider sleek curves or angular geometric patterns. You can also incorporate decorative elements like wood burning or carving to add a personal touch.
Use these advanced techniques to make a functional, attractive guitar stand. Prioritize safety and stability to protect your guitars.
Maintenance and Care for Your DIY Guitar Stand
Taking care of your DIY guitar stand is crucial for ensuring it remains a safe and attractive place to store your guitar. Here's how you can maintain your stand and keep it in top condition:
Regular Cleaning
Dust and dirt can accumulate on your guitar stand, which might scratch or damage your guitar's finish. Use a soft cloth to gently wipe down the stand. If you've painted or stained your stand, make sure to use cleaning products that are safe for the finish.
Check for Wear and Tear
Over time, parts of your stand may become loose or worn. Regularly inspect the stand for any signs of wear, especially in areas where the guitar makes contact. Tighten any loose screws and replace parts if necessary to ensure your guitar's safety.
Protect from Environmental Damage
Extreme temperatures and humidity can warp or damage your stand, especially if it's made of wood. Keep your stand in a stable environment, away from direct sunlight and moisture. If you live in a particularly humid area, consider using a dehumidifier to protect both your stand and guitar.
Refresh the Finish
If your stand starts to look dull or the finish is wearing off, give it a fresh coat of paint or varnish. This will not only make it look new again but also provide extra protection against scratches and moisture.
Stability Checks
Make sure your stand remains stable. If it wobbles or leans, it could be a sign that something needs adjusting. A stable stand is essential to prevent your guitar from falling and getting damaged.
By following these simple maintenance and care tips, you'll extend the life of your DIY guitar stand and keep it looking great. Remember, a well-maintained stand is a safe home for your guitar.
FAQs About DIY Guitar Stand
Discover the top FAQs about DIY guitar stands! Learn how to build, the materials needed, and tips for making your own personalized guitar stand.
Yes, you can! There are many beginner-friendly plans available that provide detailed instructions and tips to help you build your own guitar stand, even if you're new to woodworking.
Absolutely! There are various designs ranging from simple single-board stands to more complex folding or multiple guitar stands. You can choose a plan that suits your space, the number of guitars, and your personal style.
To ensure stability, make sure to measure your guitar’s height and thickness accurately. This will determine the angle between the stand legs and the length of the upright arm to balance the guitar properly and prevent it from falling.
Generally, building your own guitar stand can be more cost-effective than buying one, especially if you have some of the materials already. It also allows you to customize the stand to fit your specific needs and style.
Customizing your DIY guitar stand is a great way to make it blend with your room's decor. You can paint or stain the wood to match your furniture, add decorative elements like inlays or carvings, or even use unique materials like bamboo or reclaimed wood for an eco-friendly touch. The possibilities are endless, and you can get creative to reflect your personal style.
Conclusion:
Building a DIY guitar stand on your own can be very rewarding. Don't wait to try it. This guide is here to help. Dive in and start your project today!


