Building a DIY gumball machine was one of the most fun projects I've done with my kids. It started when we wanted something creative to work on during the weekend. After gathering a few materials, we were excited to put everything together. The best part was seeing how easy it was to make something functional and fun that everyone could enjoy.
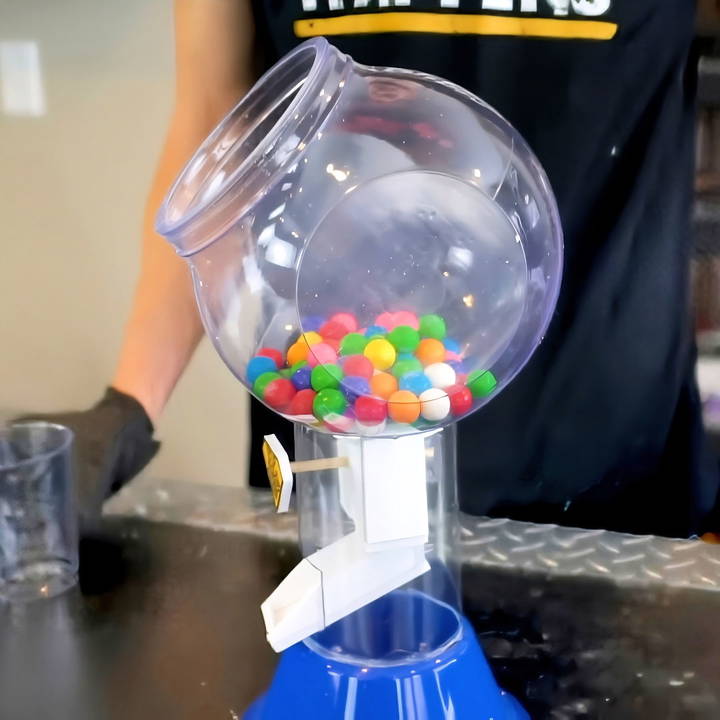
Step by step, we learned how to make a gumball machine using everyday items like a jar, cardboard, and a few small tools. The project was simple, but the results were so rewarding. Watching the first gumball roll out made us feel proud. I'm happy to share this guide, so you can enjoy the same experience with your family or friends.
Materials Needed and Their Importance
- Angled Plastic Candy Jar: Serves as the perfect transparent container, allowing you to see the gumballs and adding to the aesthetic appeal.
- Foam Core Board: This acts as the skeleton for our internal mechanism. Its lightweight and easy-to-cut nature make it an ideal choice.
- Plastic Bottle with Straight Sidewalls and Plastic Bowl: Together, these make the body and base of our machine, providing stability and a path for the gumball to travel.
- Wooden Dowels: These serve as axles for our mechanism, facilitating the movement required for dispensing the gumballs.
- Hot Glue Gun, Circle Compass, Exacto Knife, and Drill: Essential tools for assembly and precision in crafting the machine's components.
- Gumballs: The heart of the machine, without which this project would just be a complex puzzle box.
Step by Step Instructions
Learn how to make a DIY gumball machine with easy step-by-step instructions, from crafting the mechanism to building the base and adding finishing touches.
Crafting the Dispensing Mechanism
The most ingenious part of the gumball machine is undoubtedly the dispensing mechanism. Using the compass, I marked out circles on the foam core board, aiming for a diameter that would snugly fit a gumball, plus a little extra for the movement. Patience was key here, as precision matters. Cutting the circles out with an Exacto knife, I glued them together around a wooden dowel that served as our axle. This would form the core part of our mechanism.
Here's a tip: When drilling the hole for the axle, make sure the fit is snug. Too loose, and you risk the mechanism wobbling, potentially jamming the system.
Constructing the Gumball's Path
The next step involved building a structure around our mechanism to guide the gumball's path. This step required me to craft a box out of foam core that would house our circular mechanism—cutting out a square with sides slightly larger than the diameter of our mechanism allowed for smooth rotation. I then attached the sides, ensuring they were close enough to prevent the gumball from falling out prematurely.
One challenge I encountered was ensuring the circle moved smoothly without friction. A bit of sanding on the edges helped eliminate any unevenness, ensuring a smooth rotation.
Attaching the Mechanism to the Container
With the internal mechanism ready, I turned my attention to the candy jar. Carefully, I cut a hole in its base, big enough to align with our dispenser yet small enough to keep the gumballs from just pouring out. This required a steady hand and a moment of courage, as the last thing I wanted was to crack the jar.
Building the Base
For the base, I used a plastic bottle and bowl. The bottle's top was cut off, making a seamless cylinder that our mechanism could slide into. Ensuring the dowel extended through the front, I drilled a hole in the bottle cap area, allowing for an easy twist action from the outside.
Here's a learning moment: Always measure twice before cutting. Adjustments are much harder to make after the fact.
Making the Ramp
The final step focused on the delivery system – a ramp that would guide the gumball out to the eagerly awaiting hands. Cutting a piece of foam core to fit within the plastic bottle, I added side walls to prevent the gumball from escaping sideways. The ramp's angle was key; it was too steep, and the gumball would shoot out, too shallow, and it might not exit at all.
Finishing Touches
With the ramp attached and our mechanism tested several times (each time was as thrilling as the first), it was time to add the last few touches. I secured the plastic bowl to the bottom of the plastic bottle, providing a stable base. The decoration was minimal, as I wanted the swirling, colorful gumballs to be the star of the show.
Filling the jar with gumballs and giving the machine its first official turn was a moment filled with anticipation. The gumball rolled smoothly down the ramp, a testament to careful planning and execution. The joy of watching something you built work exactly as intended is unmatched.
Customization Ideas for Your DIY Gumball Machine
Making a DIY gumball machine lets you showcase creativity and personalize your space. Here are some ideas to turn a basic machine into a stylish piece of art.
Paint Techniques
A fresh coat of paint can completely change the look of your gumball machine. Here are some techniques you can try:
- Ombre Effect: Start with a darker shade at the base and gradually blend into a lighter shade towards the top.
- Distressed Look: After painting, lightly sand some areas to reveal the underlying color or metal for a vintage feel.
- Metallic Finish: Use metallic spray paint to give your gumball machine a sleek, modern look.
Decoupage
Decoupage is a simple way to add intricate patterns to your gumball machine. Follow these steps:
- Choose patterned paper or lightweight fabric that you love.
- Cut the material to fit the sections of the gumball machine you want to cover.
- Apply a layer of decoupage glue to the surface.
- Place the paper or fabric on the glue and smooth out any bubbles.
- Once dry, apply another layer of glue over the top to seal it.
Stenciling
Stenciling is a great way to add designs or words to your gumball machine. Here's how to do it:
- Secure a stencil onto the gumball machine with tape.
- Use a stencil brush or sponge to apply paint over the stencil.
- Carefully remove the stencil to reveal the design.
Embellishments
Adding embellishments can give your gumball machine character and charm. Consider these options:
- Rhinestones: Glue rhinestones in patterns or initials for a bit of sparkle.
- Stickers: Find stickers that match your interests and apply them to the machine.
- Mini Figurines: Attach small toys or figurines to the lid or base for a whimsical touch.
The key to a successful DIY project is to have fun and let your imagination run wild. Use these ideas as a starting point and see where your creativity takes you!
Seasonal Themes for Your DIY Gumball Machine
Decorating your DIY gumball machine according to the season is a delightful way to keep your decor fresh and exciting. Here's how you can adapt your gumball machine to celebrate the changing seasons:
Spring Refresh
Spring is all about new beginnings and soft colors. Consider these ideas:
- Pastel Gumballs: Fill your machine with light pink, mint green, and baby blue gumballs.
- Floral Accents: Attach artificial flowers or use floral-patterned ribbons to adorn your machine.
- Easter Theme: Use the machine as part of an Easter display with egg-shaped gumballs.
Summer Fun
Summer brings warmth and vibrant colors. Make your gumball machine a summer hit with these tips:
- Bright Colors: Choose gumballs in sunny yellows, bright oranges, and tropical blues.
- Beach Vibes: Decorate with mini umbrellas, sand, and seashell-shaped gumballs.
- Outdoor Parties: Make it a centerpiece for your outdoor BBQs and pool parties.
Autumn Warmth
Autumn is a season of warm tones and cozy vibes. Here's how to give your gumball machine an autumnal twist:
- Harvest Hues: Use gumballs in red, orange, and gold to mimic autumn leaves.
- Halloween Fun: Turn your machine into a spooky accessory with black and orange gumballs and spider web decorations.
- Thanksgiving Touch: Add cornucopia charms or mini pumpkins around the base.
Winter Wonderland
Winter is the time for cool colors and festive cheer. Transform your gumball machine with these winter ideas:
- Snowy Look: Paint your machine white and sprinkle glitter to mimic snow.
- Christmas Spirit: Use red and green gumballs and tie a holiday ribbon around the machine.
- New Year's Sparkle: Fill it with silver and gold gumballs to ring in the New Year with a sparkle.
By following these seasonal themes, you can ensure your DIY gumball machine remains a focal point in your home or office all year round.
Gumball Machine as Party Decor
A DIY gumball machine can be the star of your party decorations. It's not just a treat dispenser; it's a conversation starter and a customizable centerpiece. Here's how to turn your gumball machine into festive party decor:
Candy Buffet Centerpiece
A gumball machine is perfect for a candy buffet. Fill it with colorful gumballs and place it at the center of a table surrounded by bowls of other candies. It will draw guests in and become a playful part of your party.
Party Favors
Instead of traditional party bags, let guests use the gumball machine to take home their favorite sweets. Provide small bags or boxes for them to fill. It's a fun activity and a memorable favor.
Color Coordination
Match the gumballs to your party's color scheme. Whether it's pastels for a baby shower or bold colors for a birthday bash, coordinating the colors adds a professional touch to your decor.
Interactive Decor
Encourage guests to interact with the gumball machine. Place it where people can easily access it, and watch as it becomes a hub of activity.
Personalized Touch
Customize the gumball machine with the guest of honor's name or a special message. Use vinyl stickers or a chalkboard label for a personal touch that honors the occasion.
By incorporating these ideas, your gumball machine will not only dispense treats but also serve as a unique and engaging element of your party's decor.
FAQs About DIY Gumball Machine
Get all your questions answered about DIY gumball machines, including materials, assembly tips, and creative ideas, in our comprehensive faq guide.
The size of the terracotta pot should match the opening of the glass bowl. This ensures that the bowl sits snugly on the pot without gaps. You can measure the diameter of the pot's opening and find a bowl with a corresponding base diameter.
Absolutely! You can paint the terracotta pots and saucers in any color you like. Adding decorative elements such as gold leaf or themed designs can make your gumball machine unique and suited to your style.
Yes, your DIY gumball machine can be versatile. Besides gumballs, it can hold a variety of candies, serve as a terrarium for succulents, or even be used to serve dips at parties.
The basic steps include filling any holes in the wood beads with wood filler, painting the terracotta pots and saucers, attaching the wood bead to the saucer, applying optional gold leaf, and then attaching the glass bowl to the terracotta pot. Finally, fill the bowl with gumballs and place the saucer on top as a lid.
Safety is paramount, especially when children are involved. To make your DIY gumball machine child-friendly, ensure all materials are non-toxic and that there are no sharp edges. Use strong glue to secure all parts firmly, and make sure the glass bowl is attached securely to the terracotta pot to prevent it from falling off. Regularly check the machine for any loose components that may pose a choking hazard.
Conclusion:
In conclusion, making a DIY gumball machine is an enjoyable and straightforward craft that people of all ages can appreciate. With a few simple materials, you can make a fun, working machine that adds a playful element to any space. This guide has everything you need to get started and brings the joy of crafting right to your hands. Give it a try and see how easy it is!


