Building an easy DIY gun rack on a budget can be a rewarding project. This guide will show you how to build a sturdy and practical homemade gun rack with minimal cost. Using common materials and simple steps, you'll have a secure place for your firearms. This project is suitable for anyone who wants to keep their firearms organized and accessible.
You'll find detailed instructions and tips to make your DIY gun rack safe and visually appealing. We've included a list of materials and tools, along with step-by-step directions to help you through the process. Spend some quality time building a functional addition to your home.
Make a stylish and functional DIY gun rack with our step-by-step guide. Perfect for organizing and displaying your firearms securely.
Planning and Gathering Materials
The idea started when my friend Trevor and I were looking for a new project. We needed a gun rack and decided to make one tailored to our requirements. After watching a handy video for inspiration, we headed to Home Depot to gather our materials.
Materials Needed and Why:
- Wood: The backbone of our project. We chose sturdy varieties that could bear weight and last long.
- Saw: Essential for cutting the wood to our desired measurements.
- Drill: This is used to build holes and assemble the pieces.
- Measuring Tape and Pencil: Accuracy is key in a project like this.
- Clamps: To hold the wood in place while working on it.
Why these materials? Durability, reliability, and precision were our guiding principles. Each material and tool was chosen to ensure a solid, lasting build.
Step by Step Instructions
Learn how to build a sturdy DIY gun rack with our step-by-step instructions. From planning and cutting to assembly and finishing. Perfect for home projects!
Step 1: Planning Your Design
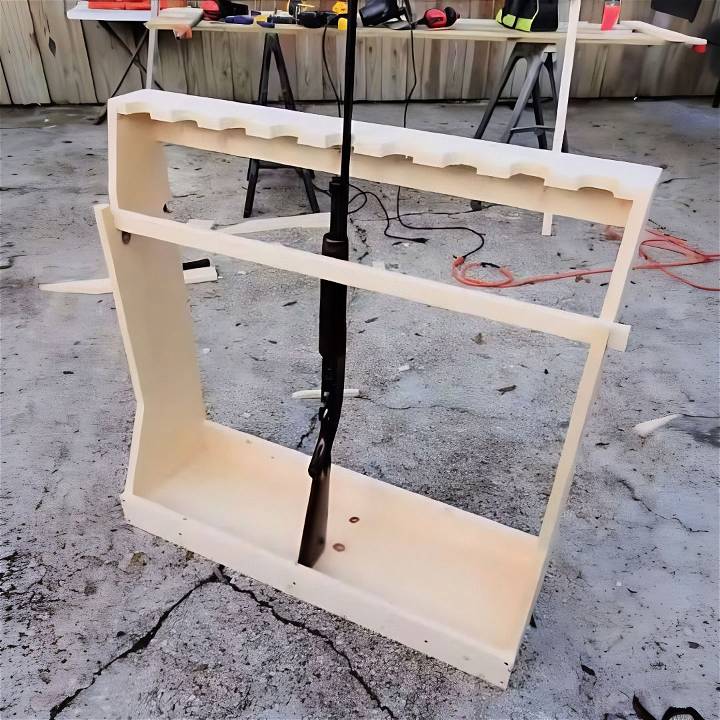
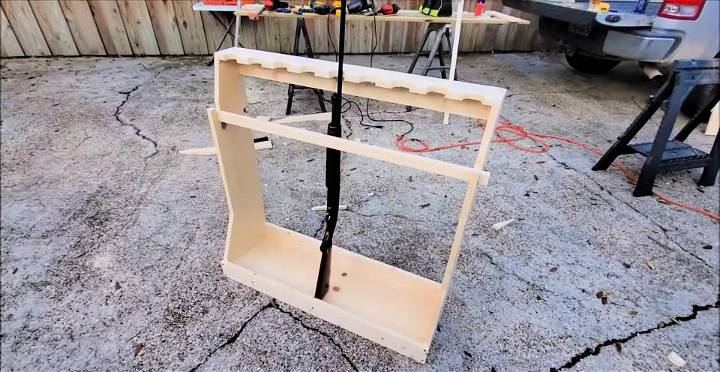
First, we sketched out our design, considering the size and type of guns it needed to accommodate. An important adjustment we decided on early was to build notches wide enough for an AR guard and to angle the base for a better fit.
Step 2: Cutting the Wood
Using our old but gold Black and Decker saw, we cut the wood according to our measurements. For our base, we decided on a 36-inch width for ample space and a 12-inch depth for stability.
Step 3: Assembling the Base
We elevated the base's rear end with extra wood strips to build a tilt, ensuring that guns would lean safely against the backrest. This detail prevents the guns from tilting forward or falling out.
Step 4: Adding the Notches
For the notches at the top, precise measurements were crucial. We spaced them evenly, ensuring they were wide enough to accommodate various gun types. This customization was a significant improvement over our previous rack.
Step 5: The Locking Mechanism
Adding a crossbar as a locking mechanism provided extra security, ensuring the guns stayed in place. This feature was a bit of a challenge but worth the effort for the added safety it provided.
Step 6: Finishing Touches
After assembling, we focused on the aesthetics, sanding down rough edges for a smooth finish, and applying a coat of protective varnish to seal the wood.
Hurdles Along the Way
One of the challenges was ensuring the notches were perfectly aligned and spaced. It took a couple of tries to get it right, requiring patience and precision. Another was the locking mechanism — designing something functional yet not overly complicated took some brainstorming.
Customization Ideas
When making a DIY gun rack, personalization is key to making it truly your own. Here are some ideas to inspire your creativity:
Choose Your Style:
- Classic: A traditional look with fine woods like oak or cherry can give a timeless feel.
- Rustic: Using reclaimed wood or a distressed finish can add character and fit a country-themed decor.
- Modern: Clean lines, glossy finishes, and metals can offer a sleek, contemporary look.
Functionality Tweaks:
- Locking Mechanism: For added security, incorporate a locking system to keep firearms safe.
- Expandable Racks: Design your rack to be adjustable, allowing for more guns to be added in the future.
- Portable Racks: Consider wheels or a foldable design for easy movement and storage.
Decorative Touches:
- Engravings: Personalize with names, dates, or meaningful quotes.
- Finishes: Experiment with different stains or paints to match your room’s color scheme.
- Lighting: Add LED strips or spotlights to highlight your collection.
Space Optimization:
- Vertical Storage: Utilize wall space to keep the floor area clear.
- Under-Shelf Racks: Make use of the space beneath shelves for additional storage.
- Corner Units: Fit the rack into a corner to save space and maintain room aesthetics.
Accessibility Features:
- Easy Reach: Ensure that guns are stored at a comfortable height for quick access.
- Labeling: Label each slot for specific firearms to maintain organization.
- Clear Display: Use glass or acrylic panels for a clear view of your collection while keeping it dust-free.
The goal is to build a gun rack that not only stores your firearms safely but also reflects your personal style and fits seamlessly into your home.
Troubleshooting Common Issues
Building a DIY gun rack can be a rewarding project, but it’s not without its challenges. Here are some common issues you might encounter and how to solve them:
Stability Concerns:
- Problem: The rack wobbles or doesn’t sit flush against the wall.
- Solution: Ensure all joints are square during assembly. Use a level to check before securing the rack to the wall. Consider adding a French cleat mounting system for added stability.
Wood Splitting:
- Problem: Wood splits when screws are inserted.
- Solution: Pre-drill holes to prevent splitting, especially near the ends of boards. Use the correct screw size and consider pilot holes.
Misaligned Gun Slots:
- Problem: The slots for guns are not aligned, making the rack look uneven.
- Solution: Measure twice, cut once. Use a template or jig to ensure consistent slot placement.
Insufficient Space:
- Problem: The rack is too small for the intended number of firearms.
- Solution: Plan your design with expansion in mind. Modular sections can be added as needed.
Finish Flaws:
- Problem: The stain or paint finish is blotchy or streaky.
- Solution: Sand the wood thoroughly before applying finishes. Test the finish on a scrap piece to ensure even application.
Difficulty Hanging:
- Problem: The rack is heavy and hard to hang by yourself.
- Solution: Enlist a friend to help lift and position the rack. Mark stud locations beforehand for secure anchoring.
Tool Marks:
- Problem: Saw or sanding marks are visible on the wood.
- Solution: Use finer grit sandpaper and sand evenly. Stain-grade wood filler can help hide imperfections.
Safety Issues:
- Problem: Concerns about the rack’s safety features.
- Solution: Research and install quality locks. Consider a separate locking mechanism for ammunition.
By anticipating and addressing these issues, you'll be more prepared to build a quality gun rack. Patience and planning are key tools for a successful DIY project.
Maintenance and Care
Taking care of your DIY gun rack is crucial for ensuring it remains a safe and reliable storage solution for your firearms. Here’s how to maintain and care for your gun rack effectively:
Regular Cleaning:
- Dust Regularly: Use a soft cloth or a feather duster to remove dust from the rack.
- Wipe Down: For deeper cleaning, use a damp cloth with mild soap to wipe down the wood, then dry immediately to prevent moisture damage.
Wood Preservation:
- Polish Wood: Apply a wood polish or wax every few months to keep the wood nourished and prevent it from drying out.
- Avoid Direct Sunlight: Place the rack in a location where it’s not exposed to prolonged direct sunlight, which can fade and damage the wood.
Metal Parts:
- Lubricate Hinges: If your rack has a door or locking mechanism, ensure hinges are lubricated to prevent squeaking and rust.
- Check for Rust: Inspect any metal components regularly for signs of rust or corrosion and treat them as needed.
Inspections:
- Tighten Fittings: Periodically check and tighten any screws or bolts to ensure the rack remains sturdy.
- Inspect for Wear: Look for signs of wear or damage, especially in areas that bear weight or see frequent use.
Safety Checks:
- Review Locks: Test the locks regularly to make sure they are functioning correctly.
- Secure Mounting: Make sure the rack is securely mounted to the wall or floor and hasn’t loosened over time.
Ammunition Storage:
- Separate Storage: Store ammunition separately from firearms in a cool, dry place.
- Check for Deterioration: Regularly inspect ammunition for any signs of deterioration or damage.
Follow these tips to keep your gun rack in top condition and extend its life. A well-kept rack not only looks better but also ensures safe firearm storage.
Safety First
When it comes to firearms, safety is paramount. A DIY gun rack is not just a storage solution; it’s a commitment to responsible ownership. Here’s how to ensure your gun rack is as safe as possible:
Secure Placement:
- Location: Choose a location for your gun rack that is out of reach of children and away from common areas.
- Visibility: Keep the rack in a discreet place to avoid drawing attention to your firearms.
Robust Construction:
- Material Strength: Use sturdy materials capable of supporting the weight of your firearms without risk of breaking.
- Reliable Mounting: Secure the rack to wall studs or another stable structure to prevent it from tipping over.
Safety Features:
- Lockable Storage: Install locks on your gun rack to prevent unauthorized access. Consider biometric locks for quick but secure access.
- Trigger Locks: Use trigger locks on all firearms stored on the rack for an additional layer of safety.
Education and Training:
- Handling Knowledge: Ensure everyone in your household knows the proper way to handle firearms safely.
- Safety Courses: Regularly attend safety courses and encourage family members to do the same.
Emergency Preparedness:
- Access Plan: Have a clear plan for accessing firearms in an emergency, ensuring safe and quick retrieval.
- First Aid: Keep a first aid kit nearby in case of an accidental injury.
Legal Compliance:
- Law Awareness: Stay informed about local laws regarding firearm storage and ensure your gun rack meets all legal requirements.
- Documentation: Keep all firearm documentation organized and accessible.
Prioritize safety in your DIY gun rack project to protect loved ones and enhance community safety.
FAQs About DIY Gun Rack
Explore faqs about DIY gun racks for essential tips, materials, and safety guidelines to build your perfect gun storage solution.
Consider the number and types of firearms you plan to store. Measure the available space where you intend to mount the rack and ensure it can accommodate your collection.
Always wear protective gear like goggles and gloves when handling power tools. Make sure the gun rack is securely mounted to the wall to prevent any accidents.
Absolutely! You can personalize your gun rack by altering its design to match your decor or adding features like a storage box for gun gear or padding to protect your firearms.
Use sturdy screws and wall anchors for a secure mount. If possible, attach the rack to wall studs to enhance stability and ensure it can support the weight of your firearms.
Yes, you can build a portable gun rack by adding features like wheels or handles for easy mobility. Just ensure that the firearms are stored securely during transport to prevent any accidents.
Final Thoughts
In conclusion, building an easy DIY gun rack on a budget is a practical and enjoyable project. With minimal materials and simple steps, you can craft a sturdy and stylish homemade gun rack. This guide helps you organize your firearms efficiently while adding a personal touch to your storage solution. Happy crafting!


