Making DIY hair extensions at home might seem challenging, but I found it to be rewarding and cost-effective. On a sunny Saturday, I gathered all the materials, including hair wefts, clips, and thread. After watching a few tutorials, I felt confident to start. Bit by bit, I sewed the clips onto the wefts, being careful and precise. This made me realize how simple it can be with a little patience.
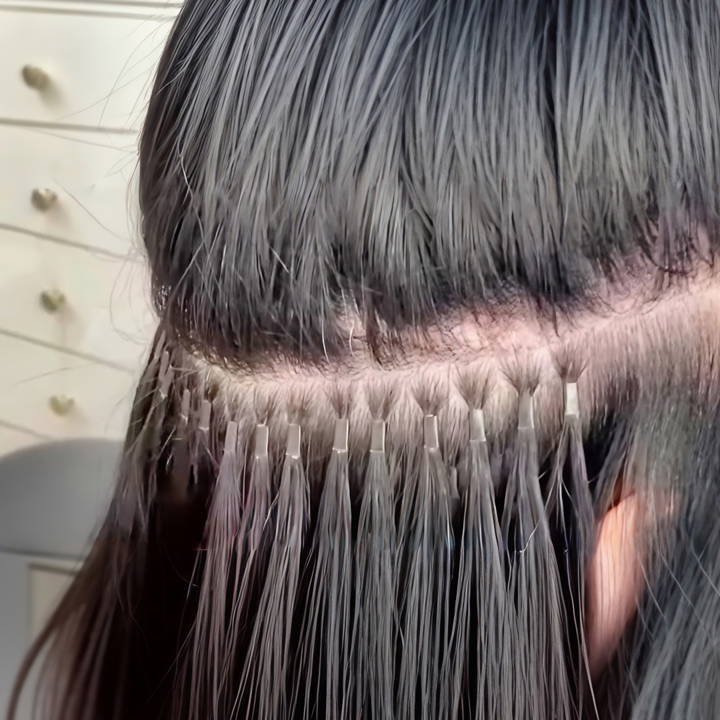
The result was amazing! My hair looked fuller and longer without spending a fortune at a salon. Friends couldn't tell the difference and kept asking for my secret. If you want to achieve stunning hair extensions right at home, try this process. It's not only fun but also very satisfying. I'm sharing this to help you feel empowered and stylish with hair extensions.
Getting started with this guide will bring you the joy of making your own beautiful hair extensions at home.
Preparation
First, gather your tools:
- I-Tip (shoelace tip) extensions
- Installation pliers (smooth inside, without teeth recommended for I-Tips)
- A tail comb or parting comb
- Loop threading tool
- Microbeads/tubes (copper recommended for individual extensions, without silicone)
- Removal tool (claw opener)
- Flat clips to manage hair sections
Make sure your hair is clean and dry before starting.
Step by Step Instructions
Discover easy, step-by-step instructions on DIY hair extensions. Learn how to add volume and length at home effortlessly!
Section Your Hair
- Begin by making a clean part where you wish to install the extensions. Use clips to keep other hair out of the way.
- Match the bead color with your root color for a seamless blend, even if installing a different shade of extensions.
Preparing the Tools
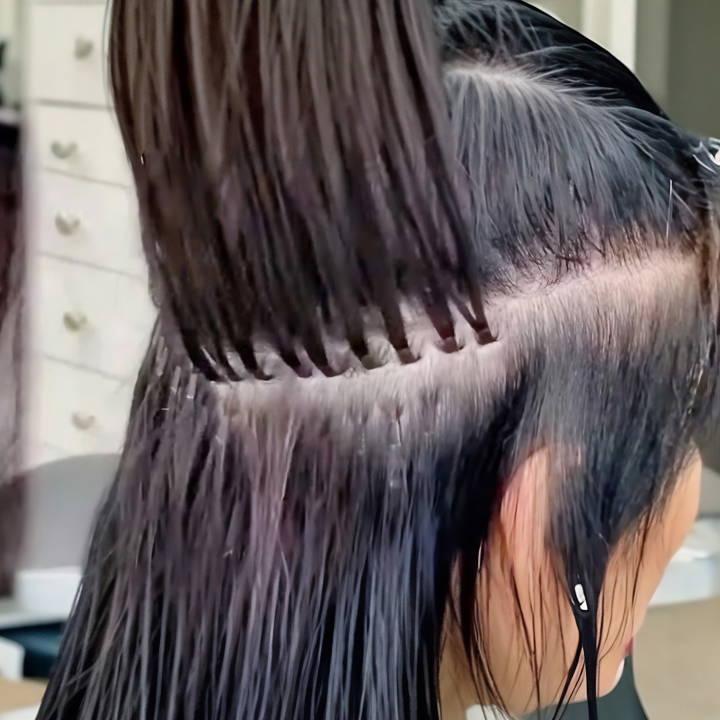
- Load some micro beads onto your loop threading tool. The bell curve of the beads should face downward.
- Pick a small section of hair where you wish to attach the extension.
Installing the Bead and Extension
- Place two fingers through the loop of the threading tool, catch the selected section of hair, and pull it through the loop.
- Slide the bead up towards the scalp, ensuring it's not too tight or too loose for comfort.
- Insert the I-Tip extension into the bead.
- Using your pliers, clamp the bead tightly to secure the extension. Ensure it lies flat against the head to avoid discomfort.
Repeat these steps until you've achieved the desired volume and length.
Removal of Extensions
- Use the claw opener to unclamp the beads gently.
- Slide off the extensions and beads.
- Extensions can be reused if the tip is in good condition. Flat or damaged tips can be revitalized by lightly heating and rolling them.
Maintenance Tips
- Be gentle when brushing or styling hair with extensions.
- Avoid applying high heat directly to the bond of the extension.
- Schedule regular maintenance checks to adjust the placement of the beads as your hair grows.
Video Tutorial
For a step-by-step video tutorial, watch How to Do Your Own Hair Extensions.
Personalization Techniques for DIY Hair Extensions
Personalizing your DIY hair extensions is a fantastic way to express your unique style and ensure they blend seamlessly with your natural hair. Here are some straightforward techniques to customize your extensions:
Choose the Right Color Match
- Selecting the perfect shade is crucial. If you can't find an exact match, opt for a slightly lighter shade rather than darker. It's easier to darken extensions than to lighten them.
Trimming for a Natural Look
- Cutting the extensions to match your haircut can make a significant difference. Consider visiting a professional stylist for the initial trim.
Styling to Blend
- Curling or straightening both your natural hair and the extensions together can help them blend more naturally. Always use a heat protectant spray to prevent damage.
Dyeing for Perfection
- If you're comfortable with dyeing hair, you can customize the color of your extensions. Always perform a strand test first to ensure the desired outcome.
Accessorize
- Adding accessories like beads or feathers can give your extensions a personal touch. Ensure they're securely attached and easy to remove.
Maintain Regularly
- Regular maintenance keeps your extensions looking their best. Brush them gently and wash them as needed with a sulfate-free shampoo.
Use these easy personalization tips to enhance and extend the life of your DIY hair extensions. The aim is a style that looks and feels great.
Technological Advances in DIY Hair Extensions
The world of DIY hair extensions is constantly evolving, with new technologies making it easier and more efficient for individuals to enhance their hair at home. Here's a comprehensive look at the latest advancements:
Nano Technology for Seamless Integration
- Nano rings have revolutionized the way extensions are attached. These tiny rings are almost invisible, making extensions look like they're growing from the scalp.
Improved Synthetic Hair Quality
- Technological improvements in synthetic hair production have made them nearly indistinguishable from natural hair, offering a cost-effective alternative without compromising on style.
DIY Home Kits
- New DIY kits have emerged, allowing for semi-permanent extensions that can last up to four weeks. These kits provide all the tools needed for a professional-looking application at home.
Customizable Extensions
- Advances in customization now allow for extensions to be pre-styled with curls or straightened to match your hair texture, right out of the box.
Eco-Friendly Options
- With a growing concern for sustainability, the market is seeing an increase in eco-friendly hair extensions that use recycled materials and ethical sourcing practices.
Stay informed on tech advances to make smart DIY hair extension choices. Use these innovations for salon-quality results at home.
Troubleshooting Common Issues with DIY Hair Extensions
When it comes to DIY hair extensions, it's normal to encounter a few hiccups along the way. Here's a guide to solving some of the most common issues, ensuring your extensions look fabulous and stay secure.
Extensions Looking Unnatural
- Solution: Make sure to match the extensions with the texture and color of your natural hair. Apply them in thin layers to blend seamlessly.
Extensions Falling Out
- Solution: This often happens if the extensions aren't secured properly. Use the right technique for your hair type and ensure each weft has enough hair to hold onto.
Dry and Damaged Extensions
- Solution: Avoid over-styling with heat and treat your extensions with nourishing products designed for synthetic or natural hair extensions.
Tangling and Matting
- Solution: Regularly brush your extensions with a soft-bristle brush and use a leave-in conditioner to keep them smooth.
Discomfort or Pain
- Solution: Extensions should never hurt. If they do, they may be too tight. Loosen them slightly for comfort, and ensure they're not pulling on your natural hair.
By addressing these common issues, you can enjoy your DIY hair extensions without any trouble. Patience and proper care are key to maintaining beautiful, long-lasting extensions.
Health and Safety Precautions for DIY Hair Extensions
Ensuring the health and safety of your natural hair and scalp is paramount when using DIY hair extensions. Here are some essential tips to keep in mind:
Consult a Professional
- Before you begin, consider consulting a professional stylist. They can provide valuable advice on the best type of extensions for your hair.
Prepare Your Natural Hair
- Start with healthy hair. Use conditioner to strengthen your hair and avoid any treatments that may weaken it before applying extensions.
Proper Installation
- Avoid installing extensions too tightly. This can lead to traction alopecia, a form of hair loss caused by pulling on the roots of your hair.
Keep It Clean
- Maintain a clean scalp to prevent irritation. Use products specifically formulated for hair extensions to avoid buildup.
Don't Overstay
- Don't leave extensions in for too long. Prolonged wear without proper care can cause damage to your hair and scalp.
Sleeping Care
- Avoid sleeping with wet hair extensions, as this can cause tangling and potential mold growth.
Regular Maintenance
- Follow a regular maintenance routine. This includes gentle brushing and using the right products to keep your extensions in top condition.
Follow these precautions to safely enjoy DIY hair extensions without harming your natural hair. Be gentle and attentive to both your extensions and natural hair.
FAQs About DIY Hair Extensions
Get expert answers to faqs about DIY hair extensions. Learn tips and techniques, and maintain your extensions for flawless, salon-quality results at home.
DIY hair extensions are hairpieces that you can attach to your natural hair on your own, without the need for professional help. They come in various types, such as clip-ins, tape-ins, and wefts, and can be made from real human hair or synthetic fibers.
The right type of hair extension for you depends on your lifestyle, hair type, and how often you want to wear them. Clip-in extensions are great for temporary length and volume and can be easily put in and taken out. Tape-ins are more semi-permanent and can last several weeks with proper care.
Yes, most hair extensions can be styled just like your natural hair. If they’re made of human hair, you can cut, color, and use heat styling tools on them. However, synthetic extensions may not withstand heat and can be more difficult to style.
To keep your hair extensions looking their best, brush them gently to avoid tangling, wash them with a sulfate-free shampoo, and let them air dry. Store them properly when not in use to maintain their shape and quality.
Hair extensions should not damage your natural hair if applied and maintained correctly. It's important to follow the instructions for your specific type of extensions and give your natural hair a break between applications to prevent stress on your hair follicles.
Conclusion:
By sharing my journey, I hope to inspire you to try DIY hair extensions at home. It's a great way to save money and still look fabulous.


