Have you ever looked at those beautiful hammock chairs in stores and thought, "I wish I could make one of those"? Well, I did too. I took on the challenge, and after several attempts, I discovered a straightforward way to make a macrame hammock chair that is both stylish and sturdy.
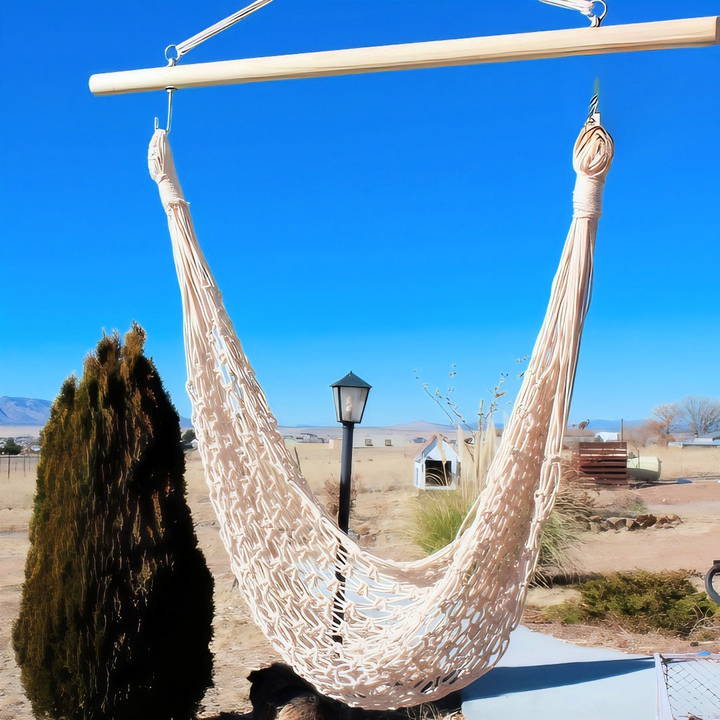
I'll take you through the process step-by-step, sharing my personal experiences, tips, and lessons I learned along the way. With a little patience and creativity, you can make a unique DIY hammock chair for your home. Let's dive into the details!
Materials Needed for Your Hammock Chair
Before we jump into the steps, let's go over the materials you'll need. Here's what I used:
- Macrame Cord (3 mm thickness): This is the primary material for the chair. I chose a 3 mm cord because it's strong enough to support weight but not too thick to make the knots bulky. You can find these on Amazon or any craft store.
- Temporary Dowel (48 inches): This dowel is used to set up the macrame work initially. It won't be part of the final product.
- Cardboard Strips (1 inch wide): These are used to maintain consistent spacing between knots. Make sure the corrugation runs up and down for sturdiness.
- Metal Ring (2-inch diameter): This is where all the cords will converge, providing a strong anchor point.
- Closet Rod (38 inches, 1.5 inches diameter): This will serve as the top bar for the chair. It's essential to drill two holes for hooks.
- J-Hooks and Lifting Eyelets (5/16 by 5 inches): These attach to the closet rod and provide the hanging points for the chair.
- Floral Wire: This is a handy tool for threading the cord ends through tight spaces.
- Scissors, Rotary Cutter, Quilting Ruler: Essential tools for cutting the cord accurately.
These materials are easy to source and ensure that the hammock chair is both functional and beautiful.
Step by Step Instructions
Make your own DIY hammock chair with our easy macrame instructions. Follow simple steps for setup, assembly, and pro tips for perfection!
Setting Up the Macrame
To start the project, you need to set up your macrame cords on the temporary dowel. This step is crucial as it forms the foundation for the hammock chair:
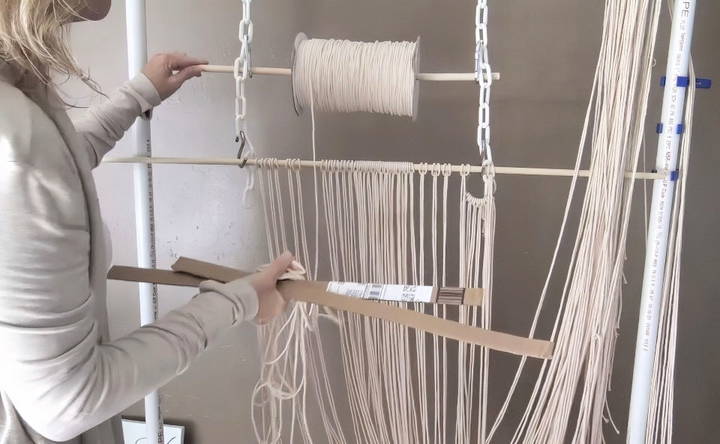
- Attach the Cords to the Dowel: I started by cutting the cords to my desired length and then looping them onto the temporary dowel. I placed the dowel on my macrame stand so that the cords could roll off easily without tangling. It saves a lot of time and hassle.
- Space the Cords Evenly: I spaced the cords approximately an inch apart across the 48-inch dowel. This doesn't need to be perfect, but keeping it consistent will help later when you start knotting.
Learning the Basic Knot: Square Knot
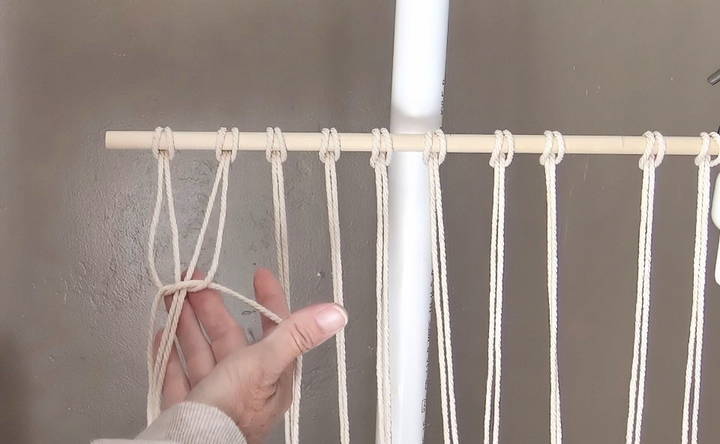
The entire chair is made using one fundamental knot—the square knot. If you're new to macrame, don't worry! Here's how I got started:
- Understanding the Square Knot: The square knot involves four cords—two on the outside and two in the center. I always remember that the left cord goes over the center two, and the right cord goes over the left one. Then, the right cord goes under everything and through the back. This makes half of the square knot.
- Completing the Knot: Once the first half is done, the trick to remember is to look at which cord comes out the back of the knot. That side goes next. The repetition is what makes this step easy to learn.
- Getting Consistent Results: I found it helpful to work in sections, making the first row of square knots approximately 24 inches down from the dowel. Measuring was a bit tedious, but it paid off in the final look of the chair.
Building the Chair Body
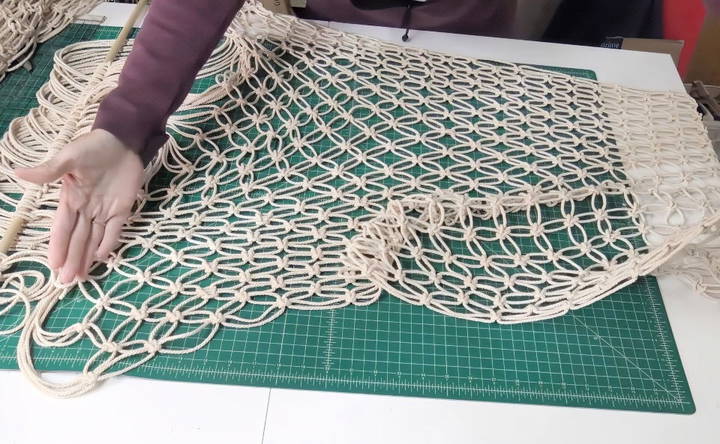
Now comes the more repetitive part—alternating square knots to make the hammock's body. This part takes patience but is quite meditative once you get into a rhythm:
- Alternating Square Knots with Spacing: After the first row, I began making alternating square knots. I used my cardboard strips to maintain a consistent one-inch gap between rows. By placing the cardboard between the knots, I avoided using a measuring tape repeatedly.
- Repeating the Process: I continued this process for about 40 inches, making a long panel of macrame knots. It took some time, but the results were worth it.
- Adjustments and Tweaks: If your rows end up slightly uneven, don't stress! My first attempt wasn't perfect either. Just ensure each row stays relatively consistent in spacing, and it will look fantastic in the end.
Attaching the Metal Ring
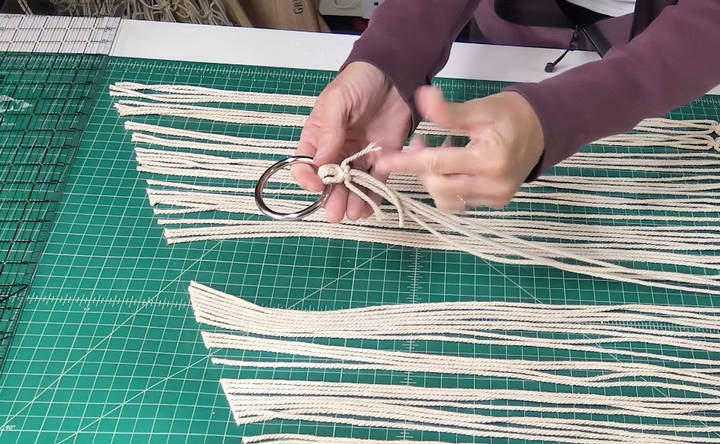
Once the macrame panel was ready, I needed to attach it to the metal ring. This part is crucial as it determines the stability of the entire chair:
- Preparing the Ends: I removed the temporary dowel and organized the cords so that they were ready to be attached to the ring. I measured and cut the cords to taper from 24 inches down to 14 inches.
- Securing with a Square Knot: I looped each set of cords through the metal ring and secured them with a square knot. It was important to leave enough length for a tail to wrap around and secure the knots later.
- Making a Noose for Extra Security: To make sure everything was secure, I took a 10-foot piece of macrame cord, folded it in half, and maked a noose wrap around all the cords. It required some “fussing,” but after pulling everything tight, the structure was very sturdy.
Completing the Top Bar and Assembly
The top bar is what connects the hammock chair to the hooks or chains where it will hang. Here's how I prepared it:
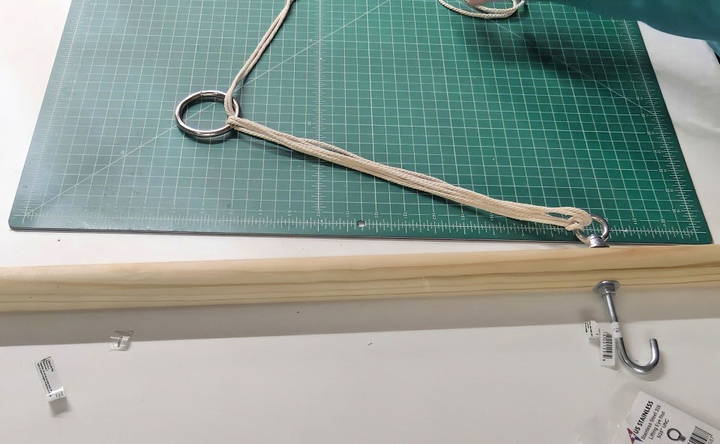
- Preparing the Closet Rod: I used an inch and a half closet rod cut to 38 inches long. With the help of a drill, I made two holes 26 inches apart. These holes are for attaching the J-hooks.
- Attaching J-Hooks: The hooks need to be secure since they bear the weight of the chair. I placed a washer and nut on each side of the hook to ensure they were snug and stable.
- Making the Hanging Ring: I looped additional cord through the eyelets of the J-hooks and formed a ring using square knots. This ring is where the chair will hang from, and it needs to be sturdy. I made sure to double-check all my measurements to maintain symmetry.
Final Assembly and Testing
Now that all the components were ready, it was time for the final assembly and testing.
- Threading the Cords Through the Rod: I looped the long cords over the rod, threading them through the eyelets. It's essential to keep the lengths even and secure to prevent any imbalance when sitting in the chair.
- Adding the Final Touches: With everything in place, I added some final wraps around the ends to hide any loose threads and give the chair a finished look.
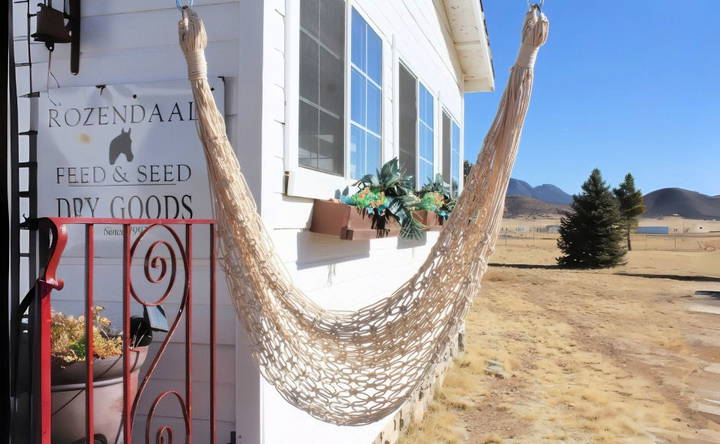
- Testing the Chair: The most exciting part! I hung the chair from a sturdy beam in my patio, carefully sat in it, and to my delight, it held perfectly. The design was comfortable, the knots were secure, and it looked just as beautiful as the store-bought versions!
Lessons Learned and Tips
- Patience is Key: The process can be time-consuming, especially if you're new to macrame. Take your time with each knot to ensure consistency.
- Measure Twice, Cut Once: It's easy to get carried away, but taking the time to measure each length carefully will save you from redoing parts.
- Use a Stand for Convenience: A macrame stand made the process much more manageable, allowing the cords to roll off without tangling.
Customization Ideas
Customizing your DIY hammock chair can make it uniquely yours and add both style and functionality. Here are some easy-to-follow ideas to personalize your hammock chair:
1. Decorative Elements
Find stylish cushions and pillows, tassels and fringe, and paint and dye techniques for unique decorative elements in your home.
Cushions and Pillows
- Comfort and Style: Add cushions or pillows to your hammock chair for extra comfort. Choose fabrics that match your decor or add a pop of color.
- DIY Covers: Make your own cushion covers using durable, weather-resistant fabric. This allows you to change the look easily.
Tassels and Fringe
- Boho Vibe: Attach tassels or fringe to the edges of your hammock chair for a bohemian look. You can use yarn, fabric strips, or even macrame.
- Easy Attachment: Sew or tie the tassels to the hammock chair's edges. Make sure they are securely fastened to avoid any accidents.
Paint and Dye
- Personal Touch: Use fabric paint or dye to add patterns or designs to your hammock chair. Stencils can help make neat and consistent designs.
- Safety First: Ensure the paint or dye is non-toxic and suitable for fabric to avoid any skin irritation.
2. Functional Additions
Discover functional additions like cup holders, pockets, and canopy that enhance convenience and comfort in your everyday use.
Cup Holders
- Convenience: Attach a cup holder to the side of your hammock chair. You can use a fabric pocket or a small mesh bag.
- Easy Access: Make sure the cup holder is within easy reach but securely attached to avoid spills.
Pockets
- Storage: Add pockets to the sides of your hammock chair for storing books, magazines, or other small items.
- Simple Sewing: Sew fabric pockets onto the sides of the chair. Use strong stitches to ensure they can hold the weight of the items.
Canopy
- Shade and Privacy: Make a small canopy to provide shade and a bit of privacy. Use lightweight fabric that can be easily attached and removed.
- Attachment: Secure the canopy to the top of the hammock chair using hooks or ties. Ensure it is stable and won't collapse.
3. Personalization Tips
Uncover top personalization tips including color coordination, monograms, and lighting to make unique and stylish spaces.
Color Coordination
- Theme Matching: Choose colors that match or complement your outdoor or indoor decor. This makes a cohesive look.
- Seasonal Changes: Consider changing the colors or patterns seasonally for a fresh look throughout the year.
Monograms and Names
- Personal Touch: Add monograms or names to your hammock chair using fabric paint or embroidery. This makes it uniquely yours.
- Gift Idea: Personalized hammock chairs make great gifts for friends and family.
Lighting
- Ambiance: Add small LED lights around the edges of your hammock chair for a cozy evening ambiance.
- Safety: Use battery-operated lights to avoid any electrical hazards. Ensure they are securely attached and weather-resistant if used outdoors.
By incorporating these customization ideas, you can make a hammock chair that is not only comfortable and functional but also a true reflection of your personal style.
Troubleshooting Common Issues
When making or using a DIY hammock chair, you might encounter some common issues. Here are practical solutions to help you troubleshoot and resolve these problems effectively.
1. Uneven Hanging
Problem: The hammock chair hangs unevenly, causing discomfort.
Solution:
- Check Attachment Points: Ensure that the attachment points are at the same height and distance from each other.
- Adjust Knots: If using ropes, adjust the knots to balance the chair. Make small adjustments and test until it hangs evenly.
- Use a Level: A level tool can help ensure that the chair is hanging straight.
2. Sagging Fabric
Problem: The fabric of the hammock chair sags too much, making it uncomfortable to sit in.
Solution:
- Tighten the Fabric: Re-tighten the fabric by adjusting the knots or re-sewing the seams.
- Reinforce with Extra Fabric: Add an extra layer of fabric to provide more support and reduce sagging.
3. Fraying Edges
Problem: The edges of the fabric start to fray over time.
Solution:
- Hem the Edges: Sew a hem around the edges to prevent fraying. Use a zigzag stitch for added durability.
- Use Fabric Glue: Apply fabric glue to the edges to seal them and prevent fraying.
4. Unstable Frame
Problem: The frame or support structure feels unstable.
Solution:
- Check Connections: Ensure all connections and joints are secure. Tighten any loose screws or bolts.
- Reinforce the Frame: Add extra support beams or brackets to strengthen the frame.
5. Discomfort
Problem: The hammock chair is uncomfortable to sit in for long periods.
Solution:
- Add Cushions: Place cushions or pillows in the chair for added comfort.
- Adjust the Height: Ensure the chair is hanging at a comfortable height. Your feet should touch the ground lightly when seated.
6. Difficulty Getting In and Out
Problem: It's hard to get in and out of the hammock chair.
Solution:
- Lower the Chair: Adjust the height so that it's easier to sit down and stand up.
- Add a Footrest: A small footrest can help you get in and out more easily.
7. Weather Damage
Problem: The hammock chair shows signs of weather damage, such as fading or mildew.
Solution:
- Use Weather-Resistant Materials: Choose fabrics and materials that are designed to withstand outdoor conditions.
- Regular Maintenance: Clean the chair regularly and store it indoors during bad weather to prolong its life.
8. Weight Capacity Concerns
Problem: Uncertainty about the weight capacity of the hammock chair.
Solution:
- Check Manufacturer Guidelines: Refer to the manufacturer's instructions for weight limits.
- Test Gradually: Gradually increase the weight in the chair to test its capacity. Start with lighter weights and add more gradually.
9. Rope Wear and Tear
Problem: The ropes or cords show signs of wear and tear.
Solution:
- Inspect Regularly: Regularly check the ropes for signs of wear. Replace any damaged ropes immediately.
- Use Durable Ropes: Choose high-quality, durable ropes that are designed for heavy use.
Fixing these issues helps your DIY hammock chair stay safe and comfy. Regular upkeep and adjustments make it last longer.
FAQs About DIY Hammock Chairs
Discover FAQs about DIY hammock chairs - from building tips to materials, we've got answers to help you make your perfect outdoor relaxation spot.
You can hang your DIY hammock chair indoors or outdoors. Popular spots include:
Indoors: From a ceiling beam or a specially installed hook.
Outdoors: From a sturdy tree branch, a pergola, or a porch ceiling. Ensure the support can handle the weight and movement.
The weight capacity of a DIY hammock chair depends on the materials used and the quality of construction. Generally, a well-made hammock chair can hold between 200 to 300 pounds. Always test the chair carefully before use to ensure safety.
To keep your hammock chair in good condition:
Regularly check the ropes and fabric for signs of wear and tear.
Clean the fabric according to the manufacturer's instructions, usually by hand washing or using a gentle cycle in the washing machine.
Store it indoors during harsh weather to prolong its lifespan.
Absolutely! You can customize your DIY hammock chair in various ways:
Fabric choice: Select different colors, patterns, or types of fabric to match your decor.
Rope design: Use different knotting techniques or colored ropes for a unique look.
Accessories: Add cushions, tassels, or even pockets for extra comfort and functionality.
Safety is crucial when using a DIY hammock chair. Here are some tips:
Check the support: Ensure the ceiling beam, tree branch, or any other support can handle the weight.
Inspect regularly: Look for any signs of wear and tear in the fabric, ropes, and hardware.
Proper installation: Follow installation instructions carefully and use appropriate hardware to secure the chair.
Conclusion
Making a hammock chair at home is a rewarding experience that combines creativity with a bit of craftsmanship. By following these steps and using the right materials, you can make a unique piece that not only enhances your space but also gives you the satisfaction of a job well done. If you decide to make one, don't hesitate to share your experience or ask questions!


