Building my own DIY hanging bed was a game-changer for my small apartment. I wanted something unique that could save space and found inspiration online. The process involved measuring, cutting wood, and finding the right ropes that could support the weight. It took some time, but the result was a cozy and stylish bed that freed up so much space.
I learned a lot about tools and materials during this project. Choosing the right type of wood and tools made a big difference. The sense of achievement when I finished was immense. Now, I have a custom bed that not only looks great but also showcases my handiwork. This experience inspired me to tackle more DIY projects around my home.
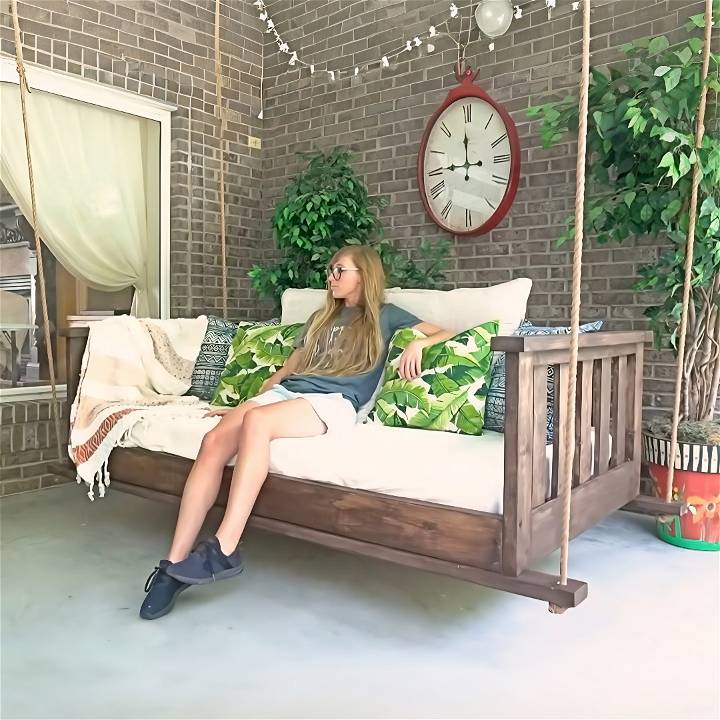
If I managed to build something this cool, I believe it can inspire others to try their hand at making a DIY hanging bed. It's a rewarding project that enhances any living space.
Materials and Tools: The Preparation Stage
Before diving into the sawdust, understanding what you need is crucial:
Materials Needed
- Five 1x4x8 Boards: These serve as the slats for the sides and back, crucial for ensuring comfort and adding a polished look.
- One 1x6x8 Board: This board trims the sides, concealing any screw heads and providing a seamless finish.
- Six 2x4x10 Boards & Two 2x6x8 Boards: The skeleton of our swing, offering strength and structure.
- One Sheet of 3/4" Plywood (optional): For those opting for a foam mattress, this will provide necessary support.
- Exterior Grade Screws: To ensure longevity and resilience against the elements.
Tools Required
- Saw: For cutting the boards to the required lengths.
- Drill: To securely fasten the screws and assemble the frame.
- Measuring Tape: Accuracy is key; measure twice, cut once.
- Pocket Hole Jig (optional): For those who prefer hidden joinery.
With these materials and tools at the ready, you're set to embark on a crafting adventure that marries function with aesthetics.
Step by Step Instructions
Learn how to build your own DIY hanging bed with our step-by-step instructions. Perfect for adding a unique touch to your bedroom.
Step 1: Cutting and Assembling
Begin by cutting your 2x6s and 2x4s to length. This will form the front, back, and sides of your swing bed frame. Using exterior grade screws (I bolstered mine with timber screws for an extra rustic charm), assemble these pieces into a rectangle, ensuring the 2x4s are flush with the bottom edge of the 2x6s.
Step 2: Corner Supports
Attach 2x4s vertically at each corner. These are pivotal for structural integrity and will support the slats and mattress.
Step 3: Horizontal Supports
Secure 2x2s between the vertical 2x4s. These essentially act as ribs, providing additional strength and support to the frame.
Step 4: Slats Installation
Now, it's time for the 1x4 slats. Starting from the center, attach them using exterior screws, working your way out. Remember to keep everything evenly spaced for a uniform appearance.
Step 5: Armrest and Trimming
Use 2x4s along the top edge to build an armrest and to conceal the screw heads. Then, apply your 1x6 boards on the sides for that neatly trimmed look.
Step 6: Support System
If you're using a foam mattress like I did, the added piece of plywood on three evenly spaced 2x4 supports at the bottom is a must. This ensures your mattress doesn't sag and maintains its shape, providing an uninterrupted comfort zone.
Step 7: Ready for Hanging
Finally, drill holes to thread the ropes through, tie them securely, and apply a coat of outdoor stain to protect your creation from the elements.
Installation: The Moment of Truth
Though the actual installation may need some extra hands and a bit more muscle, it essentially involves locating ceiling rafters, installing eye screws, and using rope kits for a sturdy hang. Adjust the ropes as needed for the perfect swing height.
Assembling this porch swing bed was more than just a weekend project; it was a venture into building something that now stands (or hangs, in this case) as a centerpiece of relaxation and cozy gatherings. Whether it's a gentle morning read or a serene evening nap, this swing bed has transformed our outdoor space into a haven of tranquility.
Choosing the Right Location for Your Hanging Bed
When building your own hanging bed, selecting the perfect location is crucial for both safety and comfort. Whether you plan to install it indoors or outdoors, thoughtful consideration ensures a delightful experience. Let's explore the key factors to keep in mind:
1. Assess Your Space
Before you start hammering nails or tying knots, take a step back and evaluate your available space. Consider the following:
- Indoor vs. Outdoor: Decide whether your hanging bed will grace an indoor room or an outdoor area. Each has its unique charm. Indoor hanging beds offer coziness and privacy, while outdoor ones allow you to bask in nature.
- Ceiling Height: Measure the height from the floor to the ceiling. Ensure there's enough clearance for the bed to swing freely without hitting walls or furniture. Aim for at least 8 feet of vertical space.
- Floor Space: Consider the footprint of the bed. Will it fit comfortably without crowding the room? Allow for some extra space around the bed for movement.
2. Sunlight and Shade
The position of your hanging bed relative to sunlight plays a significant role:
- Morning Sun: If you're a morning person, position the bed where it receives gentle morning sunlight. Imagine waking up to warm rays filtering through the curtains.
- Afternoon Shade: For those seeking respite from the midday heat, choose a spot with partial shade. A tree canopy, pergola, or awning can provide relief.
3. Wind Protection
Nobody wants their hanging bed to turn into a wild swing during gusty winds. Here's how to minimize swaying:
- Wind Direction: Observe the prevailing wind direction in your area. Position the bed perpendicular to the wind to reduce swinging.
- Windbreaks: If your hanging bed is outdoors, consider natural windbreaks like tall shrubs, fences, or walls. These build a cozy nook and shield you from strong breezes.
4. Privacy and Views
Balance privacy with scenic views:
- Privacy: If your hanging bed overlooks a neighbor's yard or a busy street, add curtains or bamboo blinds. Privacy matters, especially when you're lounging in your PJs.
- Scenic Views: On the flip side, if you have a picturesque garden, a view of the ocean, or a serene forest, position the bed to maximize these vistas. Let nature be your backdrop.
5. Structural Support
Safety first! Ensure your chosen location can handle the weight of the hanging bed:
- Ceiling Joists: If you're suspending the bed indoors, locate the ceiling joists. These sturdy beams provide the necessary support. Use a stud finder or consult a professional if needed.
- Outdoor Beams or Trees: For outdoor hanging beds, find robust beams, pergola rafters, or sturdy tree branches. Inspect them for stability and load-bearing capacity.
6. Noise and Tranquility
Consider ambient noise:
- Peaceful Spot: Avoid areas near noisy appliances, air conditioning units, or traffic. You want your hanging bed to be a tranquil oasis.
- Birdsong and Breezes: Position it where you can enjoy the rustle of leaves and the chirping of birds. Nature's soundtrack enhances the experience.
Remember, your hanging bed isn't just a piece of furniture—it's a sanctuary for relaxation, daydreaming, and stargazing. Choose wisely, and let your cozy cocoon elevate your well-being!
Decor and Styling Tips for Your Hanging Bed
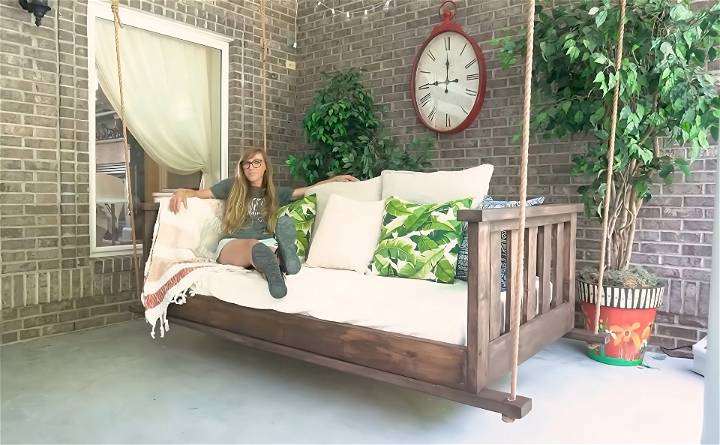
Your hanging bed isn't just a functional piece—it's an opportunity to infuse style and personality into your space. Let's explore some decor and styling ideas to make your cozy nook truly inviting:
1. Cushions and Throws
- Layered Comfort: Pile on soft cushions and throws. Mix and match textures—think knitted blankets, velvet pillows, and linen covers. Choose colors that resonate with your overall room palette.
- Play with Patterns: Don't shy away from patterns! Floral prints, geometric designs, or even bohemian motifs can add visual interest. Just ensure they complement each other.
2. Dreamy Canopies
- Sheer Elegance: Hang a sheer canopy above your bed. It adds an ethereal touch and diffuses light beautifully. White or pastel-colored fabric works wonders.
- Twinkle Lights: String fairy lights through the canopy for a magical effect. Imagine stargazing from your floating bed under a canopy of tiny lights.
3. Natural Elements
- Greenery: Introduce indoor plants near your hanging bed. A trailing pothos or a spider plant adds freshness and a touch of nature.
- Macrame Plant Hangers: Hang small potted plants in macrame hangers from the bed frame. It's a boho-chic vibe that's oh-so Instagram-worthy.
4. Textured Ropes and Drapes
- Rope Accents: Instead of plain ropes, opt for twisted or braided ones. They add texture and visual appeal. Knot them creatively around the bed corners.
- Flowing Drapes: Drape lightweight curtains around the bed. Choose breezy fabrics like cotton or muslin. Let them sway gently in the breeze.
5. Floating Shelves
- Mini Book Nook: Install floating shelves near your hanging bed. Stack your favorite books, a cup of tea, or a scented candle. It's both practical and charming.
- Display Art: Showcase small artworks or framed photos on the shelves. Rotate them occasionally to keep things fresh.
6. Color Harmony
- Monochromatic Magic: Stick to a single color family for a serene look. Blues, whites, or earth tones build a calming atmosphere.
- Accent Pop: Add a pop of color—a vibrant cushion, a colorful rug, or a painted wooden frame. It instantly lifts the space.
Let your creativity flow, and curate a space that reflects your taste and brings you joy. Whether it's a minimalist haven or a bohemian paradise, make it uniquely yours!
FAQs About DIY Hanging Bed
Discover everything you need to know about DIY hanging beds with our FAQs guide. Learn how to build your own unique sleep haven.
1. What Are Hanging Beds, and Why Should I Consider One?
Hanging beds, also known as suspended or rope beds, are a delightful addition to any living space. These unique beds offer comfort, fun, and a touch of whimsy. Here's why you might want to consider one:
- Comfort: Imagine gently swaying in a cozy bed—perfect for relaxation and mid-day naps.
- Space-Saving: Hanging beds free up floor space, making them ideal for smaller rooms.
- Aesthetic Appeal: They add a touch of magic, especially when placed outdoors on porches or in gardens.
3. How Do I Hang a Hanging Bed Safely?
Follow these steps:
- Locate Rafters or Beams: Find sturdy support for hanging.
- Install Lag Screws: Attach them directly to rafters or beams.
- Use Rope or Chain: Hang the bed at the desired height (around 18 inches from the top).
4. Can I Use Existing Furniture for My Hanging Bed?
Certainly! Repurpose an old daybed or even a pallet board. Just ensure it's sturdy and safe.
5. What Weight Can Hanging Beds Support?
Choose robust materials. Heavy-duty ceiling hooks and strong ropes or chains are essential. Always check weight ratings.
6. How Do I Make My Hanging Bed Cozy?
- Add Cushions and Throws: Soften the surface.
- Hang Curtains or Canopies: Build a dreamy atmosphere.
- Choose the Right Mattress: Opt for comfort and support.
Remember, safety comes first! Enjoy your DIY hanging bed adventure.
Conclusion:
Wrapping up this article on building a DIY hanging bed, you now have all the essential steps and tips to make your own cozy and stylish sleep sanctuary. Start your project and enjoy the comfort of your personalized hanging bed.


