Making your own DIY headband holder is a fun and valuable project for anyone wanting to tidy up their accessories. With a simple approach, you can organize your headbands while adding a personalized touch to your space. This guide will walk you through easy steps to craft your very own DIY headband stand using affordable materials. You'll find that making it yourself is not only practical but also a rewarding experience.
In the following sections, you will learn about the materials needed and the step-by-step instructions to complete this project. Making a DIY headband holder is an excellent way to keep your accessories neat and accessible. Plus, it's a fantastic way to express your creativity. Let's get started and explore how you can build your unique headband stand!
Materials Needed and Their Purpose
- Oatmeal Container: Opt for a wide container to comfortably fit the headbands around it. The idea is to recycle, so make sure to give it a good clean before starting.
- Candlestick Holder (Optional): This elevates the holder, giving it an elegant touch. A wide top is preferable for stability.
- E6000 Glue: For securely attaching the candlestick holder to the oatmeal container.
- Scrapbook Paper: Choose a design that complements the room's decor or your personal taste. This will be used to cover the container.
- Mod Podge and Brush: Acts as both glue and a sealer to adhere the scrapbook paper to the container and provide it with a finished look.
- Decorative Knob or a Large Flower (Optional): For the lid, adding a decorative element makes it easier to open and adds aesthetic value.
Step by Step Instructions
Make a stylish DIY headband holder with our easy step-by-step guide. Learn how to prepare the lid, cover the container, and assemble the base.
Preparing the Lid
My journey began with the lid, aiming to personalize it. I opted for a decorative knob resembling a daisy from Hobby Lobby for a whimsical touch. Using scissors, I cautiously poked a hole in the center of the lid, securing the knob through it. If the hardware protrudes too much inside, you might want to trim it, although I left mine as it was, not anticipating filling the container to the brim.
Covering the Container
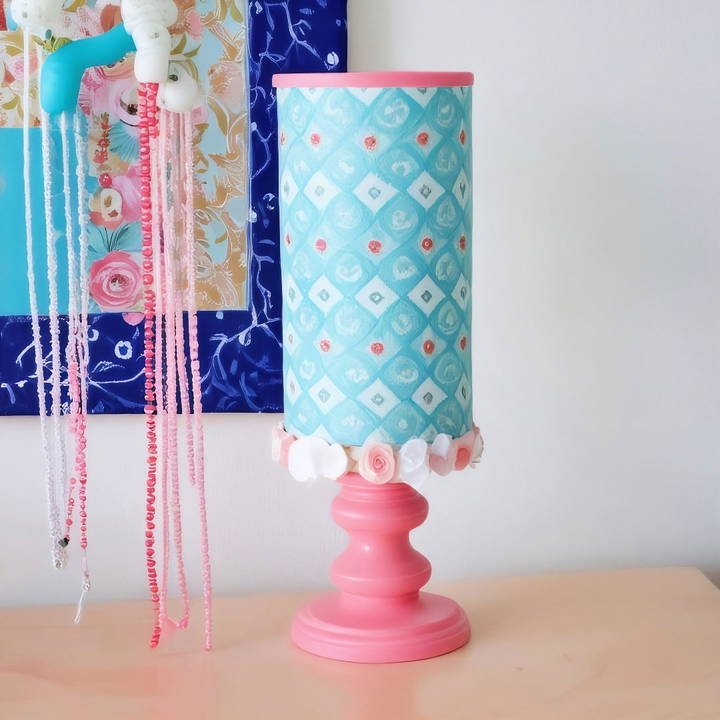
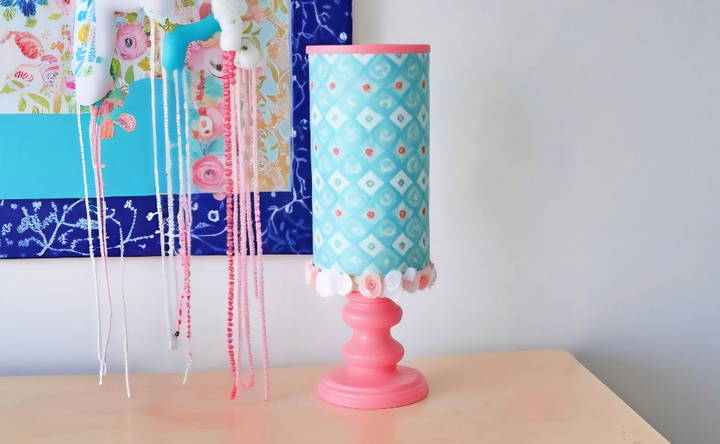
Next was the fun part: giving the oatmeal container a new lease on life. I chose scrapbook paper with a subtle, cheerful pattern. Measuring and cutting the paper to wrap around the container seamlessly was key. The initial piece covered most of the surface, while a second, smaller piece patched the gap. Applying Mod Podge directly onto the paper, I smoothed it around the container, ensuring no air bubbles and an even distribution. Extra attention at the seams with a bit more Mod Podge ensured everything stayed in place. After fully covering the container, I went over with two more Mod Podge layers, securing the pretty pattern and ensuring durability.
Assembling the Base
The candlestick holder, acting as the base, added a touch of elegance. Applying a generous amount of E6000 glue to the top of the candlestick and carefully positioning the oatmeal container atop, I ensured a balanced placement before allowing the glue to set. The anticipation as the glue dried was akin to watching paint dry, but patience is key to a sturdy foundation.
Final Touches and Usage
After allowing sufficient drying time, I affixed the lid with the decorative knob and admired my handiwork. The transformation from a simple oatmeal container to a chic headband holder was complete. The best part? Slipping headbands around the container for a tidy display and storing small hair accessories inside made my daughter's morning routine much smoother.
Maintenance and Care Instructions
Taking care of your DIY headband holder is essential to ensure it remains functional and beautiful for a long time. Here are some simple and straightforward tips to maintain your headband holder:
Regular Cleaning:
- Dust Off: Use a soft cloth or a duster to gently remove any dust from the headband holder.
- Spot Clean: If there are spots or stains, use a damp cloth with a bit of mild soap to clean the affected area. Avoid using harsh chemicals.
Fabric Care:
- If your headband holder is covered with fabric, check the fabric's cleaning instructions. Some fabrics may be machine washable, while others should only be spot cleaned.
Avoid Moisture:
- Keep the headband holder in a dry place to prevent mold or mildew, especially if it's made from natural materials like wood.
Storage Tips:
- Do Not Overload: Avoid hanging too many headbands on one holder to prevent it from losing shape or breaking.
- Even Distribution: When placing headbands on the holder, distribute them evenly to maintain balance and prevent warping.
Check for Wear and Tear:
- Periodically inspect your headband holder for any signs of wear and tear. Tighten any loose parts and repair any damage promptly to prevent further deterioration.
Keep Out of Direct Sunlight:
- Prolonged exposure to direct sunlight can fade the colors of your headband holder. Place it in a location where it's not exposed to harsh sunlight.
Follow these care tips to keep your DIY headband holder in top shape. Regular upkeep ensures longevity and appeal.
Troubleshooting Common Issues
When crafting a DIY headband holder, you might encounter a few hiccups along the way. Here's a helpful guide to troubleshoot common issues, ensuring your project turns out just right:
The Fabric Won't Stay in Place
- Solution: Ensure you're using the right adhesive for the material. Fabric glue works well for most textiles. If you're sewing, check that your stitches are even and secure.
The Holder is Unstable
- Solution: A wobbly holder can be frustrating. Make sure the base is flat and the holder is evenly weighted. Consider adding a heavier base or attaching it to a wall for extra stability.
Headbands Slip Off
- Solution: If headbands aren't staying put, try adding a non-slip material like silicone strips or rubberized paint to the areas where the headbands rest.
The Holder is Too Small
- Solution: If you've underestimated how many headbands you have, you can either make additional holders or expand the existing one by adding extra bars or hooks.
Difficulty Hanging Heavy Headbands
- Solution: For heavier items, reinforce the holder with sturdier materials or distribute the weight across multiple hooks to prevent sagging.
Materials are Hard to Find
- Solution: Can't find the exact materials listed? Get creative! Look for alternatives that can serve the same purpose, like repurposing items from around the house.
The Holder Damages Headbands
- Solution: To protect your headbands, cover any rough edges with tape or soft fabric. Choose materials that are gentle on your accessories.
Anticipate and fix common problems to make your DIY headband holder attractive and usable. Adapt with patience and creativity.
FAQs About DIY Headband Holder
Discover everything you need to know about DIY headband holder projects with our comprehensive FAQs. Tips, materials, and step-by-step guidance are included!
You can personalize your headband holder by choosing fabric that matches your room’s decor or using decorative elements like ribbons, lace, or stickers. If you’re using a cardboard cylinder, you can also paint it or cover it with adhesive fabric tape to give it a unique look.
Absolutely! You don’t need any sewing skills to make a headband holder. Most DIY headband holders can be made using a glue gun or adhesive materials to attach the fabric or decorative elements to the cylinder.
Yes, your DIY headband holder can also be used to organize other hair accessories like hair ties, clips, and bows. Simply wrap or clip them onto the cylinder along with your headbands for easy access and organization.
You can display your headband holder on a dresser, shelf, or hang it on the wall. If you want to add a bit of flair, you can attach decorative butterflies or flowers to the top with wire springs, or use a glass candlestick as a base to elevate the holder and make it a focal point in your room.
To make sure your DIY headband holder lasts a long time, consider using high-quality materials like a sturdy cardboard cylinder or PVC pipe for the base. When covering the cylinder with fabric, make sure to pull it tight and secure it well with glue. If you're using push pins as legs, opt for extra-large ones for stability. Additionally, you can reinforce the inside of the cylinder with another layer of cardboard or fabric to add extra strength.
Conclusion
In conclusion, building a simple DIY headband holder is an enjoyable way to organize your accessories. This project not only keeps your headbands neat and easily accessible, but it also adds a personal touch to your space. Remember, a DIY headband stand can be made with just a few materials. Get started today, and enjoy the satisfaction of making something useful and unique!


