Building a simple horse shelter was a project my friend and I decided to tackle one summer. We wanted to build a safe and comfortable space for our horses without spending too much money. With some basic materials and a lot of teamwork, we started to build a cheap DIY horse shelter. It was amazing to see how much we could accomplish with a clear plan and some determination.
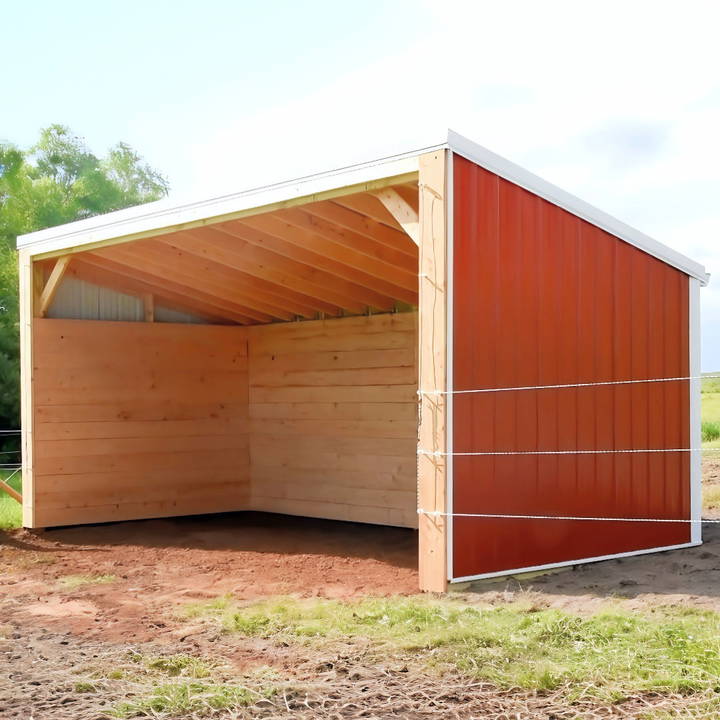
We used wooden pallets, tarps, and metal roofing to construct the shelter. It took us a few weekends to complete, but the results were worth it. Our horses now had a nice, dry place to stay during bad weather. If you're planning to build a simple DIY horse shelter, I can guarantee that these tips will help you get started and save money along the way.
Understanding Your Horse's Needs
When it comes to providing shelter for your horse, it's essential to understand their specific needs, which can vary based on breed, age, health, and the climate they live in. Horses are hardy animals, but they still require protection from extreme weather conditions, whether it's the scorching sun, heavy rain, or biting cold winds.
- Protection from the Elements: A well-designed shelter offers a safe haven from the weather. In hot climates, it provides shade and helps prevent overheating and dehydration. In colder regions, it serves as a barrier against the cold, wind, and precipitation, ensuring your horse stays warm and dry.
- Space to Relax: Horses need space not just for physical comfort but also for their mental well-being. A shelter should be spacious enough for your horse to move around freely, lie down, and stand up without feeling cramped.
- Ventilation: Good airflow is crucial to prevent respiratory issues and to keep the shelter from getting too hot or humid. The design should allow for fresh air to circulate while keeping out drafts.
- Safety: The interior of the shelter should be free of sharp edges or protruding nails that could injure your horse. Materials should be sturdy and non-toxic, as horses might chew on their surroundings.
- Accessibility: Your horse should be able to enter and exit the shelter easily. The entrance should be wide enough to accommodate them comfortably, and the flooring should prevent slipping.
- Adaptability: As your horse ages or as weather patterns change, you might need to make adjustments to the shelter. It should be built in a way that allows for modifications without extensive renovations.
Considering these factors, you can build a shelter that meets your horse's needs and improves their quality of life. A happy horse is healthy, and a good shelter is key to their happiness.
Materials Needed and Their Purpose
- 8-Inch Tubes (for the foundation): To ensure durability and stability.
- Concrete Mix (25 Bags): To secure the tubes and posts in place.
- Rebar and Stainless Steel Plates: To enhance the structural integrity.
- Lumber (2"x4"s, 2"x10"s, 6"x6"s): Various sizes for the frame, rafters, and beams.
- Screws: Suitable for treated lumber to assemble everything together.
- Steel Panels (Pro Rib): For the roof and sides, ensuring durability and matching the aesthetic of existing structures.
- Nibbler Tool: For cutting steel panels precisely.
- Gravel-Sand Mix: For flooring, providing a stable yet manageable surface for the animals.
Step by Step Instructions
Build your own DIY horse shelter with our step-by-step instructions. From groundwork to roofing, build a safe haven for your horses with ease.
Preparation and Groundwork
The first phase involved leveling the ground with a skid steer, which allowed us to build a more manageable workspace and prepare for better drainage with gravel fill upon completion. This step underscored the importance of starting with a level foundation to simplify the later stages of construction.
Setting the Foundation
Digging holes for the tubes turned out to be a Herculean task, thanks to the clay-heavy soil. Opting out of using an auger to maintain tighter hole sizes, we manually dug to the desired depth, which, while tedious, set the stage for a solid foundation. Patience and perseverance were key during this stage.
Erecting the Structure
With the holes ready and the foundation set, the next step was to install the tubes, fill them with concrete, and let them cure. This process laid the groundwork for the posts and beams that would form the skeleton of our shelter. Accuracy in alignment and height at this stage was crucial for the overall stability and level of the structure.
Framing and Roofing
Once the foundation was cured, we mounted the 6"x6" posts, followed by framing the structure with 2"x10"s and 2"x8"s. The process of notching the tops of the posts to secure the beams was straightforward but required precision.
Applying the steel panels onto the roof was a task that brought its own set of challenges. However, using a nibbler tool simplified cutting, and meticulous measurement ensured a tight, leak-proof finish. Here, teamwork became our greatest asset, with friends and family chipping in to help align, measure, and secure the panels in place.
Finishing Touches
The addition of a gravel-sand mix for the interior flooring provided a firm yet forgiving surface for the horses and cattle. We ran a gutter along the back to manage rainwater effectively, preventing water from pooling around or inside the shelter. Lastly, ensuring that the structure was secure and safe from potential damage caused by the animals or weather conditions was paramount.
Customization Ideas
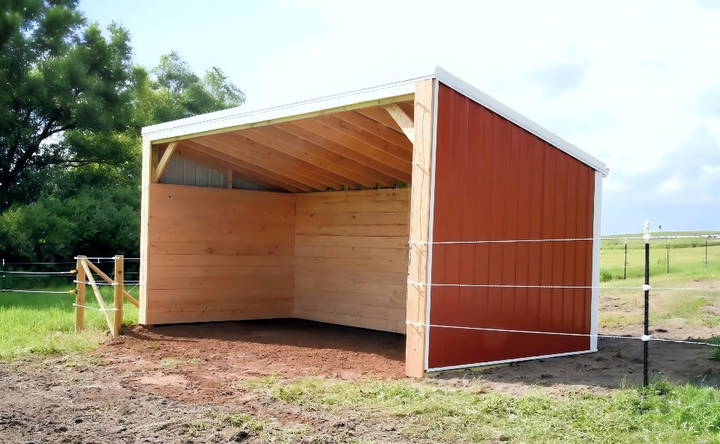
Building a DIY horse shelter is not just about functionality; it's also an opportunity to add a personal touch that reflects your style and meets your horse's unique needs. Here are some customization ideas to make your horse shelter truly one-of-a-kind:
- Color and Aesthetics: Choose colors that blend with the natural surroundings or go bold with shades that stand out. Painting the shelter not only makes it visually appealing but can also help protect the wood from the elements.
- Comfort Features: Consider adding rubber matting for flooring to provide extra comfort and reduce the risk of slipping. Installing a fan or misting system can also help keep your horse cool during hot weather.
- Storage Solutions: Build in storage areas for feed, tack, and grooming supplies. This can be as simple as shelves and hooks or as elaborate as built-in cabinets.
- Feeding Station: Incorporate a feeding area within the shelter with sturdy feeders and water troughs that are easy to clean and refill.
- Weather Adaptations: For areas with harsh weather, consider adding storm shutters or a windbreak wall that can be opened or closed as needed.
- Eco-Friendly Additions: Install solar panels to power any electrical needs or collect rainwater from the roof to use for watering your horse.
- Personalized Decor: Add decorative elements like weathervanes, horse-themed artwork, or even a nameplate with your horse's name.
- Lighting: Good lighting is important for evening chores. Solar-powered lights are an eco-friendly option that provides sufficient illumination without the need for wiring.
- Security: If needed, install a sturdy lock on the shelter door to secure your horse and belongings, especially if the shelter is located in a remote area.
Using these ideas, you can build a safe, comfy shelter for your horse that shows your care and creativity. Balance personal preferences with your horse's needs.
Maintenance and Upkeep
Regular maintenance is key to ensuring your horse shelter remains a safe and comfortable environment for your horse. Here's a straightforward guide to keeping your shelter in top condition:
- Routine Checks: Make it a habit to inspect the shelter regularly. Look for signs of wear and tear, such as loose boards or a leaky roof, and address them promptly.
- Cleaning Schedule: Keep the shelter clean to prevent the buildup of manure and waste, which can attract pests and lead to health problems. A clean shelter also reduces the risk of fungal and bacterial growth.
- Pest Control: Implement measures to keep pests at bay. This might include sealing gaps where rodents can enter or using safe repellents to deter insects.
- Weatherproofing: Before extreme weather seasons, check that the shelter is properly weatherproofed. This includes ensuring the roof is watertight, and the walls are insulated against cold drafts or excessive heat.
- Flooring Maintenance: If you have installed rubber matting, make sure it's secure and in good condition. For dirt floors, level out any holes or uneven spots to prevent tripping.
- Ventilation System: Ensure that any vents or windows are clear of obstructions to maintain good air quality inside the shelter.
- Door and Latch Inspection: Check that doors open and close smoothly and that latches are functioning correctly to keep your horse safely enclosed when needed.
- Roof and Gutter Care: Clear gutters and downspouts of debris to prevent water damage. Inspect the roof for any damage or loose materials.
- Paint and Sealant Touch-Ups: Apply a fresh coat of paint or sealant as needed to protect the wood and keep the shelter looking its best.
- Record Keeping: Keep a log of all maintenance activities. This will help you track when certain tasks were last performed and plan for future upkeep.
Follow these steps to prolong your horse shelter's life, ensuring a healthy space.
FAQs About DIY Horse Shelter
Find answers to common questions about DIY horse shelters. Learn about materials, design tips, and best practices for building your own shelter.
Select a site that has good drainage to prevent flooding, is accessible, and provides protection from prevailing winds. The shelter should be on higher ground, close to water and paddocks for convenience, and positioned to allow for proper ventilation.
You’ll need basic construction tools such as a hammer, saw, drill, level, and measuring tape. A ladder and a post-hole digger can also be very helpful during the building process.
The size of the shelter depends on the number of horses. A minimum size for one horse is typically 10’ x 12’ or 144 square feet. However, some owners prefer at least 12’ x 12’ or 192 square feet to ensure their horse is comfortable.
Yes, it's possible to build a horse shelter by yourself, especially if you choose a simple design. However, having a second person can make the process easier and safer. Ensure you follow detailed plans and take necessary safety precautions.
To ensure safety, avoid sharp edges or protrusions in the design. Use sturdy materials to withstand weather and chewing. For comfort, provide ample space for movement, bedding for warmth, and consider insulation for temperature control. Regular maintenance checks are crucial for ongoing safety and comfort.
Reflection and Advice
This project was a rewarding experience, giving us a new sense of accomplishment. Our horses were happier, and we felt proud. So if you're ready to build your own cheap DIY horse shelter, remember that it's totally doable with some effort and a bit of creativity. Happy building!


