Building a DIY hose reel for your garden can be fun and useful. One day, my garden hose was always tangled, which made watering plants a hassle. I decided to build my own garden hose reel to keep things tidy. It seemed hard at first, but following a simple guide changed everything. My garden looks neat, and I save time every day.
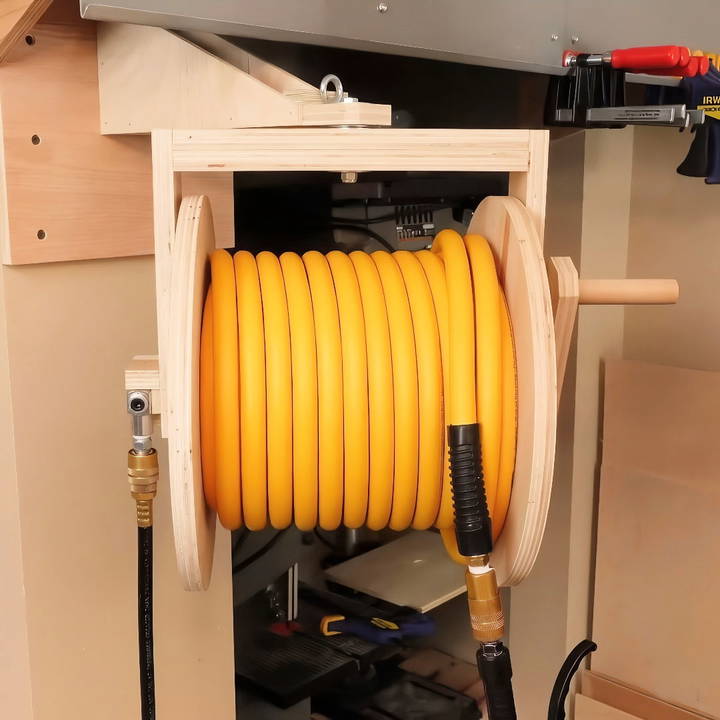
If you're tired of a messy house, a DIY garden hose reel might be the solution. With easy steps and a few materials, you can organize your garden hose. I used some wood, screws, and a crank handle. Building it was rewarding, and now my garden work is smooth and less tiring. I hope this inspires you to make your own.
Take a small step to improve your garden with a DIY hose reel. You'll find yourself with more time to enjoy your plants and stay organized.
Materials You'll Need
Before we start, here's a list of the materials you'll need and why each piece is essential:
- Plywood: This is the core material for the reel and support structure.
- 1/8-inch Drill Bit: Necessary for initial holes.
- Forstner Bits (5/8-inch and 3/4-inch): For drilling larger holes with precision.
- 3/4-inch Dowel: Used for the spokes and axle.
- Wood Glue: To ensure joints are secure.
- Trim Screws: Adds extra strength and stability.
- Metal Washers: Helps in making smooth rotations.
- Swivel Fitting: Allows the reel to swivel 360 degrees.
- Quick Connect Fittings (Male to Male and Female to Female): For connecting hoses.
- One-quarter by 2.5-inch long bolt: To connect the reel to the wall mount.
- Eye Bolt: For optional locking mechanism.
- Wood Screws & Nails: Used for general assembly.
- Two-way Tape: This is for temporarily sticking plywood pieces together.
Let's get started with our step-by-step guide.
Step by Step Instructions
Build your own DIY hose reel with our step-by-step guide! From cutting plywood to final mounting, follow these instructions for an efficient garden tool.
Step 1: Cut the Rounded Plywood Pieces
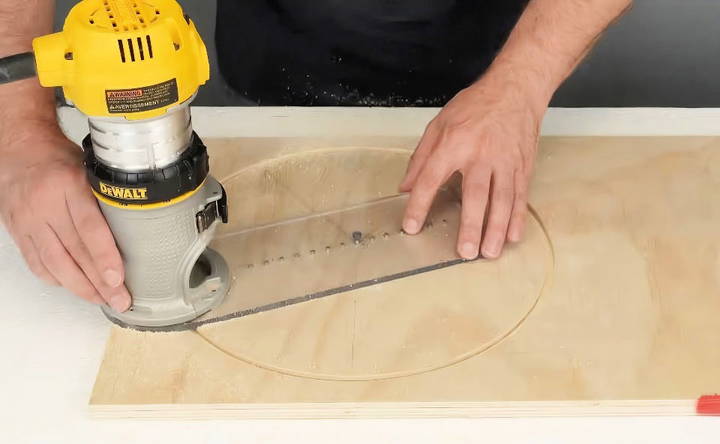
I began by drawing five spokes on my plywood with equal 72-degree spacing. This helps mark the location of the five holes for the spokes, which we'll drill later. Using a 1/8-inch diameter drill bit, I made a hole to insert a Dremel bit to build a circle. I ended up with two circles that were 12 inches in diameter.
Why twelve inches?
Twelve inches provide a good balance between size and practicality, allowing it to handle a decent length of hose without being overly bulky.
Step 2: Drill the Holes for the Spokes
To make sure both circles align perfectly, I only marked one. I stuck them together using two-way tape. Using a 3/4-inch Forstner bit, I drilled five holes through both pieces.
Center Holes
For the center, I enlarged one to 5/8 inch and the other to 3/4 inch. Forstner bits allowed for precise cutting, though you could use other bits if needed.
Step 3: Cut the Dowels
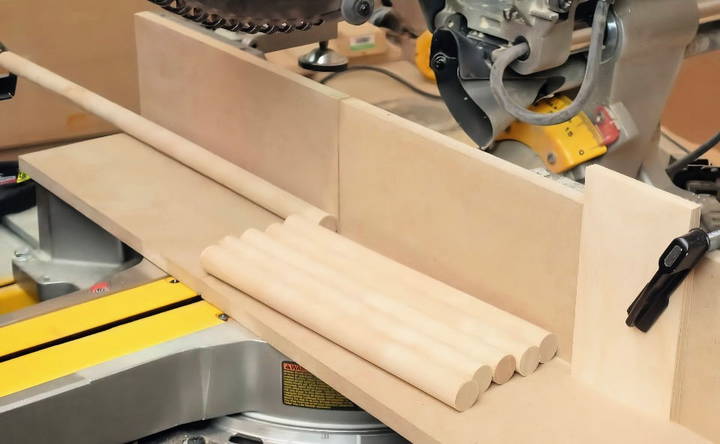
Next, I cut a 3/4-inch dowel into five 9 and 3/4-inch pieces. These will act as the spokes for our reel. I also cut smaller dowels for the axle and handle.
Step 4: Assemble the Reel
To assemble, I applied wood glue to each end of the dowels and inserted them into the holes one by one. I repeated this on the other side to complete the reel.
Step 5: Assemble the Support Structure
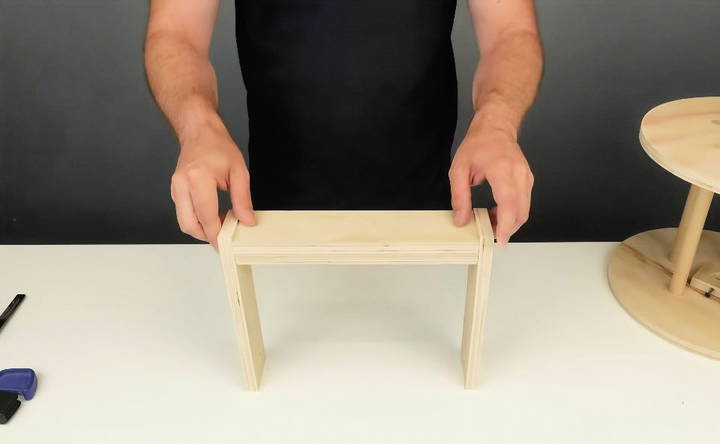
For the support, I used a two-layer thick plywood for the top and single pieces for each side. I glued the top pieces together and drilled one-quarter-inch holes where the reel would mount.
Drilling the Swivel Hole
I drilled a one-quarter hole in the middle of the top plank for the swivel axle. Next, I assembled the support pieces using wood glue and trim screws, ensuring the structure could support a 100-foot hose.
Step 6: Install the Swivel Fitting and Dowel
I glued and screwed small plywood pieces to lock the swivel fitting in place, ensuring it wouldn't move around.
Swivel Direction
Initially, the swivel pointed up. I later changed it to downwards because a downward-pointing hose won't interfere with the wall support.
Step 7: Attach the Reel to the Support
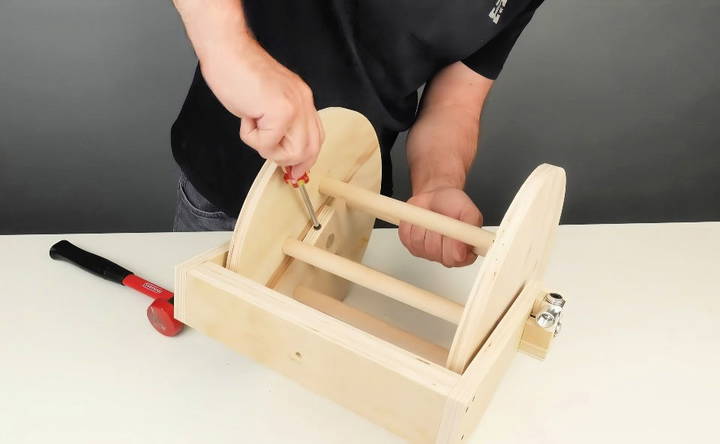
I mounted the reel on the fitting side and inserted the dowel on the other, securing it with a screw and some wood glue.
Metal Washers
I placed metal washers between the reel and the support and between the support and the handle to ensure smooth rotation.
Step 8: Build the Wall Mount Bracket
To make the wall bracket, I drilled a one-quarter-inch hole in a piece of plywood. The bracket included two triangular pieces for extra support.
Bracket Assembly
Using wood glue, screws, and nails, I assembled the bracket. I connected it to the reel's support using a one-quarter by 2.5-inch long bolt.
Step 9: Optional Locking System
I drilled five holes between the wall bracket and the top of the reel support to add an eye bolt for locking the reel's position. However, I found that removing the washers for tightening the bolt could be just as effective.
Locking System Issue
While the locking system worked, I wasn't entirely satisfied with it and decided that tightening the bolt without washers might suffice.
Step 10: Final Adjustment
I repositioned the 90-degree elbow fitting to point downwards, ensuring the hose wouldn't snag on the wall support.
Step 11: Mount and Test
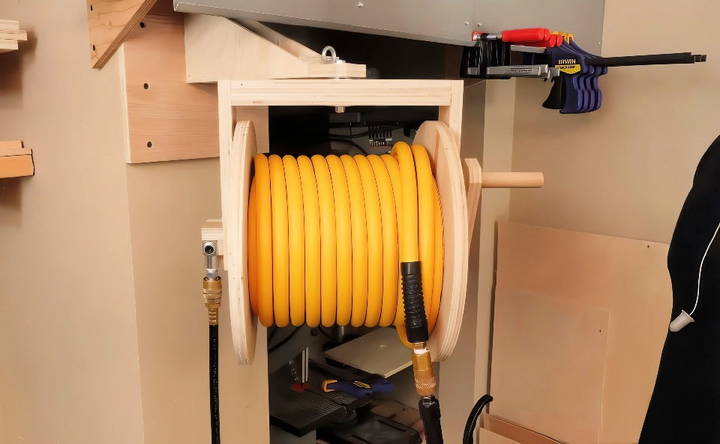
Securing the reel to the wall required using a plywood piece screwed into wall studs, making it strong enough to support the reel and hose. Once mounted, I installed the air hose, connected it to the compressor, and fed the main hose into the reel.
Customization Tips for Your DIY Hose Reel
Building a DIY hose reel gives you the freedom to tailor it to your specific needs and preferences. Here are some tips to help you customize your hose reel for maximum efficiency and personalization:
- Choose the Right Size: Measure the space where you plan to place your hose reel. Consider the length and diameter of your hose to ensure the reel will accommodate it comfortably. A reel that's too small can cause kinks and damage to the hose.
- Select a Design That Suits Your Garden: Whether you prefer a rustic, modern, or minimalist design, pick a style that complements your garden. You can paint the reel to match your outdoor decor or leave it natural for a more organic look.
- Incorporate Convenient Features: Think about adding a swivel feature to make it easier to pull the hose in any direction. You can also add a locking mechanism to keep the hose in place when not in use.
- Use Quality Materials: Opt for materials that are durable and weather-resistant. Hardwoods, metals, or high-quality plastics will ensure your hose reel stands up to the elements and lasts for years.
- Make It Portable: If you need to use your hose in different locations, consider adding wheels and a handle to your hose reel. This way, you can easily move it around your yard without any hassle.
- Add Storage: Include a small compartment or hooks to store gardening gloves, nozzles, or other tools. Keeping everything in one place makes your gardening tasks more convenient.
- Ensure Easy Rewinding: Install a smooth mechanism for winding the hose back onto the reel. This could be a hand crank or even a motorized winder for larger hoses.
- Safety First: If you're using wood, sand down any rough edges to prevent splinters. Ensure all screws and bolts are tightened securely to avoid any accidents.
By following these tips, you'll build a hose reel that's not only functional but also a perfect fit for your gardening needs. The key to a successful DIY project is planning and personalization.
Advanced Features for Your DIY Hose Reel
Enhancing your DIY hose reel with advanced features can significantly improve its functionality and ease of use. Here are some ideas to consider:
- Automatic Rewind System: Install a spring-loaded or motorized rewind system to make coiling the hose effortless. This feature is particularly useful for larger gardens where manual winding can be cumbersome.
- Water Flow Control: Integrate a flow control mechanism into your hose reel design. This allows you to adjust the water pressure and flow without going back to the faucet, saving time and water.
- Swivel Base: A swivel base allows the hose reel to rotate freely, providing greater flexibility and reach. This is especially helpful when watering different areas of your garden.
- Hose Guide: Add a hose guide to your reel to prevent the hose from tangling and ensure it winds evenly. This can be a simple, fixed guide or an adjustable one for different hose sizes.
- Locking Mechanism: Incorporate a locking mechanism to secure the hose at a desired length. This feature prevents the hose from unwinding more than necessary and keeps your workspace tidy.
- Thermal Protection: If you live in an area with extreme temperatures, consider materials that offer thermal protection to prevent the hose from cracking in the cold or degrading in the heat.
- Tool Organizer: Attach a small caddy or hooks to your hose reel to store gardening tools, gloves, and nozzles. Keeping everything in one place makes your gardening tasks more organized and efficient.
- Decorative Elements: Personalize your hose reel with decorative elements that match your garden's theme. This could be anything from a simple paint job to intricate wood carvings or metalwork.
By adding these advanced features to your DIY hose reel, you'll build a highly functional and personalized tool that will make gardening more enjoyable and efficient.
FAQs About DIY Hose Reel
Explore our FAQs about DIY hose reels to get all your questions answered and master the art of building your own efficient hose reel.
You can customize your hose reel by selecting the size, shape, and materials that fit your specific needs and garden layout. Consider the length of your hose and the space where you’ll place the reel. You can also add features like swivels or mounts to enhance functionality.
Yes, there are many easy-to-follow plans available that cater to different skill levels. Some plans require basic tools like drills and saws, while others might call for more advanced equipment. Choose a plan that matches your comfort with tools and woodworking.
Absolutely! Many DIY hose reel projects can be completed with basic tools. While some plans suggest tools like table saws or routers, you can often substitute these with simpler tools or adjust the design to avoid using them altogether.
Building your own hose reel allows for customization, ensuring it meets your exact requirements. It can also be more cost-effective than purchasing a pre-made reel. Additionally, it gives you the satisfaction of making something functional and tailored for your home.
To ensure your DIY hose reel lasts a long time, regular maintenance is key. This includes checking for any loose screws or bolts and tightening them as needed. It's also important to inspect the hose for any leaks or damage and repair or replace it if necessary. Keep the reel clean from dirt and debris, and consider applying a protective finish or paint to the wood to guard against weathering.
Final Thoughts
Wrapping up, making a DIY hose reel for your garden is a practical and enjoyable project. With this guide, you now have the steps needed to build your very own DIY hose reel.


