One winter, I decided my hot tub needed better protection. My old cover was falling apart and letting in cold air. Fixing it seemed daunting, but I realized I could build my own DIY hot tub cover. I spent some time researching and gathering materials. As I started, I felt proud to take control and make something useful with my own hands.
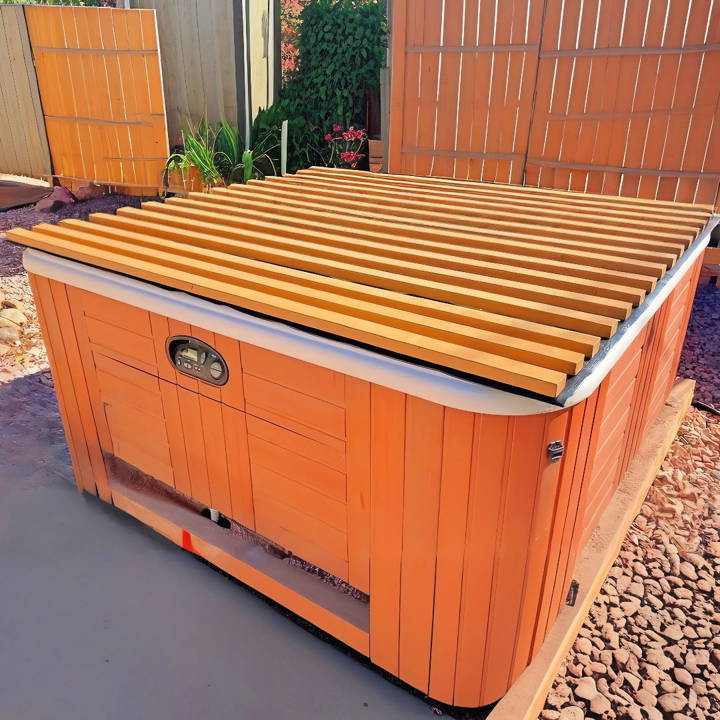
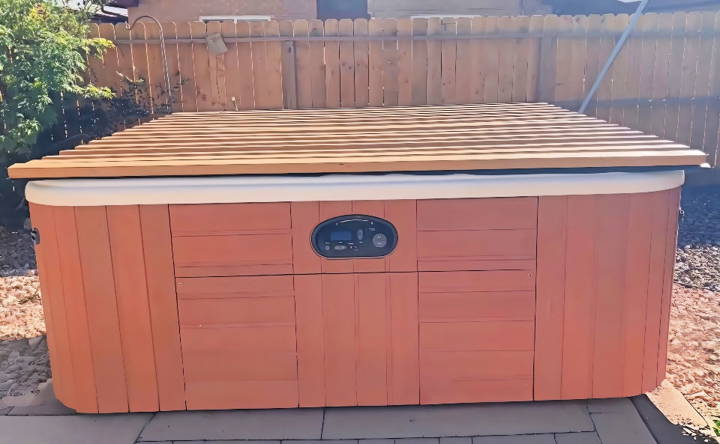
Making this cover wasn't just about saving money; it was about learning new skills. I measured the hot tub, cut insulated foam, and found waterproof material to sew. Seeing the finished cover, I was thrilled with my work.
If you're thinking of making one, I hope my experience inspires you to start. The steps below will help you, and I'm excited to share what I've learned.
Materials and Tools Needed
- 2 Anti-fatigue rubber mats (4' x 8'): These mats will serve as the primary insulating layer. Their closed-cell structure is crucial for heat retention and water resistance.
- Untreated Cedar boards (2x3): Cedar is durable and naturally resistant to moisture, making it ideal for outdoor use. The boards will form the core structure of the cover.
- Stain and sealant: Protects the cedar from the elements, ensuring longevity.
- Gorilla Tape: Much stronger than regular duct tape; it's vital for holding the mats together securely.
- Stainless steel screws and washers: To affix the cedar boards to the rubber mats. Choosing stainless steel prevents rust.
- Tools: Measuring tape, saw (if cutting is needed), drill, and screwdriver.
Step by Step Instructions
Discover step-by-step DIY hot tub cover instructions: Prep boards, secure mats, and install for a perfect fit. Simple, efficient, and budget-friendly.
1. Preparing Your Boards
I began by applying a coat of stain and sealant to the cedar boards. Ensuring all sides were covered was crucial for weatherproofing. Depending on your climate, you might choose a different sealant or additional protective layers.
2. Laying Out the Mats
Place the two anti-fatigue mats side by side on a flat surface to make an 8' x 8' square. It's essential to let them sit in the sun for a bit to flatten out.
3. Securing Mats Together
Using Gorilla Tape, secure the seam where the two mats meet. Tape on both sides for added strength. The goal is to make the seam as inconspicuous and as robust as possible.
4. Arranging Cedar Boards
Lay out your cedar boards across the mat, about 6 inches apart. Ensure their arrangement is perpendicular to the seam of the mats to prevent rolling issues later on.
5. Affixing Boards
Using the drill, screw the boards to the rubber mat with stainless steel screws and washers. The washers prevent the screws from tearing through the rubber.
6. Additional Support
Once the first set of boards are screwed in place, I recommend adding another row of screws between each of the initial screw lines for extra stability, especially to prepare for heavy snow or rainfall.
7. Rolling Test
Before moving the cover to the hot tub, perform a few rolling and unrolling tests. The cover should roll smoothly without significant effort. Fine-tune the tightness of the screws if necessary.
8. Installation
Carefully drag the cover to your hot tub and place it on top. If needed, trim any excess material for a perfect fit. At this point, you can customize the cover by adding handles or straps for easier handling.
Additional Tips
- Weatherproofing: Consider adding an additional layer of waterproof or UV-resistant coating depending on your local climate.
- Support System: To prevent sagging, consider building a simple frame or stand where the cover can rest when the hot tub is in use.
- Maintenance: Regularly check the cover for wear and tear, especially before the onset of harsh weather conditions.
Energy Efficiency of DIY Hot Tub Covers
Making your own hot tub cover can significantly increase the energy efficiency of your hot tub, leading to cost savings and environmental benefits. Here's how:
Insulation is Key
The primary function of a hot tub cover is to provide insulation and prevent heat loss. A well-insulated cover keeps the water warm, which means your hot tub heater doesn't have to work as hard or as often to maintain the desired temperature. This directly translates to lower energy usage and reduced electricity bills.
The Right Materials
For effective insulation, the choice of materials is crucial. Closed-cell foam is used for its excellent thermal resistance. The foam should be at least 4 inches thick to make a barrier against heat loss. Additionally, a vapor barrier around the foam prevents moisture absorption, which can degrade insulation over time.
Seal the Edges
Heat can escape from the smallest gaps, so ensure your DIY cover fits snugly around the edges of the hot tub. A tight seal keeps the heat in and the cold out, further enhancing energy efficiency.
Reflective Surfaces
Consider lining the underside of your cover with a reflective material. This will reflect heat back into the water rather than allowing it to escape, adding another layer of insulation.
Regular Maintenance
Inspect your cover regularly for signs of wear and tear. A damaged cover can't insulate effectively. Repair or replace parts as necessary to maintain optimal performance.
The Impact
By following these guidelines, you can make a hot tub cover that not only saves energy but also extends the life of your hot tub. An efficient cover reduces the need for repairs and replacements, making it a smart, cost-effective choice for any hot tub owner.
Every bit of energy saved counts towards a greener, more sustainable future. Your DIY hot tub cover is a small but significant step in the right direction.
Troubleshooting Common Issues with DIY Hot Tub Covers
When you take on a DIY project like making a hot tub cover, you might run into a few hiccups along the way. Here's a straightforward guide to solving some common problems:
The Cover is Too Heavy
If your cover is difficult to lift, it might be waterlogged. This usually happens when the vapor barrier is compromised. To fix this, replace the vapor barrier and reseal any edges to prevent moisture from getting in.
Heat Escaping from the Sides
A cover that doesn't fit properly can let heat escape. Make sure your measurements are accurate. If there are gaps, you can add weather stripping around the edges for a tighter seal.
The Cover is Sagging
Sagging can occur over time, especially if the cover is not supported correctly. Use a strong, rigid foam that can withstand the weight of snow or rain. Also, consider adding a center support that distributes weight evenly.
Difficulty in Handling the Cover
If the cover is awkward to handle, install handles or straps to make it easier to move. Ensure they are securely attached to the cover to avoid tearing.
The Cover is Fading or Cracking
Exposure to sunlight can cause the material to degrade. Use a UV-resistant material for the outer layer of your cover, and consider a cover cap for extra protection.
Mold and Mildew Growth
Moist environments can lead to mold. Clean your cover regularly with a mildew-resistant cleaner and keep it dry when not in use.
By addressing these common issues, you can ensure your DIY hot tub cover remains functional and efficient for years to come.
Safety Tips for DIY Hot Tub Covers
When making a DIY hot tub cover, safety is paramount. Here are some essential tips to ensure your project is not only successful but also safe:
Work in a Well-Ventilated Area
The materials used for hot tub covers, especially foam and adhesives, can release fumes. Always work in a well-ventilated space to avoid inhaling any potentially harmful vapors.
Wear Protective Gear
Use gloves to protect your hands from sharp tools and materials. Safety goggles are also a must to prevent any debris from injuring your eyes during cutting or drilling.
Be Mindful of Electrical Safety
If you're using any electrical tools, make sure they are properly insulated and you're using them away from water to prevent electric shock.
Handle Materials with Care
Some materials can be heavy or awkward to handle. Lift with your legs, not your back, to avoid injury, and ask for assistance if needed.
Secure Your Workspace
Keep your workspace tidy and free of clutter. This reduces the risk of tripping or knocking over tools and materials.
Follow Instructions Carefully
Whether you're using a kit or following an online guide, take the time to read through all instructions first. Understanding the process can prevent mistakes that might lead to accidents.
Regular Checks and Balances
After completing your cover, regularly check it for any wear and tear that could pose a safety risk, such as sharp edges or exposed insulation.
By adhering to these safety tips, you can enjoy the process of making your hot tub cover without putting yourself or others at risk.
FAQs About DIY Hot Tub Cover
Discover the top faqs about DIY hot tub covers, including materials, measurements, and maintenance tips for making your own cover.
Measure both the inside and outside dimensions of your spa shell. Your cover should be large enough to sit on the rim of the spa without falling in. If you prefer a tighter seal, you can cut the foam to fit inside the spa while the plywood extends over the spa edge.
While a tarp can cover your hot tub, it’s not the best solution. Tarps are not designed for insulation and can lead to heat loss. A well-made DIY cover with proper insulation materials will be more energy-efficient and provide better protection for your hot tub.
The recommended thickness for a hot tub cover is at least 2 inches. This thickness provides adequate insulation to maintain the water temperature and prevent heat loss. Thicker covers may offer better insulation but can be heavier and more difficult to handle.
The lifespan of a DIY hot tub cover depends on the materials used and how well it’s maintained. Generally, a well-constructed cover using quality materials like marine-grade vinyl or heavy-duty plastic can last several years. Regular cleaning and proper storage when not in use can extend its life.
Safety is paramount when it comes to hot tub covers. To ensure your DIY cover is safe:
Use locks or latches to secure the cover when not in use. This prevents unauthorized access, especially by children.
Install safety straps with buckles that can be locked with a key or combination lock.
Ensure proper fit; a cover that fits well is less likely to be dislodged by wind or other elements.
Check for wear and tear regularly. Replace any worn-out parts immediately to maintain the cover's integrity.
Conclusion
In conclusion, making your own DIY hot tub cover is a rewarding and practical project. Not only does it help protect your investment, but it also adds a personal touch to your outdoor space. Following these straightforward steps ensures you have a durable and customized cover that meets your needs. Enjoy the benefits of a self-made solution and keep your hot tub in great condition year-round.


