Starting with a simple idea, I wanted to tackle my patchy lawn without spending a lot of money on professional services. I had heard about DIY hydroseeding, a method where you mix seed, mulch, and fertilizer with water and spray it over your lawn. It seemed like a cost-effective and satisfying project to bring my lawn back to life.
I gathered all the materials, making my own mix with seeds that suited my area's climate and soil. It was a bit of trial and error at first, learning the right consistency and the most effective spraying technique. Yet, the process was surprisingly straightforward. Over time, I watched as the bare spots on my lawn filled in with fresh, green grass. It was a rewarding experience that taught me a lot about lawn care and patience.

I'm here to help with sharing my journey and tips on making a DIY hydroseeder. These insights will help you get started on reviving your lawn in an affordable and fulfilling way.
Understanding Hydroseeding
Hydroseeding, also known as hydraulic mulch seeding or hydro-mulching, is a unique planting process that uses a slurry of seed and mulch. It's often used as an erosion control technique on construction sites, as well as a substitute for the traditional process of broadcasting or sowing dry seed.
The Hydroseeding Process
The hydroseeding process begins with the preparation of a mixture, often referred to as a slurry. This slurry typically contains water, grass seed, mulch, and sometimes fertilizer and green dye. The slurry is then sprayed onto the ground using a hose. The green dye in the mixture helps the applicator see where they have sprayed, ensuring even coverage.
Benefits of Hydroseeding
Hydroseeding has several benefits over traditional seeding methods:
- Efficiency: Hydroseeding allows for large areas to be seeded in a short amount of time. It can be up to 13 times faster than hand seeding!
- Erosion Control: The mulch in the slurry helps to make an immediate bond with the soil, providing a water-absorbing layer that protects the seeds and helps prevent erosion.
- Cost-Effective: While the upfront cost of hydroseeding can be more than hand seeding, the quicker germination, higher success rate, and lower labor costs can make it more cost-effective in the long run.
Why Hydroseeding?
Hydroseeding is a great option for anyone looking to establish a new lawn or rehabilitate an existing one. It's particularly useful for larger areas where traditional seeding methods would be too time-consuming or costly. Plus, because the slurry helps protect the seeds from the sun and wind, it can lead to a higher germination rate and a more successful lawn.
A successful hydroseeding project starts with a good understanding of the process and its benefits. With this knowledge in hand, you're well on your way to a lush, green lawn.
How to Make Hydroseeder - Step by Step
Learn how to make a hydroseeder with our step-by-step guide. Make your own hydroseeding machine and grow lush, healthy grass effortlessly.
Step by Step Instructions
Learn how to build a DIY hydroseeder for your landscaping projects with our step-by-step guide below:
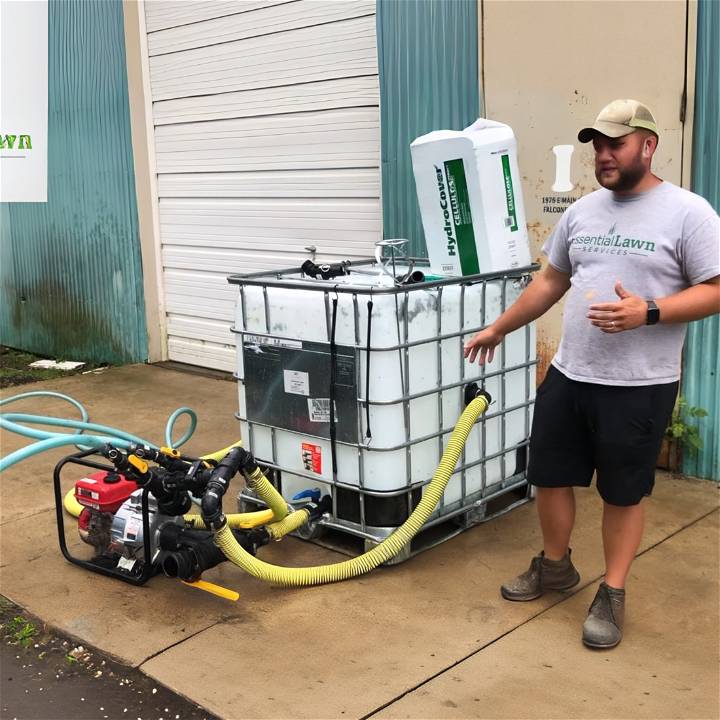
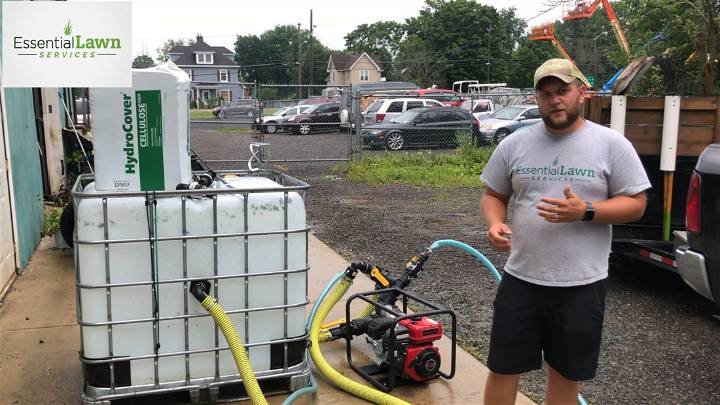
Step 1: Gather Your Materials
- 275-gallon tank: Search on platforms like Facebook Marketplace. Generally found at a reasonable price.
- Trash pump: A 300 trash pump from Harbor Freight works well.
- Fittings: Look for banjo fittings, cam lever couplings, and ball valves. These are available at local stores or online on Amazon.
- Hoses: You'll need a spray hose (preferably clear for easy monitoring), a supply line, jet lines, and a filling hose.
- Hydroseeding tip: This is essential for effective spraying. Links are often provided in tutorial videos or descriptions.
Step 2: Assembling the Tank and Pump
- Connect your trash pump to the tank, ensuring there's a clear path for water to flow through the pump and back into the tank.
- Install the fittings and hoses, making sure that all connections are secure. It's crucial that you have a system in place for both filling the tank and spraying the hydroseed mixture.
- Implement jets inside the tank to help mix the hydroseed solution. These should be connected so they can add circulation within the tank when you activate them.
Step 3: Preparing the Mixture
- Choose the right mix: Depending on your setup, the hydroseeding mixture may vary. It's recommended to use an easy jet mix if you have a jet-propelled system, for smoother operation and less clogging.
- Mixing: You'll typically fill about a third of your tank with water, then add your hydroseed mix, and repeat until the tank is appropriately filled. Proper mixing is crucial for an even spray application.
Step 4: Loading and Spraying
- Load your seed separately if you prefer precise control over seed distribution. Alternatively, you can mix the seed directly into the tank.
- Test your setup: Before heading to a job, test your system to ensure everything works smoothly and you're familiar with the controls.
- Spraying: Use the spray hose to apply the hydroseed mixture to the prepared area seamlessly. Adjust the pressure via the jet control valve to suit the needs of each application.
Maintenance and Tips
- Regular maintenance on the pump and cleaning of the hoses are necessary to keep your DIY hydroseeder in top condition.
- Experiment with additives in your mixture, like starter fertilizers or bonding agents, to improve seed germination and soil stabilization according to your project needs.
Video Tutorial
For a step-by-step video tutorial on building a DIY hydroseeder, watch this helpful video on YouTube.
It pairs well with this written guide, offering a dynamic visual complement that demystifies the building process.
This guide will help you build and use a DIY hydroseeder to seed large areas quickly and efficiently.
Hydroseeding vs. Traditional Seeding and Sod
When it comes to establishing a new lawn, there are several methods you can choose from. Each has its own advantages and disadvantages. Let's compare hydroseeding with traditional seeding and laying sod.
Traditional Seeding
Traditional seeding involves spreading grass seed manually or with a mechanical spreader, then watering it regularly until it germinates.
Advantages:
- Cost: Traditional seeding is generally the least expensive method.
- Variety: You have a wide range of grass types to choose from.
Disadvantages:
- Time: It takes longer for the lawn to be established.
- Maintenance: More watering and care are required to ensure the seeds germinate.
Laying Sod
Laying sod involves placing sections of grown grass, complete with roots, onto prepared soil.
Advantages:
- Speed: Sod gives you an instant lawn.
- Establishment: As the grass is already grown, it's less likely to be washed away by rain.
Disadvantages:
- Cost: Sod is more expensive than seeding.
- Variety: There are fewer grass types available.
Hydroseeding
As we've discussed, hydroseeding involves spraying a slurry of seed, mulch, and water onto the soil.
Advantages:
- Efficiency: Hydroseeding is faster and requires less labor than traditional seeding or sod.
- Erosion Control: The mulch in the slurry helps prevent erosion.
- Cost-Effective: Hydroseeding is generally more cost-effective than sod in the long run.
Disadvantages:
- Time: While faster than seeding, it's not as instant as sod.
- Maintenance: Like traditional seeding, it requires watering to ensure germination.
By understanding the pros and cons of each method, you can make an informed decision about which is best for your lawn. Remember, the right choice depends on your specific needs, budget, and timeline.

Who Should Try Hydroseeding?
Hydroseeding is a versatile method that can be beneficial for a wide range of people and projects. However, it's particularly useful in certain situations.
Large Areas
If you have a large area to seed, hydroseeding can be an efficient choice. The process allows for quick and even distribution of seeds, which can be particularly beneficial for large lawns, fields, or commercial properties.
Erosion Control
Hydroseeding is excellent for erosion control. The mulch in the hydroseed mixture helps to make a bond with the soil, providing a protective layer that can help prevent erosion. This makes hydroseeding a great option for areas prone to erosion, such as slopes or hillsides.
New Construction
If you're working on a new construction project, hydroseeding can be a quick way to establish a lawn. Once the construction work is finished, hydroseeding can be used to quickly cover the disturbed soil with a lush, green lawn.
Rehabilitation Projects
For rehabilitation projects, such as restoring a lawn that's been damaged by pests, disease, or drought, hydroseeding can be an effective solution. The process allows for the even distribution of seeds, ensuring that the new grass grows in evenly and densely.
While hydroseeding is a powerful tool, it's not always the best solution for every situation. It's important to consider your specific needs, budget, and timeline when deciding whether to try hydroseeding.
Troubleshooting Common Hydroseeding Problems
While hydroseeding is a powerful tool for establishing a new lawn, like any gardening technique, it can come with its own set of challenges. Here are some common problems you might encounter and how to address them.
Inadequate Watering
- Problem: The most common issue with hydroseeding is inadequate watering. If the seedbed dries out, the seeds will not germinate effectively.
- Solution: Ensure the seedbed stays consistently moist, especially during the first few weeks after application. This might require watering multiple times a day during hot or windy weather.
Poor Soil Preparation
- Problem: Another common issue is poor soil preparation. If the soil is not properly prepared, it can affect the success of the hydroseeding.
- Solution: Before hydroseeding, remove any debris from the area, loosen the top layer of soil, and ensure the area is level. You might also want to consider a soil test to check for nutrient deficiencies and adjust your slurry mix accordingly.
Incorrect Slurry Mix
- Problem: An incorrect slurry mix can lead to poor germination. This could be due to an imbalance of seeds, mulch, or fertilizer.
- Solution: Follow the recommended ratios for your specific seed mix and conditions. If you're unsure, consider consulting with a professional.
Weather Conditions
- Problem: Weather conditions can also affect the success of hydroseeding. Heavy rain can wash away the slurry, while extreme heat can cause it to dry out too quickly.
- Solution: Check the weather forecast before hydroseeding and try to choose a time when mild, consistent weather is expected. If heavy rain is forecasted shortly after application, you might need to take additional steps to protect the area.
Troubleshooting is a normal part of any gardening project. With patience and persistence, you can overcome these challenges and make a beautiful, lush lawn through hydroseeding.
FAQs about DIY Hydroseeding
Learn all about DIY hydroseeding with this comprehensive FAQ guide. Find answers to your questions on equipment, process, and tips for successful results.
What is Hydroseeding?
Hydroseeding is a planting process that uses a mixture of seed and mulch. It's often used as an erosion control technique on construction sites, as well as a substitute for the traditional process of broadcasting or sowing dry seed.
How Does Hydroseeding Work?
Hydroseeding works by spraying a slurry of seed, mulch, and water onto the soil. The mulch helps to make a bond with the soil and provides a protective layer that helps prevent erosion and retains moisture for the seeds.
What are the Benefits of Hydroseeding?
Hydroseeding has several benefits. It's efficient, allowing large areas to be seeded in a short amount of time. It's also effective for erosion control. The upfront cost of hydroseeding can be more than traditional seeding, but the quicker germination and lower labor costs can make it more cost-effective in the long run.
Can I Do Hydroseeding Myself?
Yes, you can do hydroseeding yourself. However, it requires some specific equipment and materials, including a hydroseeding machine or sprayer, seed, mulch, and often a tackifier or bonding agent.
What Type of Grass Seed is Used in Hydroseeding?
The type of grass seed used in hydroseeding can vary depending on the specific needs of the project. Common types include ryegrass, fescue, and Kentucky bluegrass, among others.
How Long Does It Take for Hydroseed to Grow?
The germination time for hydroseed can vary depending on the type of grass seed used and the conditions. Generally, you can expect to see growth within a week or two.
How Often Should I Water My Hydroseeded Lawn?
It's important to keep the newly hydroseeded area moist to ensure successful germination. This might require watering multiple times a day during hot or windy weather.
Can I Hydroseed Over an Existing Lawn?
Yes, hydroseeding can be used to overseed an existing lawn. This can be a great way to fill in bare spots and improve the overall health and appearance of your lawn.
What Time of Year is Best for Hydroseeding?
The best time for hydroseeding can depend on your climate and the type of grass you're planting. Generally, spring and fall are considered good times to hydroseed.
How Much Does Hydroseeding Cost?
The cost of hydroseeding can vary depending on the size of the area and the specific requirements of the project. On average, you can expect to pay between $0.06 and $0.20 per square foot.
Conclusion:
In conclusion, DIY hydroseeding is a cost-effective and efficient way to achieve a lush, green lawn. By following these steps and using the right materials, you can successfully transform your outdoor space.


