I've always had a special connection with animals, and one of the most fascinating creatures I've been fortunate to care for is Otis, my famous Eastern Box Turtle. Over the past few years, I've come to realize that Otis deserves the best environment I can provide, which is why I set out on a mission to build him a new vivarium - a massive indoor space that would cater to all his needs. I'll take you through my journey step by step, sharing what materials and processes made this DIY indoor box turtle habitat project successful.
Gathering Ideas and Planning
Before anything else, planning is crucial. This isn't just about building an enclosure; it's about making a home where Otis can thrive. With Otis being such a popular figure among my friends and followers, I teamed up with Jared and Danny Lynn from Toad Ranch, known for their top-notch reptile enclosures.
Designing for Humidity and Space
Eastern Box Turtles, like Otis, need high humidity levels to stay healthy. Therefore, the design had to consider both moisture retention and spaciousness. We decided on a vivarium that would eventually measure 10 feet long, 2 feet deep, and 4 feet high. This size ensures that Otis has plenty of room to explore and enjoy.
Materials: What You Need and Why
For a project of this scale, having the right materials is key:
- Pre-drilled PVC Panels: These are crucial for the enclosure's frame. Durable and resistant to moisture, PVC panels help maintain humidity inside the vivarium.
- Tempered Glass Sliding Doors: To preserve humidity while allowing easy access, tempered glass is ideal because it's strong and less prone to cracking compared to regular glass.
- Arcadia Lighting Products: I used the Pro T5 UVB kit and Jungle Dawn LED bar from Arcadia. These products ensure proper lighting, necessary for Otis's health, especially for vitamin D synthesis.
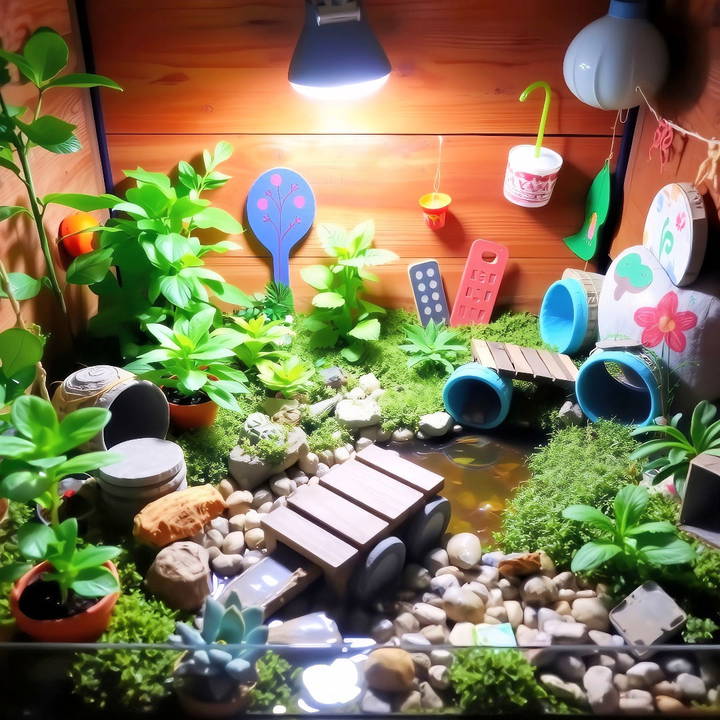
- Natural Substrate: From my own backyard, I collected forest floor material rich in organic matter and microorganisms. This builds a bioactive environment where Otis can burrow and forage.
- Decorations: Fake stumps and logs from Universal Rocks and natural branches add complexity and mimic Otis's natural habitat, offering both hiding spots and basking areas.
Step by Step Instructions
Learn how to make a perfect DIY indoor box turtle habitat with our detailed, step-by-step instructions covering assembly, lighting, substrate, and more!
Step 1: Assemble the Frame
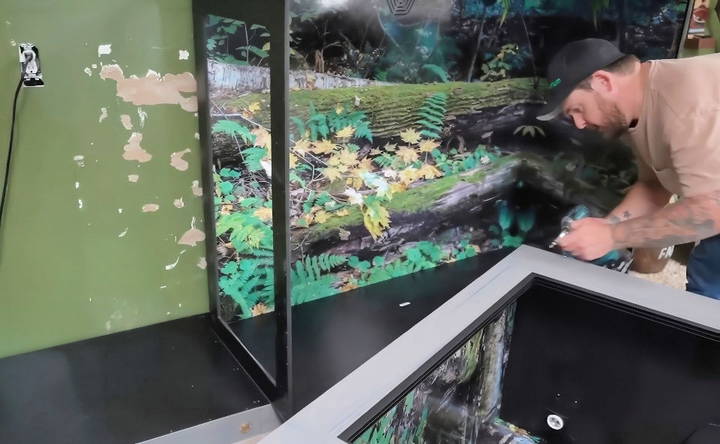
We started with the frame. Despite the vivarium's large size, assembling it was straightforward due to the pre-drilled holes in the PVC panels. Jared and I worked side by side, ensuring everything was snuggly fit. Assembling the frame is like putting together a giant puzzle, but once it's done, you get a sense of the space you're making.
Step 2: Install the Background and Join Sections
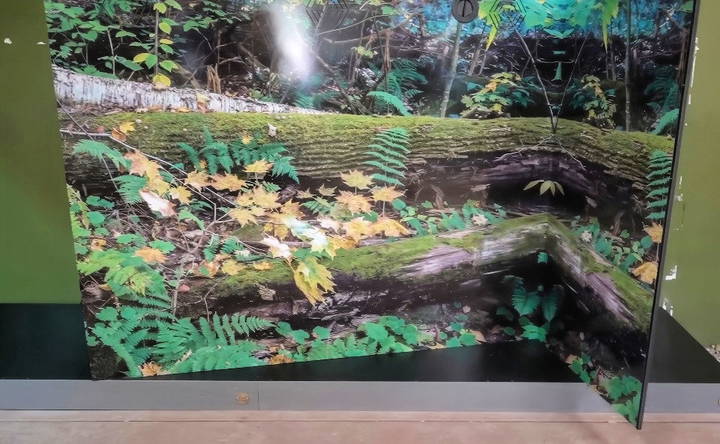
Toad Ranch's signature destination backgrounds bring an outdoor feel to indoor spaces. For Otis, we chose a scenic forest edge image that resonates with his natural habitat. The next step was joining two sections of this background seamlessly using a middle bracket.
Step 3: Add Lighting
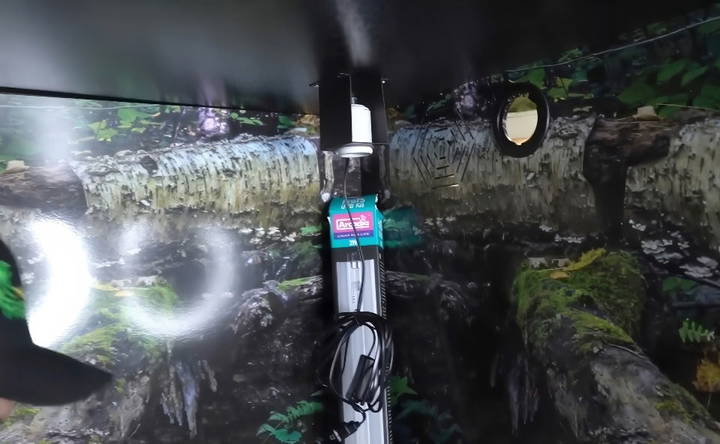
Proper lighting is essential for any reptilian habitat. The Arcadia Pro T5 UVB kit was mounted in one corner to provide UVB rays, which are vital for Otis's health. Additionally, a Jungle Dawn LED bar was set up to enhance the enclosure's light, simulating a daylight environment.
Step 4: Prepare the Substrate
On day two, I ventured into the woods to gather natural forest litter. This substrate serves a dual purpose – it's both a place for Otis to bury himself and a source of food through live invertebrates like isopods, springtails, and earthworms. We spread about six to eight inches of this substrate across the bottom of the enclosure.
Step 5: Decorate Creatively
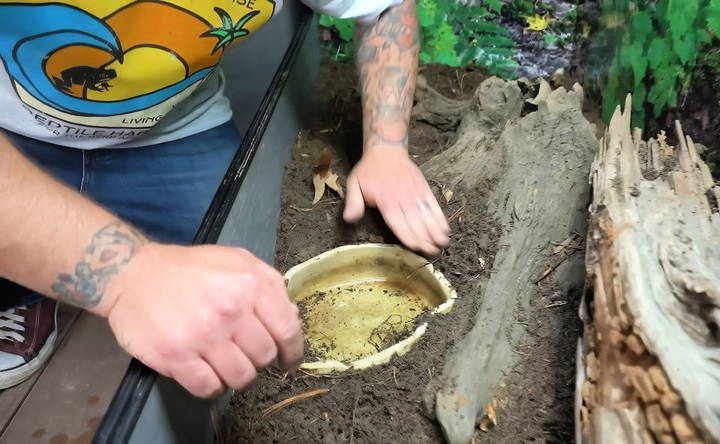
Decorating the vivarium is a fun and creative process. I incorporated elements from Otis's previous enclosure, like his favorite fake log hide, and added new features such as a faux stump from Universal Rocks. To accentuate the space and make it look unified, we positioned a large branch with attached artificial pine needles across the seam where the two sections join.
Step 6: Make Water Features
To simulate Otis's natural environment, I added several water dishes to mimic vernal ponds. These provide drinking water and bathing areas, mimicking the seasonal pools found in nature. The placement of these dishes is crucial for encouraging Otis to explore.
Finishing Touches: Making it Feel Like Home
Once everything was in place, it was time to add the final touches. Sheet moss from a well-moisturated spot in the woods brought a green, lush look to the decor. Once the setup was complete, I gave the entire habitat a good soaking, which is important for maintaining optimal humidity.
Introducing Otis to His New Home
The moment finally arrived to introduce Otis to his new home. Initially, he was a bit cautious, but within minutes he was exploring, finding a worm among the litter, and even dipping his head into one of the water ponds.
Maintaining the Vivarium
A vivarium of this size requires regular maintenance to keep it in prime condition. Key tasks include:
- Regularly checking humidity levels: Maintaining moisture is vital for Otis's respiratory health.
- Cleaning the water dishes: This prevents bacteria buildup and ensures fresh water.
- Monitoring temperature and ventilation: Thanks to the built-in fan, we can manage heat and airflow easily.
- Feeding and interaction: Although Otis hunts some of his food, I ensure he gets a balanced diet through additional feeding.
Seasonal Care
Caring for your box turtle throughout the year requires adjustments to their habitat to ensure they remain healthy and comfortable. Here's a guide to seasonal care:
Winter Care
During winter, box turtles need extra warmth and stable conditions.
- Temperature Control: Ensure the habitat temperature stays between 75-85°F (24-29°C) during the day and doesn't drop below 70°F (21°C) at night. Use a reliable heat lamp and a ceramic heater to maintain these temperatures.
- Lighting: Provide 10-12 hours of UVB lighting daily. This helps turtles synthesize vitamin D3, which is crucial for calcium absorption.
- Humidity: Maintain humidity levels between 60-80%. Use a hygrometer to monitor humidity and mist the enclosure regularly.
- Bedding: Use a deep layer of substrate like coconut coir or sphagnum moss. This helps retain moisture and provides a comfortable burrowing area.
- Diet Adjustments: Offer a balanced diet with more protein to help them maintain energy levels. Include insects, leafy greens, and occasional fruits.
Summer Care
In summer, keeping the habitat cool and preventing overheating is essential.
- Temperature Management: Ensure the habitat temperature does not exceed 90°F (32°C). Provide a cooler area within the enclosure where the temperature is around 75°F (24°C).
- Hydration: Increase the frequency of misting to keep the humidity levels stable. Provide a shallow water dish for soaking and drinking.
- Ventilation: Ensure good airflow in the enclosure to prevent heat buildup. You can use fans or open windows (if safe) to improve ventilation.
- Shade and Shelter: Make shaded areas using plants or hides to give turtles a place to escape the heat.
- Diet Adjustments: Offer more water-rich foods like cucumbers and melons to help with hydration. Continue providing a balanced diet with vegetables, fruits, and proteins.
General Tips for All Seasons
- Regular Monitoring: Check the temperature and humidity levels daily. Make adjustments as needed to keep the environment stable.
- Health Checks: Regularly inspect your turtle for signs of illness, such as lethargy, lack of appetite, or respiratory issues. Consult a vet if you notice any problems.
- Cleaning: Maintain a clean habitat by removing waste and uneaten food daily. Perform a thorough cleaning of the enclosure at least once a month.
By following these seasonal care tips, you can ensure your box turtle stays healthy and happy throughout the year.
Maintenance and Cleaning
Keeping your box turtle's habitat clean and well-maintained is crucial for their health and well-being. Here's a detailed guide to help you manage this effectively:
Daily Tasks
- Spot Cleaning: Remove any uneaten food, feces, and soiled substrate daily. This helps prevent the growth of harmful bacteria and keeps the habitat fresh.
- Water Change: Replace the water in the drinking and soaking dishes daily. Clean the dishes with mild soap and rinse thoroughly to remove any residue.
- Health Check: Observe your turtle for any signs of illness, such as changes in appetite, behavior, or appearance. Early detection of health issues can make a big difference.
Weekly Tasks
- Substrate Stirring: Stir the substrate to prevent mold and bacteria buildup. This also helps maintain proper humidity levels.
- Enclosure Wipe Down: Wipe down the walls and decorations of the enclosure with a reptile-safe disinfectant. This helps keep the environment clean and reduces the risk of infections.
Monthly Tasks
- Deep Cleaning: Once a month, perform a thorough cleaning of the entire habitat. Remove your turtle and place them in a safe, temporary enclosure.
- Substrate Replacement: Replace the old substrate with fresh, clean material. This ensures a hygienic environment and helps control odors.
- Disinfecting: Disinfect the entire enclosure, including all decorations, hides, and water dishes. Use a reptile-safe disinfectant and rinse everything thoroughly before placing it back in the habitat.
Seasonal Adjustments
- Winter: Increase the frequency of cleaning to prevent mold and bacteria growth due to higher humidity levels. Ensure the heat lamps and UVB lights are functioning properly.
- Summer: Monitor the enclosure for signs of overheating. Increase ventilation and ensure the water dishes are always filled with fresh water.
General Tips
- Use Safe Cleaning Products: Always use reptile-safe cleaning products to avoid harming your turtle. Avoid harsh chemicals and ensure everything is rinsed thoroughly.
- Regular Inspections: Regularly inspect the habitat for any signs of wear and tear. Replace any damaged items to maintain a safe environment.
- Record Keeping: Keep a log of your cleaning schedule and any observations about your turtle's health. This can help you spot patterns and address issues promptly.
By following these maintenance and cleaning tips, you can build a healthy and comfortable environment for your box turtle. Regular care and attention will ensure your pet thrives and stays happy.
FAQs About DIY Indoor Box Turtle Habitats
Discover essential FAQs about DIY indoor box turtle habitats. Get expert tips for making a safe, comfortable living space for your turtle.
Box turtles need plenty of space to roam and explore. The enclosure should be at least 36 x 12 inches for one turtle. If you have more than one turtle, increase the size accordingly. Each turtle needs about three square feet of floor space.
Box turtles require both UVB and heat lamps. UVB light is essential for their shell and bone health. The heat lamp should build a basking spot with a temperature of around 85-90°F (29-32°C). The rest of the enclosure should be kept at 70-75°F (21-24°C) during the day.
Box turtles thrive in environments with 60-80% humidity. To maintain this, mist the enclosure daily and provide a shallow water dish for soaking. Using a hygrometer can help you monitor and adjust the humidity levels as needed.
Box turtles are omnivores and need a varied diet. Offer them a mix of:
Vegetables: Leafy greens, carrots, squash.
Fruits: Berries, apples, melons.
Protein: Insects (like crickets and mealworms), cooked chicken, or commercial turtle food. Ensure their diet is balanced and includes calcium supplements to support their shell health.
Regular cleaning is crucial to maintain a healthy environment for your box turtle. Here's a simple cleaning schedule:
Daily: Remove uneaten food and spot-clean any waste.
Weekly: Replace the water in the dish and clean it thoroughly.
Monthly: Change the substrate and disinfect the enclosure. Use a reptile-safe cleaner or a solution of water and vinegar.
Conclusion: A Rewarding Journey
Building this DIY indoor box turtle habitat has been a labor of love. More than just a project, it's an ongoing commitment to providing the best for Otis, ensuring he remains healthy and happy. This experience taught me a lot about reptiles, the importance of habitat design, and the joy of seeing a pet truly thrive in a space tailored for them.


