Making a DIY induction heater can be an exciting project. This portable device uses electromagnetic fields to heat metal objects efficiently. With the right materials and steps, anyone can construct one at home. This guide will help you understand the basics and gather everything needed to start building your own portable induction heater.
In the following sections, you'll find detailed instructions and tips to help you succeed. Making a homemade DIY induction heater is not only a fun challenge but also offers practical uses in various applications. Let's explore the steps together and get started on your heating project!
Introduction to Induction Heating
Induction heating is a process that uses electromagnetic fields to heat up a metal object without any direct contact. This method can quickly heat metals to high temperatures, which is useful in various applications like metalworking, cooking, and even in medical treatments. Here's a simple breakdown of how it works and why it's beneficial:
How It Works:
- An induction coil (which is simply a coil of wire) is connected to an electric power source.
- When electricity flows through the coil, it makes a magnetic field around it.
- Place a metal object inside this coil, and the magnetic field induces electric currents in the metal—these are called eddy currents.
- These eddy currents flow through the resistance of the metal, generating heat.
Benefits of Induction Heating:
- Efficiency: It heats materials quickly and directly, without heating the surrounding air.
- Control: You can precisely control the temperature, which is essential for processes that require specific heat levels.
- Safety: Since there's no flame or external heat source, there's less risk of burns or fire.
- Cleanliness: It doesn't produce combustion gases, making it a cleaner option for the environment.
Common Uses:
- Cooking: Induction stovetops are popular because they cook food quickly and are easy to clean.
- Metalworking: It's used to harden, soften, or bond metals.
- Medical Tools: Sterilizing medical instruments with induction heating is fast and effective.
Learn induction heating to discover its uses and possibly make your own projects safely. Prioritize safety and consult experts if unsure.
Gathering the Materials
The success of any project starts with the right materials. For this induction heater, several key components were necessary:
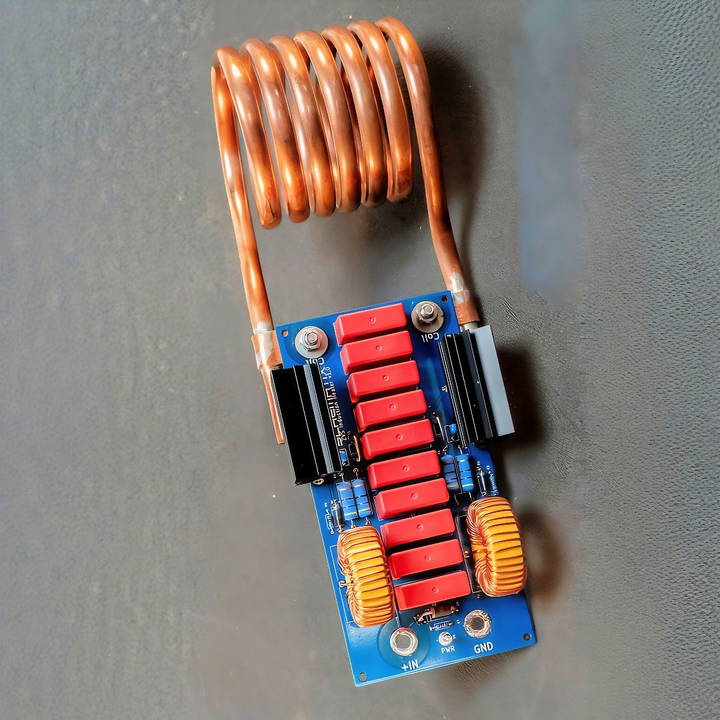
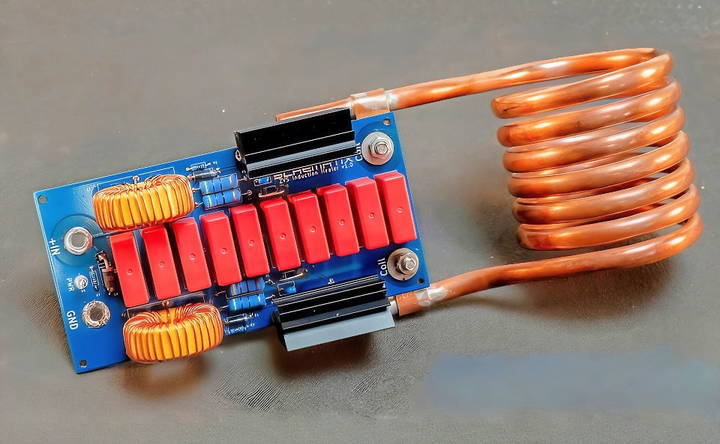
- Toroid Ring and Enameled Insulated Copper Wire: These were essential for making the inductors, the heart of the heater. The toroid serves as the core, while the copper wire when wound around it, forms the inductor. Inductors were critical for making the magnetic field required to heat the metal.
- Heat Sinks and Thermal Paste: To prevent the MOSFETs (metal-oxide-semiconductor field-effect transistors) from overheating, effective heat dissipation was necessary. Heat sinks absorb and disperse the heat, while thermal paste improves the thermal conductivity between the MOSFETs and the heat sinks.
- PCB (Printed Circuit Board) and Components: A well-designed PCB ensured that all components of the induction heater were correctly aligned and securely connected. Components like diodes, capacitors, and resistors were crucial for the circuit's functionality.
- Copper Tubing: For the induction coil, I chose copper tubing due to its durability and conductivity. The coil is where the magic happens; it's where the metal gets heated.
Step by Step Instructions
Learn how to make a homemade induction heating coil with our step-by-step guide. From winding inductors to testing, we've got you covered!
Winding the Inductors
Winding the inductors was a meticulous task that required patience. I measured and cut 1.6 meters of enameled insulated copper wire for each inductor. It was crucial to wind the wire tightly around the toroid, maintaining uniformity to ensure consistent inductance. After winding, I had between 30 to 32 turns of wire, which gave approximately 100 micro henrys of inductance. Making sure the wire's enamel insulation was sanded off before soldering was a small but important step.
Preparing the Heat Sinks
I chose spring-loaded clip heat sinks to keep the project sleek. After marking the center for alignment, I applied thermal paste to the MOSFET and slotted it onto the heat sink. This setup promised to keep the MOSFET cool under the considerable power the heater would be generating.
Assembling the PCB
Ordering the PCB and soldering the components onto it was an exciting phase. It felt like the project was starting to come together. The PCB layout was crucial for ensuring everything connected correctly and functioned as intended. I ran into a minor issue with one of the diode footprints being too small, which required some improvisation, but it was a valuable lesson in double-checking component sizes.
Constructing and Annealing the Coil
Using copper tubing, I fashioned the induction coil. I initially attempted to wrap the tubing around a PVC pipe fitting, but I later switched to a 3D printed spiral form for more precision. Annealing the copper by heating it with a blow torch and then quickly cooling it in water made it softer and easier to bend. My final coil had six and a half turns, providing a good balance between performance and efficiency.
Powering the Beast
For power, I needed something that could deliver between 12 and 40 volts DC, with the capability to handle 50 to 100 amps. I assembled a Frankenstein-esque solution involving a massive transformer, a full bridge rectifier, and a huge capacitor, all controlled by a variac. This setup allowed me to experiment with different voltages, finding the sweet spot for optimal heating performance without risking the components.
The Moment of Truth: Testing
Testing was both nerve-wracking and exhilarating. I started at 12 volts, inserting a piece of steel into the coil and gradually increased the voltage. The heater drew considerable power from the wall, reaching up to 1.4 kilowatts, which was within my expected range. Monitoring the heat sinks and components for overheating was crucial, especially as I pushed the voltage higher.
The project was not without its challenges. One significant hiccup occurred when a trace on the PCB started melting due to high current, leading to a damaged MOSFET. In hindsight, reinforcing the traces with heavy gauge wire would have prevented this issue. Despite this setback, the induction heater worked impressively, heating ferrous metals efficiently.
Advanced Modifications for Induction Heating Coils
When you're comfortable with the basics of induction heating and ready to take your projects to the next level, advanced modifications can enhance efficiency, power, and functionality. Here's a guide to some upgrades that can help you get more out of your induction heating coil.
Increase Power Output:
- Upgrade the Power Supply: Switch to a higher-rated power supply to increase the current and achieve higher temperatures.
- Use Thicker Wire: A thicker coil wire can handle more current, leading to a stronger magnetic field and better heating capability.
Improve Efficiency:
- Optimize Coil Design: Experiment with different coil shapes and numbers of turns to find the most efficient design for your specific application.
- Use a Ferromagnetic Core: Inserting a core made of ferromagnetic material inside the coil can focus the magnetic field and improve heating efficiency.
Enhance Control:
- Install a Temperature Controller: A dedicated temperature controller can help you maintain precise heating levels and prevent overheating.
- Add a Cooling System: For high-power applications, a cooling system can prevent the coil and the power supply from overheating.
Expand Functionality:
- Build a Larger Coil: A larger coil can accommodate bigger objects, allowing you to heat more substantial items.
- Make a Multi-zone System: Design a system with multiple coils, each with independent controls, to heat different parts of an object simultaneously.
These changes require electronics knowledge and pose high voltage and heat risks. Prioritize safety, seek expert advice, and follow regulations. These tweaks can extend your DIY induction heating projects.
Troubleshooting Common Issues
When working with homemade induction heating coils, you might encounter a few hiccups along the way. Here's a guide to help you troubleshoot some of the most common issues, ensuring your project runs smoothly.
Coil Not Heating
- Check Connections: Ensure all electrical connections are secure and free of corrosion.
- Inspect the Power Supply: Verify that your power supply is functioning correctly and delivering the required voltage and current.
Overheating Coil
- Adjust the Power Level: If the coil is getting too hot, reduce the power input.
- Improve Cooling: Make sure there's adequate airflow around the coil, or consider adding a fan or heat sink.
Inconsistent Heating
- Examine Coil Design: Uneven heating can be due to an irregular coil shape. Aim for a uniform coil design.
- Material Compatibility: Check that the material you're heating is suitable for induction heating; not all metals heat efficiently.
Weak Heating
- Increase Power Output: If the heating is weaker than expected, you may need a more powerful power supply.
- Coil Turns: Adding more turns to your coil can increase the magnetic field strength and improve heating.
Electrical Noise
- Use a Filter: Electrical noise can interfere with other devices. Use a filter on your power supply to minimize this.
- Shielding: Shield your setup with metal casing or grounding to reduce electromagnetic interference.
Equipment Damage
- Regular Inspection: Frequently inspect your equipment for wear and tear, especially if you're using it often.
- Surge Protection: Implement surge protection to safeguard your equipment from voltage spikes.
Address these common issues to keep your induction heating setup safe and effective. When in doubt, consult an expert.
Safety Precautions
When making a homemade induction heating coil, safety is paramount. This section outlines key safety measures to ensure your project is conducted securely and effectively.
Understand the Basics:
- Know the Principles: Familiarize yourself with how induction heating works before starting.
- Read the Instructions: Carefully read all instructions and understand the process fully.
Electrical Safety:
- Use Insulated Tools: Always handle electrical components with insulated tools to prevent shocks.
- Check for Damaged Wires: Inspect all wires and components for damage before use.
Heat Management:
- Wear Protective Gear: Use heat-resistant gloves and eye protection when operating the coil.
- Monitor Temperature: Keep a close eye on the temperature to avoid overheating and potential fires.
Workspace Safety:
- Ventilated Area: Work in a well-ventilated space to avoid the buildup of fumes or heat.
- Clutter-Free Zone: Keep your workspace free of unnecessary materials that could catch fire.
Emergency Preparedness:
- Have a Fire Extinguisher: Always have a fire extinguisher nearby in case of an emergency.
- Know First Aid: Be prepared with basic first aid knowledge for burns or electrical shocks.
Safe Design:
- Stable Setup: Ensure your coil and power source are securely mounted and stable.
- Safety Switch: Install a safety switch or circuit breaker to quickly cut off power if needed.
Follow these safety steps to reduce risks and focus on your induction heating project. If unsure, consult an experienced person.
FAQs About Homemade Induction Heating Coil
Discover everything you need to know in our FAQs about Homemade Induction Heating Coil. Learn tips, tricks, and common questions answered!
An induction heating coil is a type of electrical coil used for induction heating, which is a process where an electrically conductive material is heated through electromagnetic induction. When alternating current flows through the coil, it makes a rapidly changing magnetic field. This field induces currents in the nearby metal, causing it to heat up due to its resistance to the flow of these induced currents.
Yes, you can build a basic induction heating coil at home using common materials and tools. You’ll need items like a copper coil, a power supply, and an induction heating module. The process involves winding the copper coil, connecting it to the power supply, and assembling the components on a base, such as wood or plastic, for stability.
Safety is paramount when dealing with high voltages and currents. Always wear protective gear, such as gloves and eye protection. Ensure all connections are secure and insulated to prevent electrical shorts. Do not touch the coil while it’s powered, as it can get very hot. Keep flammable materials away, and if you’re using a cooling system, make sure there are no leaks.
Once you've assembled your induction heating coil, you can test it by powering it up and bringing a small piece of metal close to the coil. The metal should begin to heat up. Start with low power and gradually increase it to test the coil's heating capacity. Always monitor the temperature and the stability of the setup during testing.
To ensure your homemade induction heating coil operates efficiently, follow these guidelines:
Design the coil properly: The coil should be designed to avoid the cancellation of the magnetic field. If opposite sides of the inductor are too close, the coil will not have sufficient inductance required for efficient heating.
Use quality materials: Opt for high-quality copper wire for the coil and ensure that the power supply is stable and sufficient for your needs.
Proper insulation: Insulate the coil correctly to prevent electrical shorts and to ensure safety during operation.
Regular maintenance: Check the coil regularly for any signs of wear or damage. Coils can last for at least a hundred uses or more, but they should be replaced if they show signs of deterioration.
Test and adjust: Test your coil with different metals and adjust the number of turns or the power supply as needed to find the most efficient setup for your specific application.
Wrapping Up
In conclusion, making your own homemade DIY induction heater is a rewarding experience that combines creativity and practicality. By following the steps outlined in this guide, you can build a DIY induction heater that serves various useful purposes. Enjoy the process of crafting, and don't hesitate to adjust your design as you learn. Now, it's time to gather your materials and start building!


