Making a DIY infinity mirror is a fun and engaging project. I remember the first time I made one. I was amazed by how such a simple project could build an illusion that seemed endless. It was exciting and fulfilling to see the final result. The materials were easy to find, and the steps were straightforward, making it an enjoyable DIY task.
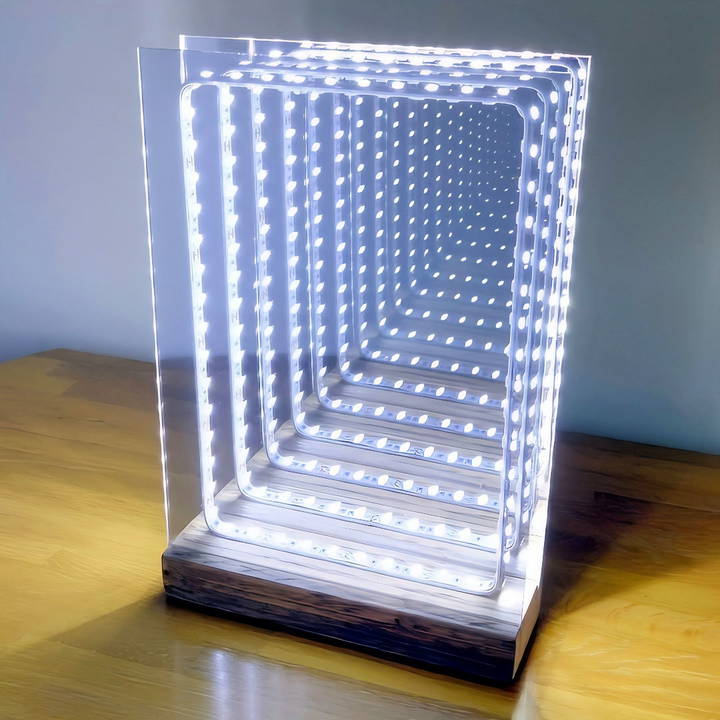
I started by gathering a standard mirror, a two-way mirror, LED lights, and a few other tools. Following a step-by-step tutorial, I carefully assembled the pieces. The hardest part was wiring the LED lights, but with patience, it turned out great. This guide can help you achieve the same satisfaction.
So, let's dive in and build a DIY infinity mirror that will light up any room and impress everyone who sees it.
Introduction to Infinity Mirrors
Infinity mirrors are a captivating optical illusion that can transform an ordinary space into a mesmerizing tunnel of light. They work on a simple yet ingenious principle: by placing a one-way mirror in front of a standard mirror and adding a set of lights between them, you build a series of smaller and smaller reflections that seem to recede into an endless depth.
How Do Infinity Mirrors Work?
At the heart of an infinity mirror is the interplay between reflection and transparency. The one-way mirror, also known as a two-way mirror, is reflective on one side and transparent on the other. When it's placed in front of a fully reflective mirror, the light bounces back and forth between the two surfaces. This builds the illusion of a long, unending tunnel.
Why Are They So Popular?
Infinity mirrors are more than just a fun project; they're a piece of interactive art. They've been used by artists and designers to build stunning visual effects in various settings, from modern art installations to home decor. The allure of infinity mirrors lies in their ability to draw the viewer into a seemingly infinite space, making a sense of wonder and curiosity.
Building Your Own Infinity Mirror
Making your own infinity mirror can be a rewarding DIY project. It's a fantastic way to learn about optics and electronics while ending up with a unique decorative piece. Plus, it's a project that you can customize to fit your personal style and the ambiance of your space.
Safety First
Before you start building your infinity mirror, it's important to prioritize safety. Always handle mirrors with care to avoid breakage and injury. When working with electrical components like LED lights, ensure that all connections are secure and that you're following the manufacturer's instructions.
Materials You'll Need and Why
- Frame: The foundation of your infinity mirror. It defines the size and shape. I used a standard rectangular photo frame (about 8x10 inches), but feel free to choose any shape or size that fits your vision.
- Two-Way Mirror: The magic ingredient. This acts as the front of your infinity mirror, allowing light to pass through from one side while reflecting it on the other. I found mine online, cut to the size of my frame.
- Glass or Acrylic Mirror: This will be the back of your infinity mirror, reflecting the LED lights to build the infinity effect. Ensure it matches the size of your frame.
- LED Strip Lights: They provide the light show. I chose RGB LED strips for their ability to change colors and patterns, making the mirror more dynamic.
- Window Tint Film (optional): If you can't find a two-way mirror, you can build one by applying this film onto a piece of clear acrylic or glass.
- Dark Paint or Tape: This is used to cover the frame's edges inside, preventing light from escaping sideways and ensuring it reflects back into the mirror.
- Power Supply: Required to light up your LEDs. Make sure its output matches the input your LED strip requires.
- Drill and Screws (optional): If your frame doesn't have a way to secure the layers together, you might need these to keep everything in place.
Each material plays a critical role in building your infinity mirror. Picking the right ones and ensuring they all fit together properly is crucial for the best effect.
Step by Step Instructions
Learn how to build a mesmerizing DIY infinity mirror with our step-by-step instructions. Perfect for home decor and tech enthusiasts!
Step 1: Prepare the Frame
Start by disassembling the frame. Remove any existing artwork and clean the glass if you're planning to use it with window tint as your two-way mirror. Paint or tape the inner edges of the frame to make them dark, reducing light leakage.
Step 2: Make Your Two-Way Mirror
If you have a pre-made two-way mirror, you can skip this step. Otherwise, apply the window tint film to one side of the clear glass or acrylic sheet following the manufacturer's instructions. It's a delicate process; ensure there are no bubbles for a flawless finish.
Step 3: Install the LED Strips
Measure the inner circumference of your frame and cut your LED strip to length. Most strips are designed to be cut at specific points. Then, adhere the strip around the inner edges of the frame, ensuring the LEDs face towards the center. This setup projects the light inwards, making a deeper infinity effect.
Step 4: Assemble the Mirror
Place the acrylic or glass mirror (the one without the film) at the back of the frame, reflective side facing up. Then, carefully align the LED strip (already attached to the frame) above it. Finally, cap it with the two-way mirror, reflective side facing down. This arrangement lets light escape through the two-way mirror while reflecting back off the standard mirror, making the infinity illusion.
Step 5: Power It Up
Connect your LED strip to the power supply and switch it on. You should instantly see the infinity effect come to life. This moment always feels a bit magical to me, seeing how simple components transform into a captivating light display.
Step 6: Secure and Display
If everything looks good, secure the back of the frame. Some frames come with clips or a backing board. If yours doesn't, you might need to gently drill the layers together or find another method to keep them in place. Finally, find the perfect spot to hang or place your new DIY infinity mirror.
Customization Ideas for Infinity Mirrors
Customizing infinity mirrors offers endless possibilities. Whether you're a DIY expert or a novice, making an infinity mirror can be a fun, rewarding project. Here are some ideas to spark your creativity:
- Frame Your Imagination: The frame is the face of your infinity mirror. You can choose from a variety of materials, such as wood, metal, or plastic. Consider painting the frame in a color that complements your room or using decorative elements like mosaic tiles, stickers, or even thematic objects that reflect your interests or hobbies.
- Light Up Your World LED lights are the heart of the infinity mirror's effect. They come in different colors and intensities and can even be programmable. Why not use RGB LEDs that change color with a remote control? Or go for a more dynamic effect with lights that respond to music or sound.
- Mirror, Mirror on the Wall The reflective surface doesn't have to be plain. You can use tinted or patterned one-way mirror film to add a unique twist to the reflection. Some films can give your mirror a gold, rose, or rainbow hue, which can dramatically change the overall look.
- Personalize with Patterns Inside the mirror, between the two reflective surfaces; you can place shapes or patterns that will be infinitely repeated in the reflection. This could be anything from geometric shapes and silhouettes of your favorite skyline to personal symbols or logos.
- Interactive Infinity For those who love technology, adding sensors can turn your mirror into an interactive piece. Motion sensors can activate the lights as someone approaches, or touch sensors can allow you to change the light patterns with just a tap.
- Size and Shape: Who says infinity mirrors have to be rectangular? You can build mirrors in any shape you desire: circular, triangular, or even irregular shapes. Think outside the box and design a mirror that's as unique as you are.
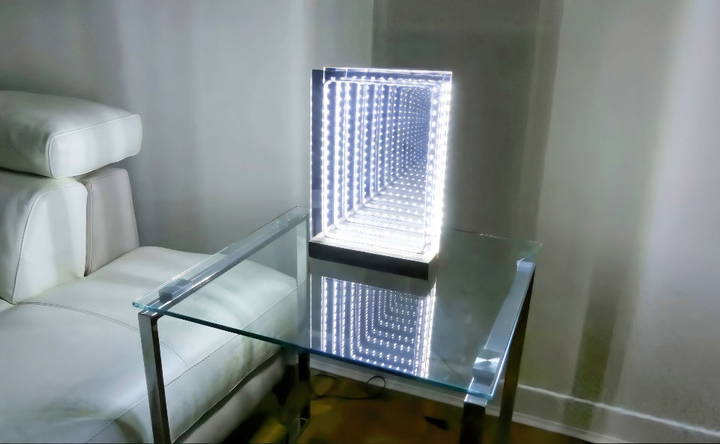
- The Finishing Touch Once your infinity mirror is complete, the final touch is how you display it. Mount it on a wall, incorporate it into furniture like a table or shelf, or even suspend it from the ceiling. The way you present your mirror can enhance its magical effect.
The key to a successful DIY project is to have fun and let your creativity shine. With these customization ideas, your infinity mirror will not only be a stunning piece of decor but also a reflection of your personal style.
Advanced Techniques in DIY Infinity Mirrors
For those who have mastered the basics of making an infinity mirror and are looking to take their project to the next level, advanced techniques can add complexity and sophistication to your design. Here are some advanced methods to consider:
- Programmable LED Lights Instead of using standard LED strips, you can upgrade to programmable LEDs. These allow you to control the color, brightness, and pattern of the lights, making dynamic effects that can change with the touch of a button or through a smartphone app.
- Incorporating Smart Technology Smart technology can be integrated into your infinity mirror to build interactive experiences. Consider adding sensors that react to movement or sound, adjusting the lighting in response to the environment, or even setting up voice commands to control the display.
- Making 3D Effects By strategically placing objects or additional layers of partially reflective glass within the mirror, you can build a 3D effect. This technique involves careful planning and precision but can result in a truly stunning visual depth.
- Combining Materials Experiment with different materials for the frame or the reflective surfaces. For example, using a metallic or iridescent film can give a different reflective quality, and experimenting with wood, metal, or acrylic for the frame can change the overall aesthetic.
- Adding Artistic Elements Consider adding painted designs or vinyl decals between the glass layers to enhance the visual effect. These elements can be simple shapes or complex illustrations that are multiplied into the infinite reflections.
- Interactive Art Installations If you're ambitious, you can scale up your infinity mirror into a larger installation piece. This could involve constructing a walk-in room lined with mirrors or making a large-scale wall piece that becomes a focal point of a room.
- Combining with Other Art Forms Infinity mirrors can be combined with other art forms, such as sculpture or digital art, to build hybrid pieces. This could involve projecting images onto the mirror or incorporating sculptural elements that interact with the reflected light.
Explore advanced techniques to push DIY infinity mirrors' limits, showcasing your technical skill and creativity. Always prioritize safety with electrical components and glass.
Troubleshooting Common Issues with Infinity Mirrors
Making an infinity mirror can be a fun and rewarding DIY project, but sometimes, you might run into a few hiccups along the way. Here's a helpful guide to troubleshooting common issues so you can enjoy your infinity mirror to the fullest.
LED Lights Not Working
- Check the Connections: Ensure all wires are properly connected and that there are no loose ends.
- Power Supply: Verify that your power source is working and providing the correct voltage.
- LED Strip: Inspect the LED strip for any damage. If a section isn't working, it may need to be replaced.
Mirrors Not Reflecting Properly
- Clean the Surfaces: Dust and fingerprints can affect the reflection. Clean both mirrors with a microfiber cloth and glass cleaner.
- Alignment: Make sure the mirrors are perfectly parallel to each other. Even a slight angle can disrupt the infinity effect.
Dim Reflections
- Brightness: Increase the brightness of your LEDs if they're dimmable.
- Mirror Quality: Ensure you're using a high-quality two-way mirror for the best reflection.
Overheating
- Ventilation: Check that your frame allows for adequate air circulation to prevent the LEDs from overheating.
- LED Quality: Use high-quality LEDs that are designed for long-term use and have a lower heat output.
Electrical Safety
- Insulation: Double-check that all electrical connections are insulated to prevent short circuits.
- Professional Help: If you're unsure about the wiring, consult with a professional electrician.
Optical Distortions
- Glass Quality: Low-quality mirrors can cause distortions. Invest in good quality mirrors for a clear and crisp infinity effect.
- Flatness: Ensure that both mirrors are completely flat. Warping can cause the reflections to distort.
Flickering Lights
- Stable Power Source: Flickering can be caused by an unstable power supply. Use a consistent power source.
- Controller Check: If you're using a controller for the LEDs, make sure it's functioning correctly.
Safety is key with glass and electrical work. Wear protective gear and ensure good lighting. If problems persist, consult a professional or experienced DIYer.
Maintenance and Care for Infinity Mirrors
Taking care of your infinity mirror is essential to ensure its longevity and to keep it looking as mesmerizing as the day you built it. Here are some straightforward tips to maintain and care for your infinity mirror:
Keep It Clean
- Glass Surfaces: Use a microfiber cloth and a glass cleaner to wipe down the mirrors. This will keep the reflective surfaces clear and the illusion intact.
- LED Strips: Gently dust the LED strips with a soft, dry brush to prevent dust accumulation that can dim the lights.
Check the Electronics
- Regularly inspect the wiring and connections to make sure everything is secure and functioning properly. If you notice any frayed wires or loose connections, power off the device and make the necessary repairs.
Avoid Moisture
- Infinity mirrors and moisture don't mix well. Keep your infinity mirror away from high humidity areas to prevent any potential damage to the electrical components.
Handle with Care
- When moving your infinity mirror, be gentle. The glass can be fragile, and rough handling may disrupt the alignment of the mirrors.
Update and Upgrade
- As LED technology advances, consider upgrading your lights to more energy-efficient and brighter options that may become available.
Safety First
- Always ensure that your infinity mirror is placed in a safe location where it's not at risk of being knocked over or damaged.
Follow these care tips to maintain your infinity mirror for years. Regular upkeep keeps the display quality and ensures your DIY project remains safe and stunning.
FAQs About DIY Infinity Mirror
Discover the FAQs about DIY infinity mirrors to get tips, tricks, and expert advice on easily making your optical illusion centerpiece.
An infinity mirror creates the illusion of an endless tunnel of light. It consists of a two-way mirror (a mirror that is reflective on one side and transparent on the other), a standard mirror, and LED lights. When the LED lights are switched on, they reflect between the two mirrors, giving the appearance of infinite depth.
Yes, you can use any color or style of LED strip lights. However, ensure they are bright enough to build the desired effect. Some people prefer using RGB LED lights for color-changing capabilities, adding an extra dimension to the infinity mirror effect.
Building an infinity mirror is a straightforward DIY project that can be completed with some patience and basic tools. It involves measuring and cutting materials, applying adhesive, and assembling the parts. There are many step-by-step guides and videos available that can help you through the process.
Customizing your infinity mirror can be a fun way to add a personal touch. You can paint the frame in your favorite color, use colored LED lights, or even add patterns to the reflective film for a unique effect. Some people also add objects inside the frame, like figurines or natural elements, which become part of the infinite reflection.
Safety is paramount when working on any DIY project. When building your infinity mirror, make sure to:
Wear gloves to avoid fingerprints and protect your hands while handling glass and mirrors.
Use eye protection when cutting materials or working with power tools.
Ensure all electrical connections for the LED lights are secure and insulated to prevent short circuits.
If you're not experienced with electrical components, consider using battery-operated LED lights for an easier and safer option.
Final Thoughts
By sharing my experience, I hope you feel inspired and confident to start your own DIY infinity mirror project. These simple steps can guide you to build something truly magical.


