Making your DIY kayak cart at home can save you money and provide a practical way to transport your kayak. You'll find that building a DIY kayak dolly is straightforward with easy-to-follow instructions. This step-by-step guide will help you gather materials and construct a reliable cart that makes moving your kayak a breeze.
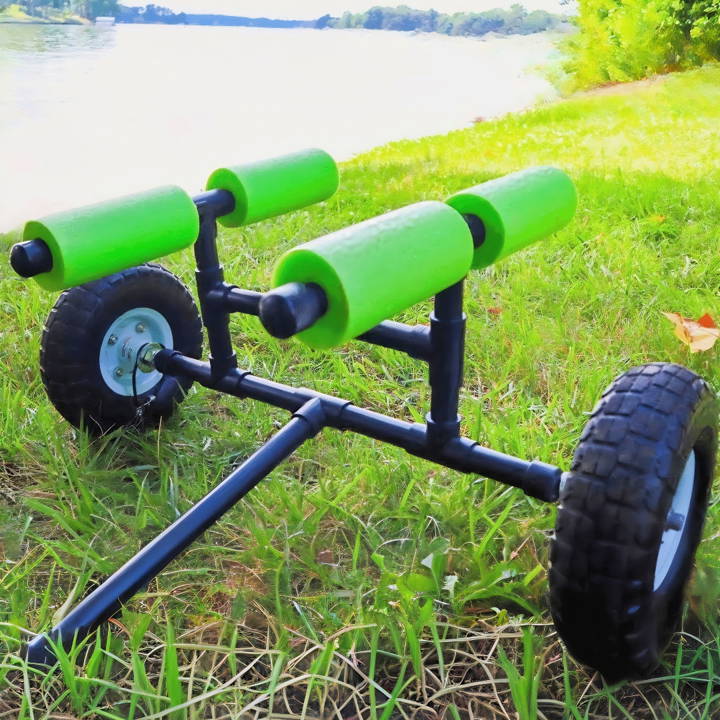
Designing a homemade DIY kayak cart offers you the flexibility to customize it according to your specific needs. Whether you need it for short trips to the water or larger adventures, this guide simplifies the building process.
Ready to enhance your kayaking experience? Follow along to learn how to build your own DIY kayak cart in the next section.
What Is a Kayak Cart?
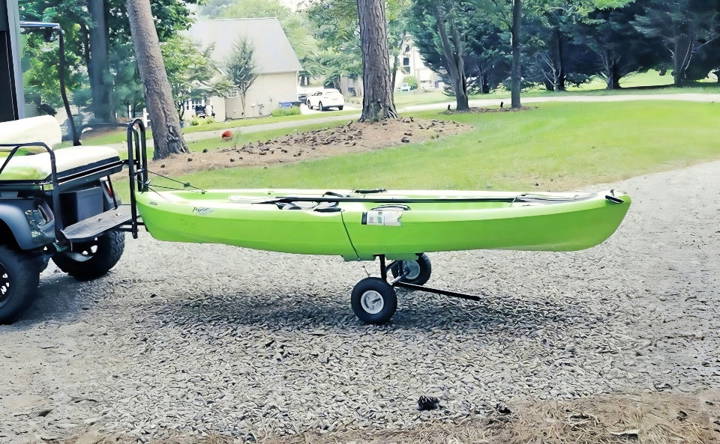
A kayak cart is a small, wheeled device that cradles your kayak, allowing you to roll it rather than carry it. It typically consists of two wheels, a frame that supports the kayak's weight, and a strap or bungee cord to secure the kayak in place.
Why Use a Kayak Cart?
- Ease of Transport: With a kayak cart, you can easily move your kayak over various terrains, including sand, gravel, and paved paths.
- Prevents Damage: Carrying a kayak can lead to accidental drops or collisions. A cart keeps your kayak off the ground, reducing the risk of scratches or dents.
- Saves Energy: Instead of using your strength to carry the kayak, you can conserve energy for paddling.
- Solo Trips: If you're paddling alone, a kayak cart makes it possible to handle the kayak without assistance.
DIY vs. Store-Bought
Building your own kayak cart can be a rewarding project. It allows you to:
- Customize: Tailor the cart to fit your specific kayak model and personal needs.
- Save Money: DIY carts can be less expensive than commercial options.
- Learn New Skills: You'll gain practical skills in crafting and assembly.
Understanding the Materials You'll Need
Before diving into the actual building process, it's essential to gather all your materials. Here's why each one is crucial:
- PVC Pipes (3/4 inch, 10 feet): Form the cart's structure. PVC is durable, lightweight, and cheap, making it an ideal choice.
- End Pieces and T-Joints (3/4 inch): Serve as connecting points for the PVC, ensuring stability.
- Axle Rod (5/8 inches): Acts as the backbone for the cart's wheels, supporting the kayak's weight.
- Flat Washers, Lock Washers, Hex Nuts, and Lock Nuts (5/8 inches): These components secure the wheels onto the axle, preventing them from coming off during transport.
- Tires (10-inch): Chosen for their durability and ability to handle rough terrain. Ensure they fit a 5/8-inch rod.
- PVC Cement, Saw, Wrench, Measuring Tape, Paint (Optional): For assembling and customizing your cart.
Step by Step Instructions
Learn how to build a DIY kayak cart with our step-by-step guide. From cutting pvc to final assembly and testing, we cover all you need to know!
Step 1: Cutting the PVC
Using my trusty miter saw (though a handsaw works fine), I cut the PVC into specific lengths according to the design. This step requires accuracy, as the correct length ensures the cart's stability and functionality.
Step 2: Assembling the Frame
Starting with the top braces, I connected 8-inch pieces to the ends of a T-joint, making a giant "T." I repeated this process and then focused on the mid-section, which looked like a giant "H." This involved connecting 11-and-a-half-inch pieces to the middle of brand-new T-joints.
For the PVC axle casing, I creatively used T-joints and different-length PVC pieces to build a structure where the axle rod would sit, ensuring it was both snug and allowed room for the wheels.
Step 3: Gluing It All Together
With my PVC primer and cement, I glued the pieces together, following the golden rule of priming first and then applying cement. The key here was ensuring a strong bond to hold the cart together under the kayak's weight.
Step 4: Preparing the Axle
After drilling 5/8-inch holes in two caps and securing them to the ends of the PVC axle casing, I threaded the rod through, adding washers and nuts to secure the wheels. A handy trick I learned was using an extra nut to clean the rod's threads, making it easier to add or remove nuts.
Step 5: Final Touches and Testing
Although I opted to glue all pieces for stability, I appreciated the design's flexibility, allowing for a detachable model if desired. After attaching the wheels and giving the cart a once-over, it was time for the real test.
Strapping the Kayak and Hit the Road
Using a simple bungee cord system, I secured my kayak to the cart, marveling at how snug and secure it felt. The upgraded design provided stability and ease, allowing me to transport my kayak effortlessly over various terrains.
Troubleshooting Common Kayak Cart Issues
When you're using a kayak cart, you might run into a few hiccups along the way. Here's a straightforward guide to solving some common problems you may encounter:
The Kayak Keeps Slipping Off the Cart
- Solution: Make sure the straps are tight and secure. If they're worn out, replace them. For added grip, consider adding a rubber mat or foam padding where the kayak rests on the cart.
The Cart is Difficult to Pull on Soft Sand
- Solution: Use wheels that are designed for sand—larger, balloon-style wheels that won't sink. Reduce the load on the cart if possible, and pull it at a consistent, slow pace to prevent it from getting stuck.
The Wheels are Wobbling or Coming Off
- Solution: Check the wheel attachments. Tighten any loose bolts or screws. If the wheels are damaged, it's best to replace them. Always carry a small repair kit with you for quick fixes.
The Cart Can't Handle the Weight of the Kayak
- Solution: Ensure your cart is rated for the weight of your kayak. If you've built your own cart, reinforce the frame with stronger materials. Distribute the weight evenly on the cart.
The Cart is Rusting or Corroding
- Solution: If you're using a metal cart, rust can be an issue, especially in salty environments. Use carts made from corrosion-resistant materials like aluminum or stainless steel. Regularly clean and dry your cart after use.
The Cart Makes a Lot of Noise
- Solution: A noisy cart can be due to loose parts or lack of lubrication. Tighten all connections and apply a silicone-based lubricant to moving parts.
Difficulty Storing the Cart
- Solution: If storage is an issue, consider a foldable design or a cart that can be disassembled. Store it in a dry, sheltered place to prevent damage.
By fixing these issues, your kayak cart will stay reliable. Regular maintenance and proper use prevent problems and extend its life.
Safety and Maintenance Tips for Kayak Carts
When it comes to kayak carts, safety and proper maintenance are crucial. Here's a guide to keeping you and your kayak cart in top condition:
Safety First
- Check Your Cart Before Use: Inspect your cart for any loose bolts, worn straps, or damage before each use.
- Load Your Kayak Properly: Place your kayak evenly on the cart to prevent tipping, and make sure it's securely fastened.
- Use on Suitable Terrain: Only use your cart on the terrain it's designed for. Avoid rocky or overly steep paths that could cause accidents.
Maintenance Matters
- Regular Cleaning: After each use, especially in saltwater, rinse your cart with fresh water to prevent rust and corrosion.
- Storage: Store your cart in a cool, dry place away from direct sunlight to prevent wear on the tires and straps.
- Wheel Care: Check the air pressure in pneumatic tires regularly and replace them if they show signs of wear or damage.
- Lubrication: Apply a water-resistant lubricant to metal parts periodically to ensure smooth operation and prevent rust.
Longevity of Your Cart
- Replacement Parts: Keep an eye on the condition of all parts. Replace straps, wheels, or hardware as soon as they show signs of wear.
- Avoid Overloading: Don't exceed the weight limit of your cart, as this can lead to structural damage or failure.
- DIY Repairs: If you're handy, small repairs can often be done at home with basic tools and replacement parts.
By following these simple safety and maintenance tips, you'll ensure that your kayak cart remains a reliable aid for your kayaking adventures, keeping both you and your kayak safe and sound.
FAQs About DIY Kayak Cart
Discover everything you need to know about DIY kayak carts with our comprehensive FAQs, which are perfect for kayak enthusiasts and DIY lovers alike.
Yes, you can use different materials such as aluminum or wood. However, PVC is popular due to its lightweight, durability, and ease of assembly.
The size of the wheels will depend on the type of terrain. For smooth surfaces, smaller wheels may suffice. For rough or sandy terrain, larger, wider wheels are recommended to prevent sinking and to make pulling easier.
The weight capacity of a DIY kayak cart depends on the materials used and the construction quality. Generally, a well-built PVC cart can handle the weight of a standard kayak, which is typically around 50-70 pounds.
No special skills are required. Basic knowledge of measuring, cutting, and assembling is enough. Many online guides provide step-by-step instructions that make the process accessible for beginners.
To ensure your DIY kayak cart is durable and long-lasting, consider the following tips:
Use UV-resistant PVC to prevent degradation from sunlight exposure.
Apply a waterproof sealant to any wooden components to protect against moisture.
Choose stainless steel hardware to avoid rust and corrosion.
Regularly check all connections and tighten any loose bolts or screws.
Store your cart in a sheltered area when not in use to protect it from the elements.
Reflecting on the Experience
Conclusion
Wrapping up, making your own DIY kayak cart is a straightforward and rewarding project. With simple instructions and readily available materials, you can build a durable and efficient cart. This DIY solution not only saves money but also enhances your kayaking experience by making transportation more convenient.


