If you own multiple kayaks, you're likely aware of how much space they can take up. Storing them can be a headache, especially if you wish to protect them from damage. Luckily, building a kayak rack that can hold multiple kayaks is simpler and cheaper than you might think.
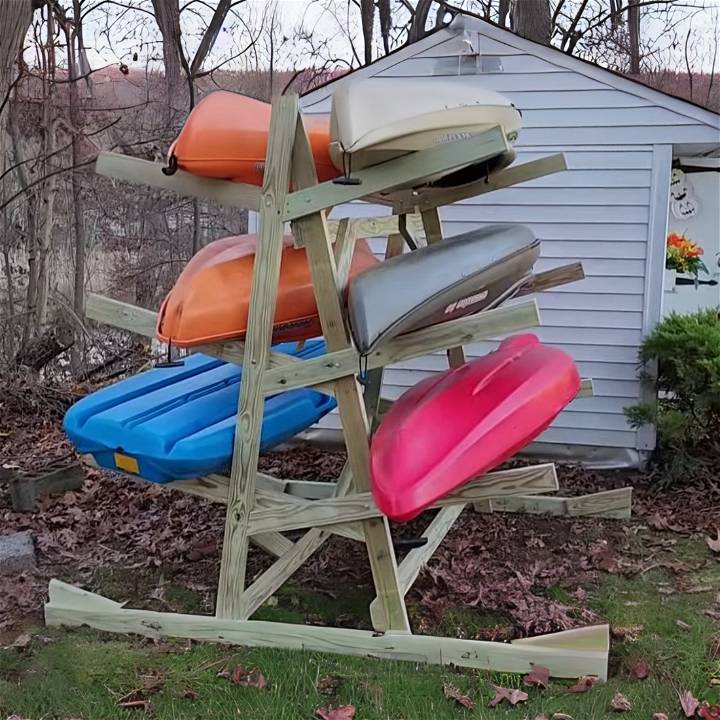
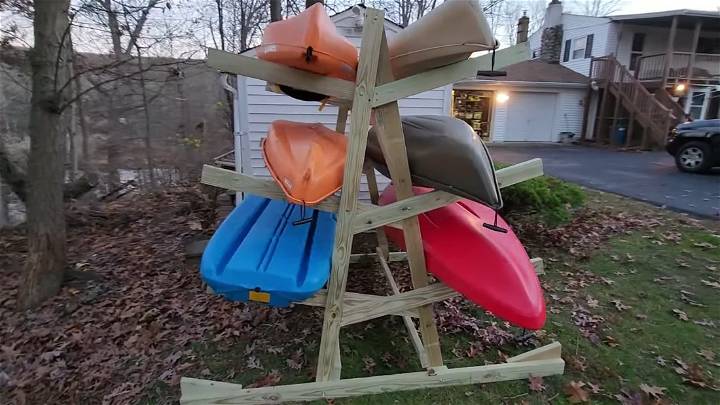
In this guide, we'll walk you through the steps to construct a sturdy, freestanding kayak rack based on an A-frame design that can accommodate up to eight kayaks, all for about $128.
Materials Needed:
- 15 pressure-treated 2x4s, 8 feet long each
- 18 hex bolts, 4.5 inches, 5/16 size
- 18 washers and nuts for the bolts
- 3-inch exterior Phillips screws
Tools Required:
- Saw
- Drill
- Screwdriver
- Measuring tape
- Level
Step by Step Instructions
Make a DIY kayak rack for multiple kayaks with this easy guide below:
Step 1: Design and Measurements
Measure one of your kayaks to determine the clearance needed for each slot. For an average kayak, an 18-inch clearance should be sufficient. To comfortably fit kayaks and ensure easy accessibility, plan for a rack width of 6 feet. Aim to make an A-frame structure with 30-inch arms to support each kayak.
Step 2: Cutting the Base and Legs
Cut two of your 2x4s to 89 inches. These will serve as the base for your kayak rack. For the A-frame sides, you need two 83-inch pieces that will form an inverted ‘V' shape at each end of the rack. Cut a slight angle at one end of each A-frame piece to ensure they sit flat when assembled.
Step 3: Assembling the A-Frame
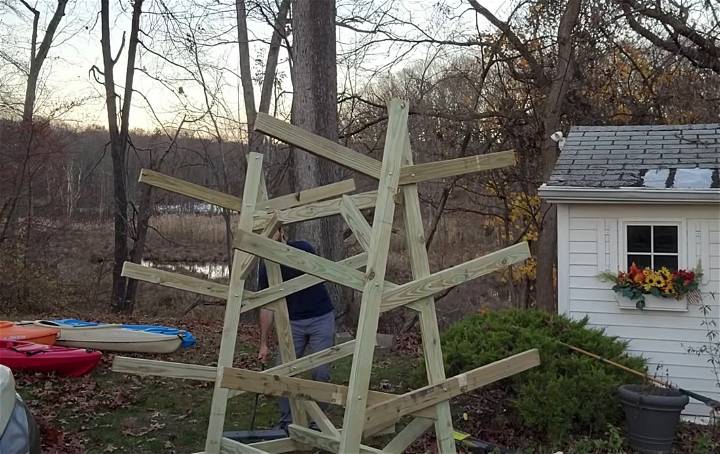
Bolt two 83-inch pieces together at the top to form an A shape. Ensure it's correctly aligned and secure both the top and bottom points with hex bolts. Repeat this process to make a second A-frame structure for the other end of the rack.
Step 4: Attaching the Cross Members
Cut and attach a six-foot-long cross member at the top and two more at the base of your assembled A-frames to connect them, ensuring the structure's width is six feet apart. Screw them into place for added stability.
Step 5: Adding Braces
To eliminate any side-to-side movement, add diagonal braces at each corner of the A-frame. Cut two-foot-long pieces with one angled side to fit snugly against the A-frame, and attach them using screws.
Step 6: Installing the Arms
Decide how many arms you need based on the number of kayaks. Attach the arms by bolting them through the A-frame for load-bearing support. The opposite ends should be fastened with screws into pre-drilled holes, making a slight angle so that the kayaks slide towards the A-frame when placed.
Step 7: Finishing Touches
Double-check all connections are tight and secure. Add additional cross bracing if needed for extra stability. Optionally, apply a waterproof sealant to extend the life of your rack.
Step 8: Testing and Placement
Ensure your rack is level and stable. Place it in its final location and begin loading your kayaks, evenly distributing weight. Adjust if necessary to accommodate all kayaks comfortably.
Video Tutorial
For a step-by-step video guide on how to assemble your kayak rack, watch the YouTube tutorial provided by EveryotherKarl. It pairs well with this written guide, providing a visual perspective on the assembly process and making it easy to follow along.
Constructing your own kayak rack is not only cost-effective but also allows customization to fit your specific storage needs. By following these steps and consulting the video guide, you'll have a durable kayak rack ready to use in no time.
Customization Ideas for Your DIY Kayak Rack
One of the great things about building your own kayak rack is the ability to customize it to suit your specific needs and preferences. Here are some ideas to inspire you:
Choosing the Right Material
The choice of material for your kayak rack can greatly influence its durability, cost, and ease of construction. Common materials include wood, PVC, and metal. Each has its own advantages:
- Wood: A wooden rack is sturdy and can be painted or stained to match your decor. However, it requires regular maintenance to prevent rot and insect damage.
- PVC: PVC is lightweight, affordable, and easy to work with. It's also resistant to weather and corrosion. However, it may not be as durable or aesthetically pleasing as wood or metal.
- Metal: Metal racks are extremely durable and can support heavy kayaks. However, they can be more difficult to construct and may require welding.
Designing for Your Space
Consider the space where you plan to install your kayak rack. If you have limited space, a vertical or wall-mounted rack might be a good option. If you have more room, you might prefer a freestanding rack that can hold multiple kayaks.
Adding Extra Features
Think about adding features that could enhance the functionality of your rack. For example, you could add padding to the arms of the rack to protect your kayak from scratches. Or, you could add casters to the bottom of the rack to make it easy to move around.
The key to a successful DIY project is to make it work for you. So don't be afraid to get creative and add your own personal touch to your kayak rack.
Safety Precautions for Your DIY Kayak Rack
When building and using your DIY kayak rack, safety should be your top priority. Here are some safety precautions to keep in mind:
During Construction
- Proper Tools: Use the right tools for the job. This not only makes the construction process easier but also reduces the risk of accidents.
- Protective Gear: Always wear protective gear, such as safety glasses and gloves, when cutting or drilling materials.
- Ventilation: If you're painting or staining your rack, ensure you're in a well-ventilated area to avoid inhaling harmful fumes.
After Construction
- Weight Limit: Be aware of the weight limit of your rack. Overloading it could cause the rack to collapse, potentially damaging your kayaks and causing injury.
- Regular Checks: Regularly check the rack for any signs of wear and tear. This includes checking for loose screws, cracks in the material, and any other potential issues.
- Proper Lifting: When placing your kayak on the rack, lift with your legs, not your back, to avoid injury. If your kayak is heavy, ask for help.
Safety first! By following these precautions, you can ensure that your DIY project is not only fun and rewarding but also safe.
Maintenance Tips for Your DIY Kayak Rack
Maintaining your DIY kayak rack is crucial to ensure its longevity and functionality. Here are some tips to help you keep your rack in top shape:
Regular Inspection
Regularly inspect your kayak rack for any signs of damage or wear. This includes checking for loose screws, cracks in the material, or any other potential issues. Early detection of problems can prevent more significant damage and ensure the safety of your kayaks.
Cleaning
Keep your rack clean. Dust, dirt, and grime can accumulate over time and may cause damage if not regularly cleaned. Use a soft cloth and mild detergent to clean your rack, and make sure to dry it thoroughly to prevent moisture-related damage.
Weather Protection
If your rack is outdoors, it will be exposed to the elements. Consider using a weather-resistant finish to protect it from rain, sun, and snow. Regularly reapply the finish as needed to maintain its effectiveness.
Proper Storage
When not in use, store your rack in a dry, protected area to prevent damage from harsh weather conditions. If this isn't possible, consider using a cover to protect it from the elements.
A well-maintained kayak rack will not only last longer but also provide better protection for your kayaks.
FAQs About DIY Kayak Racks
Get answers to all your questions about DIY kayak racks in this comprehensive FAQ guide. Learn how to build, install, and store your kayak with ease.
1. What materials can I use to build a kayak rack?
You can use a variety of materials to build a kayak rack, including wood, PVC, and metal. Each material has its own advantages and disadvantages in terms of cost, durability, and ease of construction.
2. How much does it cost to build a DIY kayak rack?
The cost can vary greatly depending on the materials you choose, the size of the rack, and whether you already have some of the tools and materials. On average, you can expect to spend between $50 and $200.
3. How many kayaks can I store on the rack?
The number of kayaks you can store on the rack depends on the design of the rack. Some racks are designed to hold only one kayak, while others can hold multiple kayaks.
4. Can I build a kayak rack if I don't have any carpentry skills?
Yes, you can. There are many simple designs that require minimal carpentry skills. However, if you choose a more complex design, you might need some basic carpentry skills.
5. How do I maintain my kayak rack?
Regular inspection and cleaning are key to maintaining your kayak rack. If your rack is outdoors, you might also need to apply a weather-resistant finish to protect it from the elements.
6. Can I move the kayak rack once it's built?
This depends on the design of the rack. Some racks are designed to be stationary, while others have wheels for easy movement.
7. Can I customize my kayak rack?
Absolutely! One of the benefits of a DIY kayak rack is that you can customize it to suit your specific needs and preferences.
8. Is it safe to store my kayak on a DIY rack?
As long as the rack is built correctly and not overloaded, it should be safe to store your kayak on a DIY rack.
9. Do I need any special tools to build a kayak rack?
Most kayak rack designs require basic tools like a saw, drill, and screwdriver. Some designs might require additional tools.
10. Can I build a kayak rack for my truck or SUV?
Yes, there are designs available for vehicle-mounted kayak racks. However, these designs are often more complex and may require additional materials and tools.
Conclusion:
In conclusion, building your DIY kayak rack can be a fun and rewarding project that helps you save space and keep your gear organized. Get started today and enjoy the convenience of having your kayak ready to go at a moment's notice!


