Making a DIY kayak trolling motor mount was quite an adventure for me. I wanted to explore lakes and rivers with ease, so I needed a good motor mount. I started by researching and gathering all the materials. It seemed overwhelming, but I knew it would be worth it. Building my own mount meant I could customize it to fit my kayak perfectly.
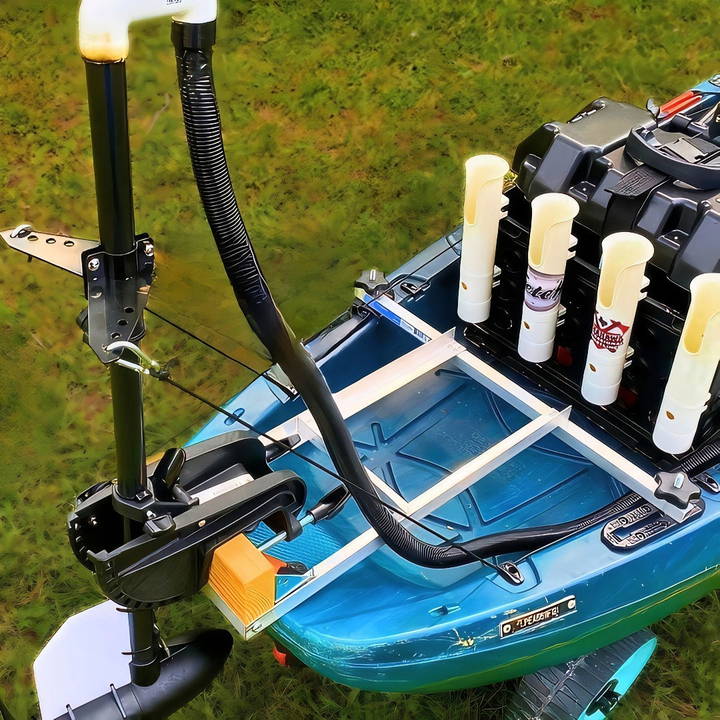
Once I had everything, the assembly was straightforward. I carefully followed instructions and double-checked each step. As I secured the motor, I imagined the relief of not having to paddle all the time. It was a project that required patience, but seeing the finished mount made me proud. Building a DIY trolling motor mount for a kayak can save you money and offers a sense of accomplishment.
Get started with the steps below; these steps will help you build a reliable and efficient mount. I'm excited to see how this helps you!
Materials You'll Need:
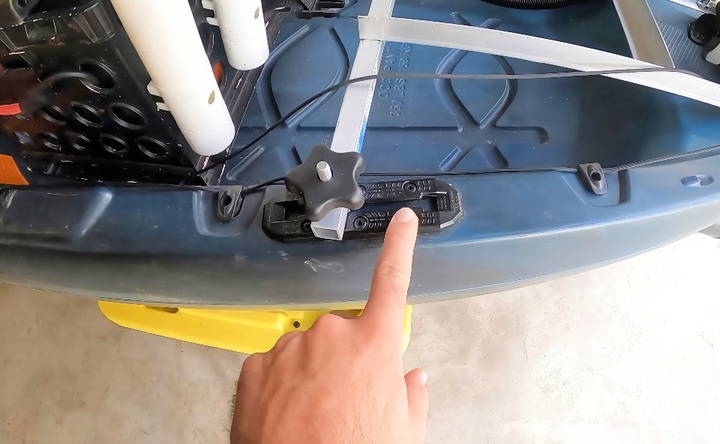
- YakAttack Gear Tracks: These are essential for mounting the motor securely to your kayak.
- Waterproof Rivets: Used to attach the gear tracks; their waterproof nature ensures durability and rust resistance.
- T-Bolts: These will help in attaching and detaching the motor mount easily.
- Aluminum Angle Pieces and Aluminum Tube: Lightweight but sturdy materials to build the motor mount.
- Screws, Nuts, and Washers: To secure all components together.
- 2x4 Piece of Wood: Acts as a base for the motor mount.
- Pulley System & PA Cord: Designed to allow easy lifting of the motor when in shallow water.
- Carabiner & Rubber Washers: Ensures the pulley system works smoothly.
- PVC Pipe: For making a handle to pull the motor up.
- Cleat: For locking the motor in the raised position.
- $2 Walmart Cutting Board: Repurposed as a rudder for better steering.
All right, let's get started!
Step by Step Instructions
Learn how to build a DIY kayak trolling motor mount with step-by-step instructions, from gear tracks to final adjustments. Perfect for kayak fishing enthusiasts!
Step 1: Installing the Gear Tracks
Learn the essential steps for installing gear tracks. Discover why they are needed and how to do it easily with our concise guide.
Why This Is Needed:
The gear tracks provide the foundation for mounting the trolling motor. Without them, the motor has no stable base.
How to Do It:
- Position the Gear Tracks: Place the gear tracks on both sides of the kayak where you want the motor to be mounted.
- Attach the Tracks: Using the waterproof rivets, secure the gear tracks onto the kayak. These rivet types are crucial as they prevent water from seeping into the kayak.
- Check Stability: Ensure the gear tracks are firmly in place and do not shift or wiggle.
Step 2: Building the Motor Mount
Build a sturdy motor mount efficiently. Learn why it's crucial and follow step-by-step instructions to craft the perfect motor mount for your project.
Why This Is Needed:
The motor mount provides a stable and sturdy platform for the trolling motor.
How to Do It:
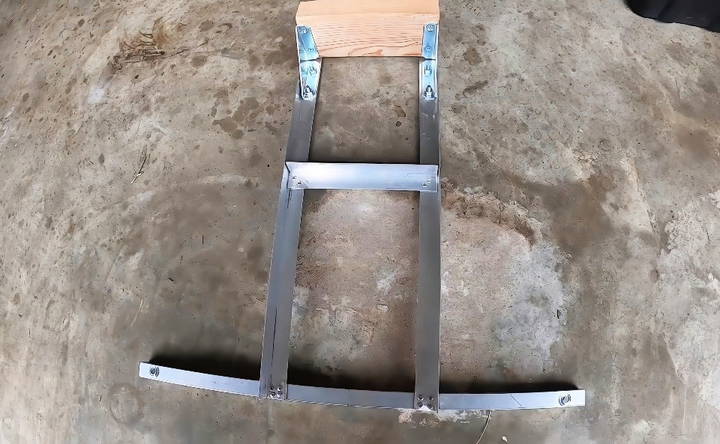
- Prepare the Aluminum Angles: Cut the aluminum angle pieces to your desired length. I used a 1/16-inch thick angle piece.
- Construct the Frame: Connect the aluminum angles with rivets to build a frame. Over-engineer if you like; it's better to be extra sturdy.
- Mount the Tube and Wood: Attach the aluminum tube and the 2x4 piece of wood to the frame. The wood acts as a strong base, and the tube helps in securing the motor.
- Drill Holes for T-Bolts: Make holes in the aluminum frame where T-Bolts will pass through and secure the setup to the gear tracks.
- Attach the Mount: Slide the T-Bolts into the gear tracks and screw the motor mount onto them tightly.
Step 3: Mounting the Trolling Motor
Discover why mounting the trolling motor is essential and learn step-by-step how to do it effectively for optimal performance on your boat.
Why This Is Needed:
Proper mounting ensures the motor is secure and functions correctly.
How to Do It:
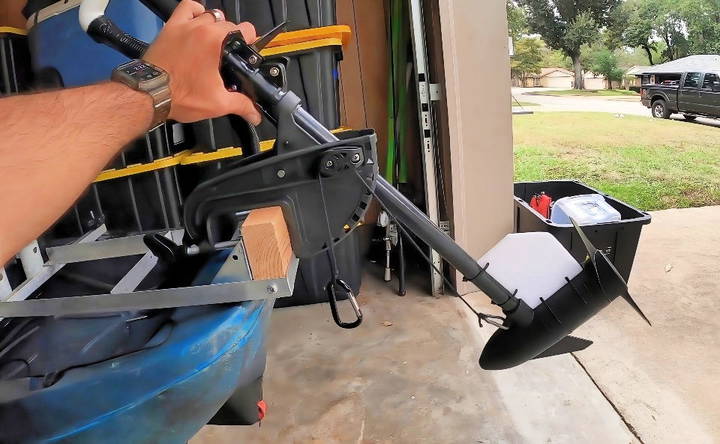
- Place the Trolling Motor: Position the motor on the motor mount, ensuring it is centered.
- Secure the Motor: Use the screws and T-Bolts to firmly secure the motor to the mount.
Step 4: Building the Pulley System
Learn how to make a pulley system efficiently. Understand why it's needed and follow step-by-step instructions to set it up correctly.
Why This Is Needed:
A pulley system allows you to lift the motor out of the water easily, crucial for shallow waters.
How to Do It:
- Install the Pulley: Attach a Harken pulley to a sturdy point on the motor mount.
- Add Rubber Washers: These provide the necessary spacing so the pulley can work smoothly without obstruction.
- Thread the PA Cord: Pass the PA cord through the pulley and attach one end to a carabiner. Tie the other end to the lifting handle made from a piece of PVC pipe.
- Attach the Cleat: Fix the cleat onto the kayak where it's convenient for you. This will lock the motor in position when raised.
Step 5: Crafting a Rudder
Learn the essential steps to crafting a rudder. Discover why it's necessary and how to do it effectively in this comprehensive guide.
Why This Is Needed:
A rudder improves the kayak's steerability, making navigation easier.
How to Do It:
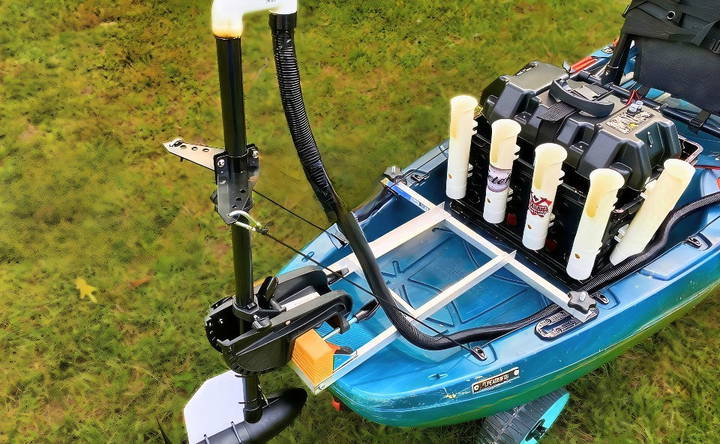
- Template Creation: Use a piece of cardboard to trace the rudder shape onto the cutting board.
- Cutting and Sanding: Cut the shape from the cutting board and sand down the edges.
- Attachment: Drill four holes on the rudder and secure it to the motor using zip ties.
Step 6: Final Adjustments and Testing
Discover why final adjustments and testing are crucial for ensuring top performance and quality. Essential steps for project success.
Why This Is Needed:
Ensures everything is in working order, and any adjustments can be made before hitting the water.
How to Do It:
- Check All Connections: Ensure all bolts, screws, and rivets are firmly in place.
- Test the Pulley System: Lift and lower the motor to ensure it operates smoothly.
- Steering and Rudder Check: Test the rudder's effectiveness in assisting with steering.
- Battery Setup: Secure your battery and ensure it's properly connected to the motor via the PWM box.
Troubleshooting Common Issues
When you're setting up a trolling motor on your kayak, you might run into a few snags. Here's a straightforward guide to help you overcome common challenges:
Motor Doesn't Fit the Mount Properly
- Check Compatibility: Ensure that your motor is compatible with the mount. Manufacturers often list compatible models.
- Adjust the Mount: Some mounts have adjustable parts. Loosen them, fit the motor, and then tighten them securely.
Motor Detaches During Use
- Secure Connections: Double-check all connections before setting out. Use lock nuts and thread-locking fluid to prevent loosening.
- Regular Inspections: Before each trip, inspect the mount for any signs of wear or damage.
Loss of Power or Intermittent Operation
- Battery Check: Verify that the battery is fully charged and properly connected.
- Wiring Inspection: Look for loose, damaged, or corroded wires and connectors.
Excessive Vibration or Noise
- Tighten All Parts: Ensure all parts are tightly secured to the kayak.
- Propeller Maintenance: Clean the propeller and check for damage. Replace if necessary.
Motor Overheats
- Ventilation: Make sure the motor has proper ventilation and isn't enclosed in a tight space.
- Usage: Avoid running the motor at full speed for extended periods.
Steering Problems
- Alignment: Check that the motor is mounted straight and aligned with the kayak's stern.
- Control Test: Test the steering controls on land to ensure smooth operation.
If you're ever in doubt, consult with a professional or the manufacturer's guidelines. Be prepared and knowledgeable about your equipment to keep your adventures worry-free.
FAQs DIY Kayak Trolling Motor Mount
Discover answers to your FAQs about DIY kayak trolling motor mounts. Learn how to install and optimize for the best kayaking experience.
The location for mounting your trolling motor on a kayak depends on your preference and the kayak’s design. You can opt for a side mount, which is easier to operate but may affect balance, or a stern or bow mount, which offers better control and maneuverability. Consider the type of fishing you’ll be doing and how you prefer to control the motor when deciding.
Yes, you can design a trolling motor mount that's easily removable. When making your mount, ensure it securely attaches to your kayak but can be detached without much effort. This might involve using quick-release mechanisms or designing the mount so it clamps onto the kayak without permanent fixtures.
Making your own trolling motor mount can be more cost-effective than purchasing a pre-made kit. It also allows you to customize the mount to fit your specific kayak and needs. Additionally, a DIY mount can provide a sense of accomplishment and a better understanding of how your equipment works.
Safety is paramount when installing a trolling motor mount. Ensure the mount is securely attached to prevent the motor from falling off. The mount should also not interfere with the kayak’s balance and stability. Always test the mount in calm waters before heading out to ensure it’s safe and functional.
To ensure the trolling motor mount will fit your specific kayak model, measure the dimensions of your kayak where you plan to install the mount. Compare these measurements with the size and shape of the mount you intend to build. Consider the weight capacity and distribution of your kayak to avoid any imbalance. It's also a good idea to check online forums or manufacturer guidelines for recommendations on mounting solutions that have worked well for your kayak model.
Conclusion:
Wrapping up, building a DIY kayak trolling motor mount can be a fun and rewarding project. It lets you customize your kayak and save money while exploring new waters. With the right materials and steps, building your trolling motor mount becomes easy and satisfying. Enjoy the enhanced performance on your next adventure!


