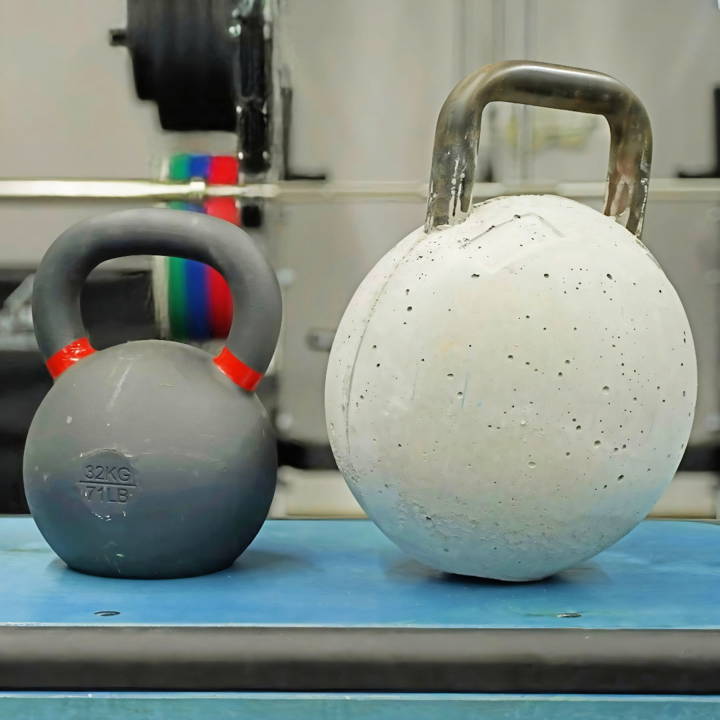
Making your own DIY kettlebell was one of the most satisfying projects I have ever done. I found a great guide that showed me how to make a DIY kettlebell from simple materials lying around my home. Not only did I save money, but I also built a versatile tool for my workouts. With just a few hours of effort, I had a functional fitness tool ready.

Using the homemade kettlebell has been a game-changer for my fitness routine. It provided the perfect weight for various exercises, including swings, squats, and presses. The sense of accomplishment in making and using it added motivation to my workouts. If you're keen on enhancing your fitness regimen, trying this out can be incredibly rewarding.
By following this guide, you can craft your own functional fitness tool. It's practical, cost-effective, and empowering. I'm here to help, and these tips will get you started on the right path to better fitness with a personal touch. Dive in and see the results!
Materials Needed and Their Purpose
Before diving into the process, it's crucial to gather the right materials. Each component plays a pivotal role in making a sturdy and functional kettlebell:
- Concrete Mix (High Strength 5000+): Forms the weight of your kettlebell. Using a high-strength mix ensures durability.
- Silicone Spray: Applied inside the mold to facilitate easy removal of the kettlebell once the concrete has set.
- Heavy-Duty Nails or Round Bar: Used to reinforce the kettlebell handle, ensuring it remains securely attached.
- Duct Tape: Seals the mold and keeps everything intact during the curing process.
- Two Buckets: One for mixing concrete and another to hold the mold.
- Mixing Tool (Shovel or Gloves): For mixing concrete. I opted for gloves to get a feel for the consistency.
- Block Spacer (Optional): Helps maintain the correct distance between the handle and the weight.
- Scale: To measure the precise amount of concrete mix needed.
Step by Step Instructions
Make your DIY kettlebell with our step-by-step guide. Learn molding, reinforcing, assembling, pouring concrete, curing, and final touches.
Preparing the Mold
Firstly, apply the silicone spray evenly inside the mold. This step is crucial for ensuring your kettlebell doesn't stick after curing.
Reinforcing the Handle
Drill holes in the handle and insert the heavy-duty nails or round bars in a cross pattern. This reinforcement is key to the longevity of your kettlebell. Cover the hollow part of the handle with duct tape to prevent concrete from seeping in.
Assembling and Securing the Mold
Fit the handle into the mold, securing it with the block spacer. Snap the mold halves together and use duct tape generously along the seams and around the handle opening. This keeps the mold from bursting open as the concrete expands slightly while drying.
Mixing and Pouring the Concrete
Weigh your dry concrete mix using the scale to get the correct amount for your desired kettlebell weight. Gradually mix in water until you achieve a thick but manageable consistency. Pour the concrete into the mold, periodically shaking the mold to avoid air bubbles and ensure an even fill.
Curing Process
After filling, leave the mold in a safe, dry area to cure. My top tip here: patience is your friend. It might be tempting to demold early, but waiting the recommended time ensures your kettlebell sets properly.
Demolding and Final Touches
Once cured, carefully remove the duct tape and open the mold. You should have a solid, well-formed kettlebell. Any rough edges can be sanded down for a smoother finish.
Making my DIY kettlebell had challenges, like perfecting the concrete mix and mold alignment. But lifting my handmade kettlebell is priceless.
The kettlebell's functionality exceeded my expectations. It's been a fantastic addition to my workouts, proving that you don't need to spend a fortune to get quality gym equipment.
Progression and Adaptation Strategies
When it comes to kettlebell training, progression, and adaptation are key to continuous improvement and avoiding plateaus. Here's how you can strategically advance your workouts and tailor them to your evolving fitness goals.
- Starting Small and Building Up Begin with a weight that allows you to perform exercises with proper form. As you grow stronger, gradually increase the weight of your kettlebell. A good rule of thumb is to progress to a heavier kettlebell when you can easily complete two sets of 20 reps with your current weight.
- Mixing It Up Variety is crucial in any fitness regimen. Incorporate different kettlebell exercises into your routine to challenge various muscle groups and keep your workouts interesting. This not only prevents boredom but also ensures a well-rounded development of strength and endurance.
- Adjusting the Intensity To boost the intensity of your workout without changing the weight, you can increase the number of reps, sets, or reduce the rest time between sets. Another method is to integrate high-intensity interval training (HIIT) with your kettlebell exercises.
- Setting Realistic Goals: Set short-term and long-term goals that are specific, measurable, achievable, relevant, and time-bound (SMART). Whether it's increasing the weight you lift, improving your endurance, or mastering a new exercise, having clear goals will keep you focused and motivated.
- Listening to Your Body: Pay attention to your body's signals. If you're feeling fatigued or experiencing discomfort beyond the usual muscle soreness, it may be time to rest or adjust your workout. Remember, recovery is just as important as the exercise itself for progress.
- Seeking Professional Guidance If you're unsure about how to progress, consider consulting a fitness professional. They can provide personalized advice and ensure you're using the correct form and technique.
Following these strategies lets you safely and effectively progress in your kettlebell training, adapting workouts to your needs.

Exercise Library with DIY Kettlebells
Using DIY kettlebells, you can still do diverse exercises. Get creative to work all major muscles. Here's a library of workouts for strength and fitness.
- Kettlebell Swing The swing is the cornerstone of kettlebell training. Stand with your feet shoulder-width apart, holding the kettlebell with both hands. Bend your knees slightly, hinge your hips to swing the kettlebell between your legs, then thrust your hips forward to swing it up to chest level. It's a powerful move that engages your entire posterior chain.
- Goblet Squat: Hold the kettlebell close to your chest with both hands, elbows pointing down. Squat down, keeping your back straight and chest up, then drive through your heels to return to standing. This exercise is great for building lower body strength and flexibility.
- Turkish Get-Up: Lie on your back with the kettlebell next to your shoulder. Roll onto your side and press the kettlebell up with one hand. Prop yourself up on your elbow, then your hand, lift your hips and sweep your leg back to a kneeling position. Stand up, then reverse the steps to return to the starting position. This complex move works on stability and coordination.
- Kettlebell Deadlift: Place the kettlebell between your feet. Bend at your hips and knees, grasp the kettlebell, and stand up by extending your hips and knees. This exercise strengthens your glutes, hamstrings, and lower back.
- Bent Over Row Bend over with a straight back, holding the kettlebell in one hand. Pull the kettlebell to your side, keeping your elbow close to your body, then lower it back down. This move targets your back muscles and biceps.
- Front Rack Reverse Lunge: Hold the kettlebell at your chest, gripping it by the handle with both hands. Step back with one foot and lower your knee towards the ground, then push back up to standing. This exercise challenges your balance and works your legs and core.
These exercises are just a start. Your DIY kettlebell lets you try many movements for varied, challenging workouts. Begin with a manageable weight, then increase it or add reps as you get stronger.
Troubleshooting Common Kettlebell Issues
When embarking on your kettlebell journey, especially with DIY kettlebells, you might encounter some common issues. This section aims to help you identify and solve these problems, ensuring a safe and effective workout experience.
Kettlebell Feels Unstable
- Solution: Check the handle and body of your DIY kettlebell for any loose parts. If you've used concrete, ensure it has cured properly. For added stability, consider adding a rubber base.
Grip Slipping During Workout
- Solution: If your grip is slipping, it could be due to sweat or a smooth handle surface. Use chalk to improve your grip, or wrap the handle with athletic tape for a more secure hold.
Wrist or Forearm Pain
- Solution: Pain in the wrist or forearm often results from improper technique. Ensure you're not bending your wrist excessively and that the kettlebell rests on your forearm, not your wrist, during lifts.
Difficulty with Certain Movements
- Solution: Struggling with specific exercises usually points to a need for form correction or strength building in certain areas. Review exercise tutorials, and don't hesitate to lower the weight until you master the movement.
Kettlebell Too Light or Too Heavy
- Solution: If your kettlebell doesn't challenge you or is too difficult to lift with proper form, adjust the weight accordingly. You can fill your DIY kettlebell with different materials, like sand or lead shot, to fine-tune the weight.
Noise During Swings
- Solution: A rattling noise might occur if there are loose materials inside your kettlebell. Secure the contents with additional filler or padding to minimize noise.
Developing Calluses
- Solution: Calluses are common but can be minimized by using gloves or adjusting your grip. Ensure you're not gripping the handle too tightly and that your hands are positioned correctly.
Address these troubleshooting points to keep your kettlebell workouts confident and comfortable. Seek advice from fitness pros when in doubt.
FAQs About DIY Kettlebell
Discover the essential faqs about DIY kettlebell, covering cost-effective creation, safety tips, and workout benefits for fitness enthusiasts.
A DIY kettlebell is a homemade version of the traditional kettlebell, which is a versatile piece of fitness equipment used for strength training. Making your own kettlebell can be cost-effective and allows for customization to fit your specific workout needs.
The weight of your DIY kettlebell can be adjusted by the amount of filling material (like cement or sand) you use. To ensure proper balance, make sure the handle is securely attached and centered over the weight. Test the balance before using it in your workouts.
Yes, a well-made DIY kettlebell can be used for the same range of exercises as a commercial one, including swings, squats, and presses. Ensure that your kettlebell has a comfortable grip and is durable enough for dynamic movements.
Safety is paramount when making and using a DIY kettlebell. Ensure that all components are securely fastened to prevent injury. When using your kettlebell, start with lighter weights to practice form and prevent accidents.
Maintaining your DIY kettlebell involves regular inspections for any signs of wear or damage, especially if you're using materials like cement or sand. If you've used a container, such as a milk jug or paint bucket, make sure there are no leaks. For kettlebells made with a PVC pipe handle, check that the handle remains firmly attached and isn't showing signs of cracking. It's also a good idea to store your kettlebell in a dry place to prevent corrosion or degradation of materials.
Conclusion:
In conclusion, making your own DIY kettlebell is a fantastic way to enhance your functional fitness routine. By crafting a homemade kettlebell, you gain a cost-effective and customizable workout tool. This simple project can add variety and effectiveness to your exercise regimen. Get started today, and enjoy the benefits of your new fitness accessory!


