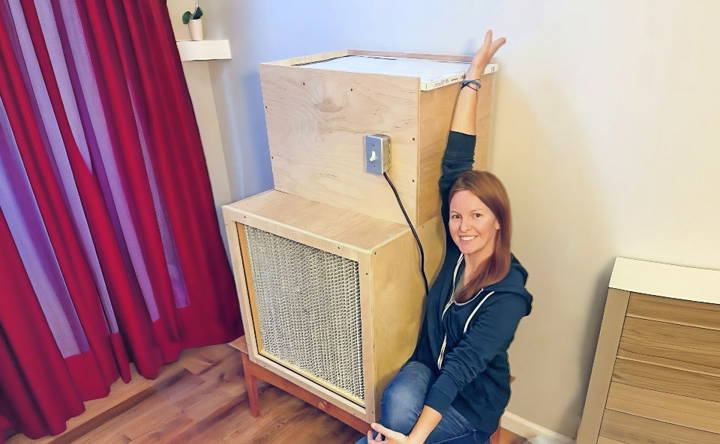
Making a DIY laminar flow hood is easier than you might think. I recently built one in my garage to help with my home lab projects. The process required some basic materials and tools, and I was amazed at how clean and efficient it kept my workspace. Here is how I managed to build this useful piece of equipment.
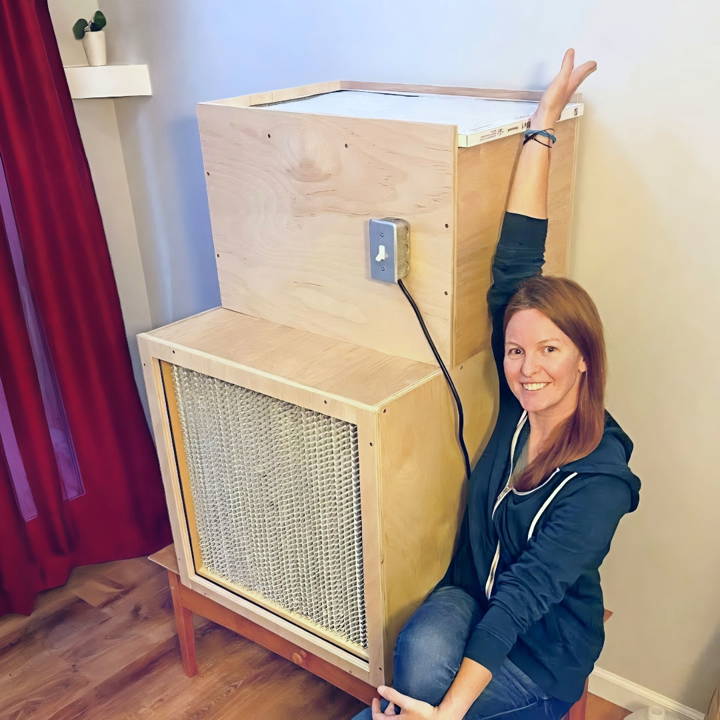
First, I got a HEPA filter, a pre-filter, and a fan. These are crucial for ensuring clean airflow. Next, I built a wooden box to house the filters and the fan. The assembly was straightforward, but I had to ensure all the seams were sealed tightly to prevent leaks. This small project made my experiments so much easier.
Follow this DIY laminar flow hood guide, and you'll have a clean workspace in no time. These really help you save money and achieve better results in your projects.
Materials Needed and Why
- HEPA Filter (24x24 inches, 0.3 micron): The heart of the laminar flow hood, this ensures air sterilization by filtering out particles larger than 0.3 microns with a 99.97% efficiency rating.
- Dayton 1TDU2 Blower: Chosen for its ability to deliver approximately 200 cubic feet per minute, crucial for maintaining a laminar flow of clean air.
- Plywood & 2x3s: Used for constructing the frame of the hood. The sturdy material ensures a durable structure.
- Wood Screws & Weather Stripping: Essential for assembling the pieces and preventing air leaks.
- Wire, Switch, and Switch Box: To safely install the blower with an on/off switch.
- Power Drill, Jigsaw, and Sandpaper: Tools needed for cutting the plywood and smoothing rough edges.
- Silicone Sealant: Used to seal the edges and crevices to prevent any air leakage.
Step by Step Instructions
Learn how to build a DIY laminar flow hood with our step-by-step guide. Follow instructions from constructing the cabinet to final assembly for a perfect setup.
Step 1: Constructing the Cabinet
I started by cutting the plywood into four pieces to build the main cabinet - two pieces for the top and bottom (25.5x24 inches) and two side pieces (25.5x25.5 inches). Sanding down the edges was crucial to ensure everything fit perfectly without any rough edges.
Step 2: Preparing the Filter Base
Next, I cut the 2x3s to 24 inches to serve as the base for the HEPA filter. It was essential to measure back the thickness of the filter (11.5 inches in my case) to ensure a snug fit. Pre-drilling holes before fastening the 2x3s with wood screws helped prevent the plywood from splitting.
Step 3: Assembling the Main Box
Using wood glue and screws, I attached the sides to build the box's frame. Pre-drilling holes for the screws was a critical step to avoid any wood damage.
Step 4: Installing the Blower
After measuring and cutting out the opening for the blower, I carefully drilled the holes and secured the blower in place using weatherstripping to seal any gaps.
Step 5: Constructing the Pre-Filter Box
The pre-filter box, which houses the pre-filter, was constructed similarly to the main cabinet. Attaching it to the main cabinet required precision to ensure a tight fit around the blower.
Step 6: Wiring the Blower
Carefully following the wiring diagram provided with the blower, I punched out the metal hole for the wire box and secured the wired armor cable. Installing the switch and wiring it up allowed me to control the blower with ease.
Step 7: Sealing and Finishing Touches
After sliding the HEPA filter into place, I used silicone sealant around all inner edges to prevent air leakage. The back panel was then fastened with wood screws and sealed with silicone.
Step 8: Final Assembly
Attaching the front-facing plywood strips provided the finishing touches to my laminar flow hood. After a thorough check to ensure all components were securely in place and that there were no air leaks, my laminar flow hood was complete.
Advanced Customizations
If you've built a basic laminar flow hood and want to improve it, advanced customizations are a great next step. These changes boost efficiency, usability, and effectiveness. Consider these advanced customizations:
UV-C Light Installation:
- Purpose: UV-C lights are known for their germicidal properties. Installing these lights in your laminar flow hood can add an extra layer of sterilization, ensuring an even cleaner workspace.
- How to Install: Mount the UV-C light fixture inside the hood, ensuring it's positioned to cover the entire work area. Always follow the manufacturer's safety guidelines when installing UV-C lights.
- Safety Note: UV-C light can be harmful to the skin and eyes. Never expose yourself to UV-C light, and only use it in an unoccupied hood.
Digital Airflow Monitoring:
- Purpose: Consistent airflow is crucial for a laminar flow hood. A digital airflow monitor can help you keep track of the airflow speed and alert you to any changes that might indicate a problem.
- How to Install: Attach the airflow sensor to the interior of the hood, connect it to the digital display mounted on the hood's exterior, and calibrate it according to the instructions provided.
Variable Speed Fan Control:
- Purpose: Different tasks may require different airflow speeds. A variable speed fan control allows you to adjust the airflow to suit your specific needs.
- How to Install: Integrate the variable speed controller with the fan's power supply. Ensure that the control is easily accessible during use.
HEPA Filter Upgrade:
- Purpose: If you're working with particularly sensitive materials, upgrading to a higher-grade HEPA filter can provide even finer filtration, capturing more particles.
- How to Install: Replace the existing filter with the upgraded HEPA filter, making sure it fits snugly and seals properly within the hood.
Custom Work Surface:
- Purpose: Depending on your work, you might need a specific type of surface. For example, a stainless steel surface is ideal for sterile applications.
- How to Install: Measure the interior dimensions of your hood and cut the material to size. Install the new work surface, ensuring it's flat and secure.
Customizations can greatly improve your laminar flow hood but need deeper knowledge and safety measures.
Testing and Validation
After assembling your DIY laminar flow hood, it's crucial to test and validate its performance to ensure it meets the necessary standards for a clean and controlled environment. Here's how you can do it:
Visual Inspection:
- What to Do: Start with a thorough visual check. Look for any gaps or misalignments where air might escape, or contaminants could enter.
- Why It Matters: Ensuring a tight seal is fundamental for the laminar flow to work correctly.
Smoke Test:
- What to Do: Use a smoke pen or incense stick near the hood's entrance. The smoke should flow smoothly and straight across the work area without swirling.
- Why It Matters: This test visually confirms the unidirectional flow of air, which is the essence of a laminar flow hood.
Particle Counting:
- What to Do: Use a handheld particle counter to measure the number of particles inside the hood. Compare this to the particle count in the surrounding room.
- Why It Matters: A significant reduction in particle count inside the hood indicates effective filtration.
Airflow Measurement:
- What to Do: An anemometer can measure the speed of the air coming through the filter. The airflow should be consistent across the entire filter face.
- Why It Matters: Consistent airflow ensures that the entire work area is protected from contaminants.
Filter Integrity Test:
- What to Do: Check the HEPA filter for any damage or leaks. You can use a leak detection spray designed for this purpose.
- Why It Matters: Any damage to the filter can compromise the entire hood's performance.
Documentation:
- What to Do: Keep a log of all tests and results. This will be useful for future maintenance and troubleshooting.
- Why It Matters: Documenting the hood's performance over time can help you spot trends and address issues before they become significant problems.
Conduct these tests to ensure your DIY laminar flow hood works correctly and provides the clean environment needed.
Safety Precautions
When making and using a DIY laminar flow hood, safety is paramount. Here are key precautions to ensure your project is not only successful but also safe:
Electrical Safety:
- What to Do: Ensure all electrical connections are secure and comply with local electrical codes. Use a ground-fault circuit interrupter (GFCI) for added protection.
- Why It Matters: Proper electrical safety prevents the risk of shock or fire, especially in environments where flammable materials may be present.
Filter Handling:
- What to Do: When replacing or disposing of filters, wear gloves and a mask. Handle used filters carefully to avoid dispersing trapped particles.
- Why It Matters: Filters can accumulate harmful particles over time, and proper handling minimizes the risk of exposure.
UV-C Light Precautions:
- What to Do: If your hood includes UV-C lights for sterilization, never look directly at the lights when they are on. Use a timer or remote switch to operate them safely.
- Why It Matters: UV-C light can cause serious harm to your eyes and skin, so it's crucial to use it responsibly.
Work Area Cleanliness:
- What to Do: Keep the area around the laminar flow hood clean and uncluttered. Disinfect the work surface before and after each use.
- Why It Matters: A clean work area reduces the risk of contamination and ensures the hood functions effectively.
Personal Protective Equipment (PPE):
- What to Do: Wear appropriate PPE, such as lab coats, gloves, and safety glasses, when working with the hood.
- Why It Matters: PPE provides a barrier between you and potential contaminants, protecting your health and safety.
Ventilation:
- What to Do: If you're using chemicals or materials that emit fumes, ensure your workspace is well-ventilated.
- Why It Matters: Good ventilation prevents the buildup of hazardous fumes, protecting your respiratory health.
Training and Knowledge:
- What to Do: Before starting your DIY project, educate yourself on the principles of laminar flow and the proper use of all equipment.
- Why It Matters: Understanding the science behind your laminar flow hood and how to use it correctly is essential for both safety and success.
Follow these safety tips to build and operate your DIY laminar flow hood confidently.
FAQs About DIY Laminar Flow Hood
Discover essential faqs about DIY laminar flow hood: tips, construction steps, and maintenance for optimal performance.
A DIY laminar flow hood is a device that builds a clean air environment, free from contaminants like dust, microbes, and particles. It's essential for tasks requiring a sterile workspace, such as culturing mushrooms, tissue culture, or electronics assembly. By using a HEPA filter, it ensures that the air flowing over your work area is clean, which is crucial for preventing contamination in sensitive projects.
A laminar flow hood works by drawing air through a HEPA filter, which captures 99.97% of particles as small as 0.3 microns. The filtered air is then pushed out in a smooth, laminar flow, making a sterile environment for your work. This steady stream of clean air prevents airborne contaminants from settling on your workspace.
Yes, you can build a laminar flow hood on a budget. There are tutorials available that show how to construct a functional laminar flow hood for less than $100. These guides provide step-by-step instructions on selecting the right materials, assembling the components, and ensuring that the hood operates correctly to maintain a sterile environment.
Maintaining your DIY laminar flow hood involves regularly checking and replacing the pre-filter, ensuring the HEPA filter is secure and free from damage, and cleaning the exterior surfaces. It’s also important to test the airflow periodically to make sure it remains laminar and does not become turbulent, which could compromise the sterility of your workspace.
Selecting the right fan for your DIY laminar flow hood is crucial for maintaining the proper airflow. You'll need a fan that can handle the static pressure of the HEPA filter, which is typically between 0.8" and 1.0" of static pressure. The fan should be powerful enough to push air through the HEPA filter while maintaining a laminar flow over your work area. It's also important to consider the noise level of the fan, as a quieter fan will make for a more pleasant working environment.
Conclusion
To conclude, I can't stress enough how helpful the DIY laminar flow hood has been for my experiments. Don't wait to make your own; start now and see the difference it makes.


