Starting a project with a DIY laser cutter changed the way I work on my hobbies. At first, the idea of using lasers to cut and engrave seemed daunting. But, after diving in, I found it wasn't as hard as I thought. The learning curve was there, but it was exciting to see my projects come alive in ways I never imagined.
One of the best parts was making personalized gifts for friends and family. Whether it was engraving names on wooden keychains or cutting intricate designs for decorations, the DIY laser cutter made my work stand out. It has become an invaluable tool in my workshop, giving me the freedom to experiment and create unique, personal items.
I hope sharing my journey encourages you to get started with DIY laser cutters. These tools can open up a world of creativity for your projects.
Gathering Materials
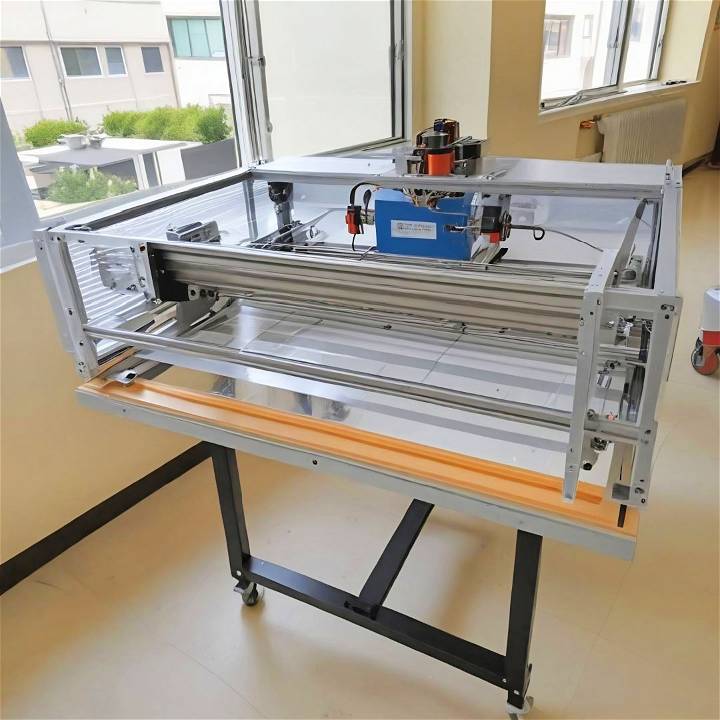
The journey to building my laser cutter started with gathering all the necessary materials. The decision to use aluminum extrusion (both 2020 and 2040 v-slot profiles) was driven by its adjustability and compatibility with linear movement mechanisms. These materials are not only easy to find but also versatile enough to be incorporated directly into the frame.
Why Aluminum Extrusion?
- Adjustability: The slots in the extrusions allow for easy adjustments during and after assembly.
- Accessibility: These materials are readily available in many hardware stores or can be ordered online.
- Compatibility: Their design integrates well with linear movement components, which is critical for a laser cutter.
Step by Step Instructions
Learn how to build your own laser cutter with our step-by-step instructions. Save time and money by making your own DIY laser cutter today!
Design and Planning
Designing this machine was perhaps the most time-intensive phase. Using CAD software, I meticulously planned every cut, every joint, and every assembly point. Building a detailed cut list was crucial as it prevented any miscalculations and ensured that I had all the dimensions perfectly laid out before the physical assembly began.
The Importance of a Cut List
- Accuracy: Guarantees precise dimensions for cutting, reducing waste and errors.
- Efficiency: Saves time by providing a clear roadmap for the cutting process.
The Assembly Phase
Assembling the laser cutter's frame was both challenging and rewarding. I started by cutting the aluminum extrusions to length, a process that required precision and patience. The use of 3D printed plates for initial trials before cutting them from quarter-inch aluminum was a decision that saved me from potential mistakes.
3D Printing vs. Aluminum Plates
- Testing: 3D printed plates are great for prototyping and ensuring everything fits correctly before committing to aluminum.
- Durability: Aluminum plates offer the strength and longevity needed for a stable laser cutter frame.
Ensuring Movement and Precision
For the laser to cut accurately, the X and Y axes needed to move smoothly. Incorporating v-wheels and eccentric nuts into the design allowed for adjustability and precision. I also tapped holes directly into the aluminum plates, streamlining the assembly process and enhancing the rigidity of the overall structure.
Smooth Movement is Key
- Adjustability: Eccentric nuts on the v-wheels make it easy to adjust the tension and alignment, ensuring smooth movement.
- Precision: A rigid frame translates to more accurate cuts, making the tapping of holes into the aluminum plates a crucial step.
The Bed and Laser Tube
Addressing the Z-axis, or the bed's movement, was essential for focusing the laser properly. By attaching the bed to plates with a brass nut embedded and turning an 8mm threaded rod, I achieved a reliable and adjustable mechanism to raise and lower the bed.
Mounting the laser tube required careful consideration of both safety and precision. The 3D printed mounts allowed for the necessary adjustments to align the tube with the machine's mirrors, a critical step for the functional operation of the laser cutter.
The Critical Components
- Z-Axis Adjustability: Essential for focusing the laser for optimal cutting performance.
- Laser Tube Alignment: Precision in aligning the laser tube with the mirrors ensures the effectiveness of the laser cutter.
Building a DIY CO2 laser cutter was a great learning experience, with challenges that tested my skills. Sharing designs and CAD files shows my belief in open-source projects. The journey ends with a valuable tool for my workshop.
For Future Builders
- Patience and Planning: The key ingredients to a successful DIY project.
- Community Sharing: Don't hesitate to share your journey and learnings to inspire and assist others.
Embarking on building your own CO2 laser cutter requires a blend of dedication, meticulous planning, and a willingness to tackle unforeseen challenges. With each step, from material selection to final assembly, the project not only tested my skills but also enriched my understanding of what it means to build something truly from scratch.
Laser cutters are powerful tools that allow you to cut and engrave materials with precision. They work by focusing a laser beam onto a material, which either melts, burns, or vaporizes away, leaving an edge with a high-quality finish.
Why Build Your Own?
Building your own laser cutter can be a rewarding project. Not only can it save you money compared to buying a pre-assembled unit, but it also gives you the freedom to customize it to your specific needs. Whether you're a hobbyist looking to build intricate designs or a small business owner producing custom parts, a DIY laser cutter can be tailored to suit your projects.
The Basics You Need to Know
A DIY laser cutter kit typically includes all the necessary parts: a laser module, a frame, motors, and a control board. You'll need some basic tools and a bit of technical know-how to assemble it, but don't worry, most kits come with detailed instructions. Once assembled, you'll connect it to a computer with software that controls the laser, allowing you to cut or engrave designs you've buildd or downloaded.
Safety First
Safety is paramount when operating a laser cutter. Always wear protective eyewear to shield your eyes from the laser. Make sure to work in a well-ventilated area, as the cutting process can produce fumes. Never leave the laser cutter unattended while it's operating, and always use it in accordance with the manufacturer's guidelines.
By following these principles, you'll be on your way to successfully building and operating your own DIY laser cutter. Remember, take your time, follow the instructions, and don't hesitate to reach out to the community if you need help. Happy crafting!
Troubleshooting and Maintenance for DIY Laser Cutters
Maintaining your DIY laser cutter is crucial for its longevity and performance. Here's a comprehensive guide to help you troubleshoot common problems and keep your machine in top condition.
Regular Cleaning
Dust and residue can accumulate on your laser cutter, especially on the lens and mirrors. This can affect the quality of your cuts and engravings. Regularly clean these components with a soft, lint-free cloth. If you notice any uneven or shallow cuts, it might be a sign that the optics need cleaning.
Checking and Replacing Optics
The laser's optics are delicate and can wear out over time. Inspect them for any signs of damage or wear. If you find any issues, replace the damaged parts promptly to avoid further problems.
Aligning the Laser
Misalignment can lead to inaccurate cuts. Check the alignment of your laser's mirrors and lens periodically. You can do this by firing test pulses at target points. Adjust as needed to ensure the beam is straight and centered.
Cooling System Maintenance
Your laser cutter's cooling system is vital for preventing overheating. Keep an eye on the coolant levels and check for any leaks. Clean or replace filters regularly, and monitor the temperature and pressure to ensure everything is operating within safe limits.
Lubricating Moving Parts
To keep your laser cutter moving smoothly, lubricate the moving parts such as the rails and bearings. Use the right type of lubricant as recommended by the manufacturer, and follow a regular maintenance schedule.
Troubleshooting Common Issues
If you encounter problems like low laser power or air assist issues, first check the power settings and connections. Ensure that the air assist is functioning correctly and that there's no blockage in the air path.
By following these tips, you ensure your DIY laser cutter works well and produces quality work. Remember to consult the manual or community for help when needed. Keep your machine clean, maintained, and aligned for successful projects.
FAQs About DIY Laser Cutter
Discover everything you need to know about DIY laser cutters in our comprehensive FAQs guide. From materials to safety tips, get all your answers here.
What is a DIY laser cutter?
A DIY laser cutter is a machine that you can assemble and use to cut or engrave materials like wood, plastic, and fabric. It uses a focused beam of light to precisely remove material and build designs.
How does a laser cutter work?
A laser cutter focuses a narrow beam of light onto a material, which either melts, burns, or vaporizes the area it touches. This process is controlled by a computer that directs the laser according to a digital design.
Is it safe to use a DIY laser cutter?
Yes, if you follow safety guidelines. Always wear protective eyewear, work in a well-ventilated area, and never leave the laser cutter unattended while it's running.
Can I engrave designs with a laser cutter?
Absolutely! In addition to cutting, you can engrave detailed designs onto surfaces. This is perfect for building personalized items or intricate artwork.
How do I maintain my DIY laser cutter?
Keep it clean, check the alignment of the laser, and replace any worn-out parts. Regular maintenance will ensure your laser cutter continues to work well for your projects.
Conclusion:
In conclusion, embarking on a DIY laser cutter project can be a rewarding and fun experience. With the right tools and knowledge, you can unleash your creativity and build amazing designs. Dive into the world of DIY laser cutting today!


