Building my DIY lat pulldown was simpler than I thought. I gathered a few basic materials like a sturdy rope, pulleys, and a weight stack. My friend and I spent a Saturday afternoon assembling it in my garage. We carefully followed a step-by-step guide. I felt a great sense of pride seeing the finished lat pulldown, knowing it didn't cost much.
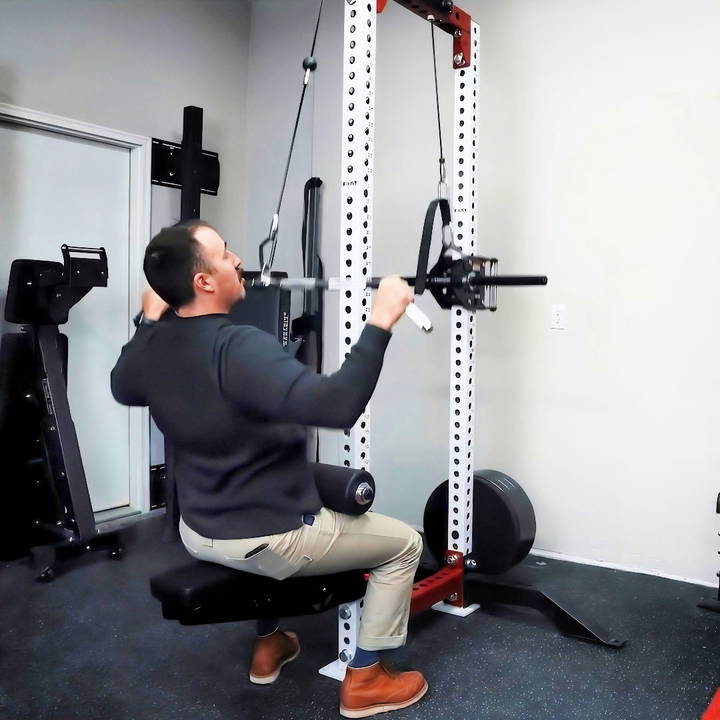
Since setting it up, I've used it every morning. It's really helped me build upper body strength. The homemade lat pulldown is a perfect addition to my home gym. I can do a variety of exercises now. If you're thinking about strengthening your back and arms, building your own lat pulldown is a great start. Get your materials ready and enjoy the process!
Materials You'll Need
- Rogue LT1 50 Cal Trolley System: This is the core component of our build. Known for its durability and adjustable features, it's perfect for our DIY lat pulldown.
- Modular Uprights: We'll be using 3x3 modular uprights with one-inch holes. These will serve as the main support structure.
- Top and Bottom Cross Members: Essential for providing stability and ensuring everything stays in place.
- Rogue Slinger Pulley System: This will be used to guide the cable smoothly over the top and down.
- Weight Pegs and Plates: For loading our lat pulldown system.
- Carabiners and Spud Straps: For securing the cable system.
- Seat: You can repurpose an existing bench or buy a dedicated lat pulldown seat.
- PVC Pipe: Optional but useful for guiding the cable through the pull system smoothly.
- Utility Pins: These will hold the weights in place on the trolley system.
Step by Step Instructions
Learn to build your own DIY lat pulldown with our step-by-step guide. Follow our easy instructions for a perfect home gym setup.
Step 1: Setting Up the Uprights and Cross Members
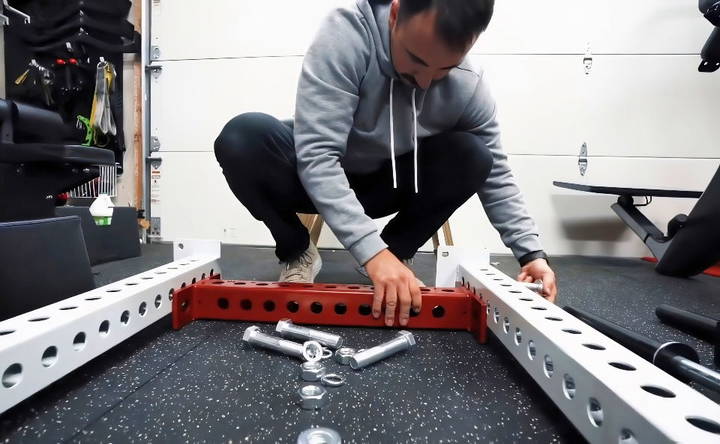
- Position the Uprights: Start by setting up two modular uprights. Make sure they are securely anchored to ensure stability.
- Attach the Cross Members: Connect the top and bottom cross members between the uprights. This will build the basic frame for our lat pulldown station.
Step 2: Installing the Rogue Slinger Pulley System
- Mount the Slinger: Attach the Rogue Slinger pulley system to the top cross member.
- Run the Cable: Guide the cable over the top pulley and down through the pulley system.
Step 3: Integrating the 50 Cal Trolley System
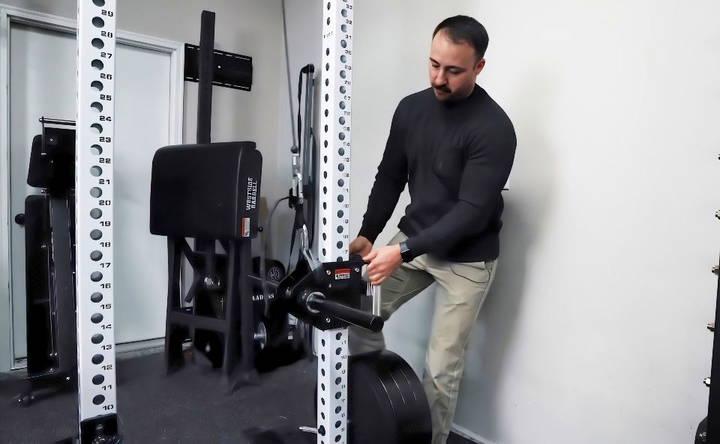
- Prepare the Trolley: Take the LT1 50 Cal Trolley System and flip it upside down.
- Add Weight Pegs: Attach weight pegs to the trolley for plate loading. Ensure they are securely fastened to avoid any wobbling.
Step 4: Connecting the Cable
- Secure with Carabiners and Straps: Use spud straps and carabiners to connect the cable from the slinger to the trolley system.
- Fine-Tuning the Mechanism: Adjust the tension and ensure that the trolley moves smoothly up and down. You may need to add some weight to balance it perfectly.
Step 5: Setting Up the Seat
- Choose Your Seat: Whether you're using a dedicated lat pulldown seat or repurposing an old bench, ensure it is stable and comfortable.
- Secure It Properly: If necessary, use bolts or straps to secure the seat so it doesn't move during use.
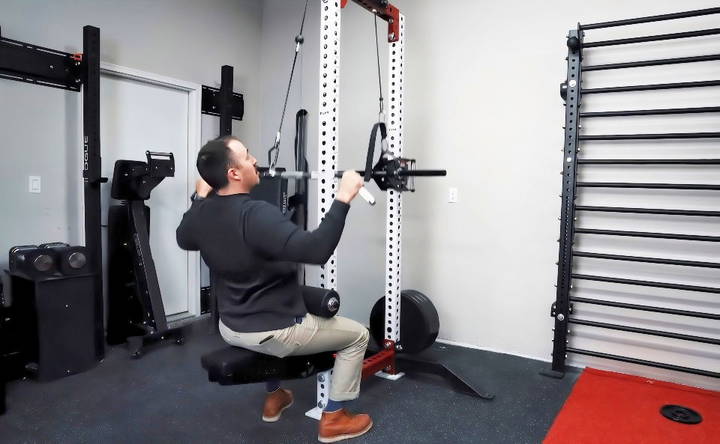
Step 6: Adding Functionalities
- Low Row Addition: To add a low row functionality, consider installing an additional pulley system at the base.
- Guide Cables with PVC: Cut a piece of PVC pipe and place it around the cable near any metal parts to prevent wear and tear.
Usage Tips and Final Thoughts
- Weight Loading: Start with a lighter weight to test the stability and smoothness. Gradually increase as you feel more comfortable.
- Maintenance: Keep the pulley system and trolley well-lubricated to avoid any friction or wear over time.
- Testing: Perform a few test pulls to ensure everything is securely in place and functioning smoothly.
Safety and Practical Considerations
- Anchor Points: Always double-check that your uprights and cross members are securely attached and can handle the weight you're planning to use.
- Smooth Operation: Ensure the trolley and pulley system operate smoothly to prevent any sudden jerks or stops during your workout.
- Seat Stability: Make sure your seat is stable and does not wobble. This is crucial for maintaining proper form and avoiding injuries.
Customization Options
When making your own lat pulldown machine, the beauty lies in the ability to tailor it to your personal preferences and the constraints of your workout space. Here are some customization options that can help you make the most out of your DIY project:
- Adjusting the Frame Size: Not everyone has the same amount of space available, so it's important to adjust the dimensions of your lat pulldown machine accordingly. If you're working with a smaller area, consider a compact design that can be mounted against a wall or in a corner. For larger spaces, you might opt for a freestanding model that allows for a full range of motion and additional exercise options.
- Selecting the Right Pulley System: The pulley is the heart of your lat pulldown machine. You can choose between various types of pulleys based on smoothness, durability, and price. A higher-quality pulley will provide a smoother experience but may cost more. It's also essential to ensure that the pulley can handle the weight you plan to lift.
- Choosing Your Weight System: There are several ways to integrate weights into your lat pulldown. You can use weight plates, adjustable dumbbells, or even sandbags if you're looking for a more cost-effective solution. Make sure that the weight system you choose is secure and easy to adjust for different exercises and strength levels.
- Incorporating Various Handles and Grips: Different handles can target different muscle groups and add variety to your workouts. Consider adding a straight bar, V-bar, rope, or individual handles to your setup. This will allow you to perform a wide range of exercises beyond the standard lat pulldown.
- Adding Safety Features: Safety should never be compromised. Adding features like a weight lock can prevent weights from slipping, and rubber footing can stabilize the machine, especially on slick surfaces.
- Personal Touches: Finally, don't forget to add personal touches to your machine. This could be anything from a custom paint job to foam padding on the seat for extra comfort. These small additions can make your workout experience more enjoyable and motivate you to use your machine regularly.
By considering these customization options, you can build a lat pulldown machine that not only meets your fitness goals but also fits perfectly into your home gym environment.
FAQs About DIY Lat Pulldown
Explore our FAQs about DIY lat pulldown to get expert tips, step-by-step guides, and answers to all your questions for a successful workout setup.
A DIY lat pulldown is a homemade version of the traditional gym equipment used to target the latissimus dorsi muscles in your back. Building one can be cost-effective, customizable to fit your space, and offers the convenience of working out at home.
The main benefits include cost savings, the ability to tailor it to your specific needs and space, and the satisfaction of building your own gym equipment. Additionally, you can often use higher quality materials than what might be found in some commercial options.
Yes, safety is paramount. Ensure all components are securely fastened, the weights are properly balanced, and the pulley system operates smoothly. Regularly inspect your equipment for wear and tear to prevent accidents.
Absolutely! Besides the standard lat pulldown exercise, you can use the machine for variations like close-grip pulldowns, reverse grip pulldowns, and even tricep pushdowns if you add additional handles and attachments.
When choosing materials, prioritize durability and strength to ensure safety and longevity. Use heavy-duty cables or ropes, solid bars, and secure pulleys. If possible, opt for materials that are weather-resistant if your setup is outdoors. It's also important to consider the weight capacity of each component to match your workout needs.
Conclusion
Building a DIY lat pulldown system was an incredibly rewarding project. Not only does it offer me the versatility and effectiveness of a commercial-grade machine, but it also integrates seamlessly into my home gym setup. The use of the Rogue LT1 50 Cal Trolley System as the core component provides a robust and smooth-functioning pulldown station.
If you're looking to add a lat pulldown system to your home gym without breaking the bank, I highly recommend giving this DIY project a try. It's not just about saving money; it's about making something that fits perfectly into your space and meets your specific workout needs.


