Making something with your own hands is a rewarding experience. I remember the day I decided to build my own DIY lathe. It was both exciting and challenging. I spent hours researching and gathering materials. Each step taught me something new about woodworking and mechanical assembly. By the end, I felt a great sense of accomplishment.
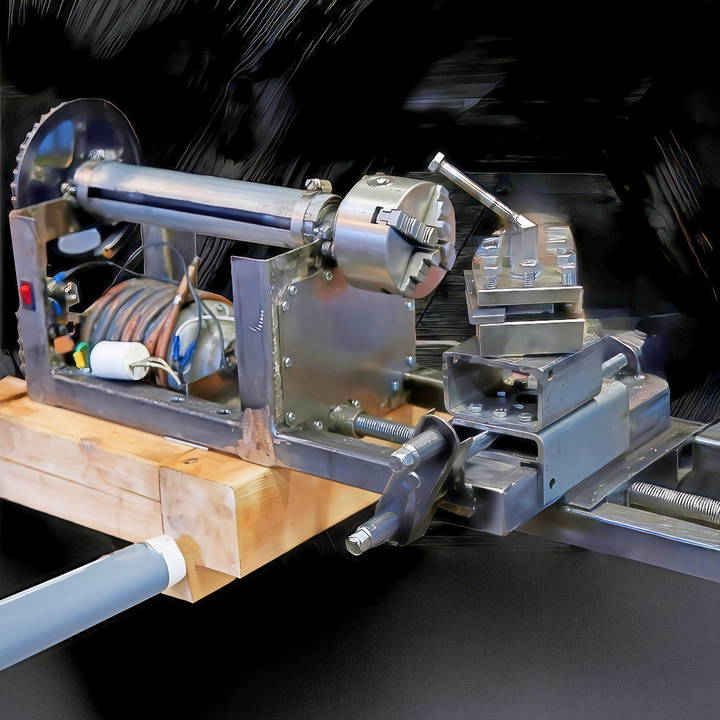
Making your own DIY lathe saves money and provides a customized tool that fits your exact needs. With patience and the right materials, you, too, can build a functional lathe. If you're a hands-on person who loves to make, this guide will help you on your journey. I'm excited to share these straightforward steps to get you started in building your lathe.
Step by Step Instructions on
Learn how to build a DIY lathe with our step-by-step guide, from gathering materials to fine-tuning and testing. Perfect for hobbyists and metalworking.
Step 1: Gathering Materials and Tools
The first step was sourcing the needed parts without breaking the bank. I scoured my workshop for anything that could be repurposed, from metal scraps to old machinery parts. The primary materials and tools I gathered included:
- Metal Frame Pieces: Vital for building a sturdy base and frame for the lathe.
- Drive Shaft and Bearings: The heart of the lathe, enabling the main spindle to rotate smoothly.
- Welding Equipment: Essential for assembling the metal pieces securely.
- Four Jaw Chuck: A lucky find in my shop that allowed for greater versatility in the workpieces I could turn.
Step 2: Design and Assembly
Drawing a technical plan was a departure from my usual improvise-as-I-go approach, signifying the seriousness of this project. Each component's placement and function were carefully thought out, ensuring a sensible assembly process. The welding was challenging, requiring patience and precision, but witnessing the frame taking shape was gratifying.
Step 3: Tackling the Drive Shaft Assembly
This part proved more complex than anticipated. I had to grind down the drive shaft to fit the bearings perfectly. Getting this right was critical for the lathe to operate smoothly and accurately. The process of heat fitting the bearing onto the shaft was tense but ultimately successful, providing a robust drive shaft unit ready to be welded into the frame.
Step 4: Fine-tuning and Problem Solving
Aligning the chuck correctly with the drive shaft was a delicate task. Any misalignment would mean inaccurate workpieces, defeating the lathe's purpose. I opted for a pragmatic approach, tack welding and adjusting until everything lined up perfectly. This step was a testament to the fact that sometimes, "good enough" engineering can lead to satisfactory results.
Step 5: The Drive System Configuration
Realizing the initially installed motor spun the lathe too fast, I delved into the world of gears and ratios. Selecting the right gear sizes to adjust the RPMs was crucial for the lathe's functionality and my safety. I fabricated a chain tensioner to ensure consistent operation, and with the drive system finalized, I was a step closer to having a fully functional lathe.
Step 6: The Cutting Tool and First Test
Making the cutting tool from O1 tool steel and fine-tuning its shape was a blend of art and science. The first test run was a moment of truth. While not perfect, it was a start. Adjusting the tool's height and regrinding the edges for better contact with the material gradually improved the lathe's performance.
Continuous Improvement
Although my homemade lathe doesn't mirror a store-bought one in looks or performance, it's a creation I'm immensely proud of. It's a tangible result of creativity, problem-solving, and the drive to learn. The journey taught me invaluable lessons in metalworking, machinery design, and the satisfaction of turning a vision into reality.
Advanced Techniques for Experienced Users
For those who have mastered the basics of lathe work, exploring advanced techniques can open up a new world of possibilities. Here, we delve into some sophisticated methods that can help you take your projects to the next level.
Understanding Grain Orientation
- Grain orientation plays a crucial role in the final appearance and strength of your project.
- Learn to identify the direction of the grain and how it affects the turning process.
- Adjust your technique to work with the grain, not against it, for a smoother finish.
Multi-Axis Turning
- Multi-axis turning allows you to make irregularly shaped objects.
- It involves changing the axis of rotation during the turning process.
- This technique requires careful planning and precision but results in unique, eye-catching pieces.
Working with Inlays
- Inlays can add beauty and complexity to your work.
- Use materials like metal, stone, or contrasting wood to make intricate designs.
- Practice the art of cutting precise recesses and securing the inlay material firmly.
Making Threads
- Threading on a lathe enables you to make screw threads for functional pieces or decorative elements.
- It's a delicate process that involves matching the thread pitch and diameter accurately.
- Patience and steady hands are key to mastering this skill.
Hollowing Techniques
- Hollowing is essential for making items like vases or hollow vessels.
- Learn to use hollowing tools effectively to remove material from inside an object.
- Understand the importance of maintaining wall thickness for structural integrity.
Surface Decoration and Texturing
- Explore various methods to decorate the surface of your work, such as carving, burning, or painting.
- Texturing tools can make patterns and visual interest on the wood surface.
- Experiment with different techniques to find your signature style.
Incorporate advanced techniques to make intricate and personalized lathe projects. Remember, success requires practice, patience, and learning from each attempt.
Lathe Maintenance and Troubleshooting
Maintaining your lathe is essential to ensure it operates smoothly and safely. Here's a comprehensive guide to help you keep your lathe in top condition and troubleshoot common problems.
Regular Maintenance Routine
- Clean your lathe after each use to remove wood shavings, dust, and metal filings.
- Lubricate moving parts regularly with appropriate oils to reduce wear and tear.
- Inspect belts and pulleys for signs of wear and replace them if necessary.
Aligning the Lathe
- Check the alignment of the headstock and tailstock periodically to ensure accuracy in your work.
- Use a precision test bar or a dial indicator to check for alignment and make adjustments as needed.
Dealing with Vibrations
- Vibrations can affect the quality of your work. Make sure the lathe is securely mounted to a stable surface.
- If vibrations persist, check for loose parts or an unbalanced workpiece and address these issues.
Sharpening Tools
- Dull tools can damage your lathe and your work. Sharpen your tools regularly to maintain a clean cut.
- Use a grinding wheel or sharpening jig to get consistent angles and sharp edges.
Solving Electronic Issues
- If your lathe has electronic components, a reset may solve minor glitches.
- For persistent electronic problems, consult the manufacturer's manual or a professional technician.
When to Seek Professional Help
- If you encounter a problem that's beyond your expertise, don't hesitate to contact a professional.
- Regular professional servicing can prevent many issues and extend the life of your lathe.
Ensure your lathe's reliability with maintenance tips and troubleshooting advice. Keep it clean, sharp, and smooth for high-quality woodworking or metalworking.
FAQs About DIY Lathe
Discover essential FAQs about DIY Lathe projects, covering tips, materials, tools, and techniques for your woodworking journey!
A DIY lathe is a tool that you can build at home to rotate a piece of material so you can shape, cut, sand, or drill it with precision. It’s commonly used for woodworking projects like making bowls, pens, or furniture legs, but can also be adapted for metalworking.
Always wear safety glasses to protect your eyes from flying debris. Ensure all components are securely fastened and check for any loose parts before starting the lathe. Use sharp tools to minimize the force needed and never leave the lathe running unattended.
Yes, but it requires more precision and a stronger motor than a wood lathe. The tool rest and tailstock must be designed to handle the resistance of metal. It’s recommended to start with woodworking and progress to metalworking as you gain experience and confidence.
There are many resources online, including step-by-step guides and instructional videos. Websites like Instructables offer detailed projects submitted by users, and you can find comprehensive guides tailored to various skill levels and material preferences.
The motor is the heart of your DIY lathe, and choosing the right one is crucial for its performance. For woodworking, a motor with 1/2 to 1 horsepower is usually sufficient. If you plan to work with metal, you'll need a more powerful motor, at least 2 horsepower. Look for a motor that has variable speed control, which will give you the flexibility to work on a variety of projects with different requirements. Remember to match the motor's power supply requirements with what you have available in your workshop.
Final Thoughts
In conclusion, making your own DIY lathe is a rewarding and cost-effective project. This guide has covered all the essential steps for making your own lathe, providing you with a hands-on solution. Start your project today and experience the satisfaction of crafting your DIY lathe.


