Making my own DIY lawn aerator at home was one of the best decisions for my garden. I used simple materials like a plank of wood, some nails, and a sturdy handle. The total cost was minimal, and the process was straightforward. I learned a lot by doing it myself and was proud of the results. Plus, the improvement of my lawn was noticeable within weeks.
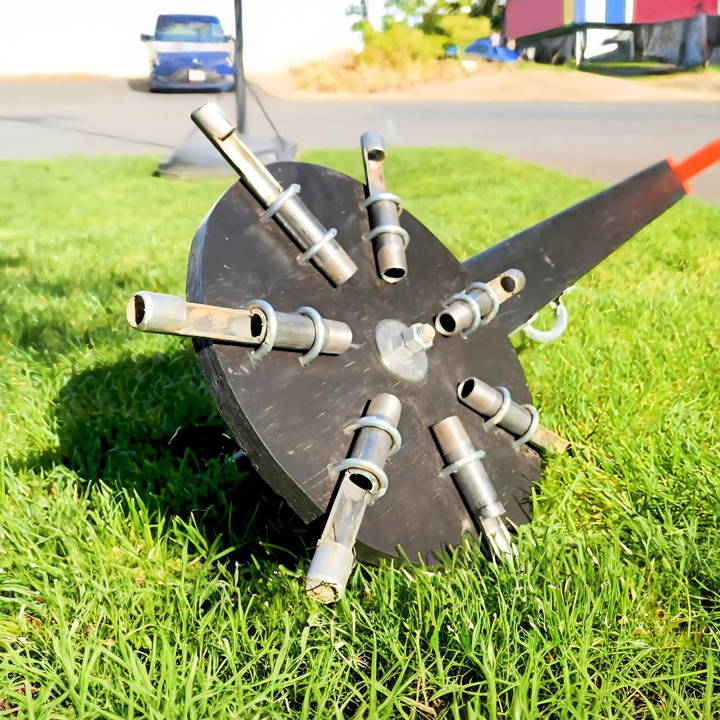
Using a DIY lawn aerator not only saved me money but also yielded effective results. My lawn looked healthier and greener. I felt accomplished knowing I built it with my own hands.
If you're thinking about making your own homemade lawn aerator, this guide will help you. Get creative and take pride in nurturing your garden with these practical steps.
Why Aerate Your Lawn?
The soil in your lawn can compact over time due to foot traffic, lawn equipment, and natural settling. This leads to fewer air pockets, making it hard for roots to thrive and reducing moisture and nutrient retention.
Aeration loosens the soil, aiding root growth and drainage. It helps prevent waterlogging, moss, and thatch. Regular aeration boosts water absorption, reducing runoff and waste.
The Best Time to Aerate
The ideal time to aerate your lawn is during the growing season when the grass can heal and fill in any open areas after soil plugs are removed. Typically, this is in the early spring or fall for cool-season grasses, and late spring through early summer for warm-season grasses.
Materials Needed and Why
- Steel Pipe (1/2 inch diameter): For the tines that remove cores from the lawn. Steel is durable and can withstand the stress of penetrating soil.
- Wood (2x4): To build the frame and handle. Wood is sturdy, easy to work with, and provides a comfortable grip.
- Wheel (13-inch diameter): The base of the aerator, making it mobile. A larger wheel navigates uneven terrain more readily.
- U-bolts, Washers, Nuts: For securing the tines to the wheel. These provide the adjustability and firmness needed for the tines to function correctly.
- Grinding Disc: To smooth out the tines, ensuring they easily penetrate the soil and release the cores.
- Weights (to preference): Key for pressing the tines into the ground. The weight needed will vary depending on soil type.
Step by Step Instructions
Learn how to make a homemade lawn aerator with our step-by-step instructions, from preparing the wheel to adding the final touches.
Step 1: Preparing the Wheel
I began by marking and dividing my wheel into seven equal parts, then drilling a central hole. This setup would later accommodate the steel pipes (tines).
Step 2: Crafting the Tines
After cutting my steel piping in half, I buildd a 2-inch opening on one end of each piece to allow soil cores to exit. Though precise measurements weren't crucial, ensuring uniformity amongst the tines was.
Step 3: Assembling the Aerator
I attached each tine to the wheel using U-bolts, spacing them evenly and securing them just tight enough to allow for rotation but prevent wobbling.
Step 4: The Frame and Handle
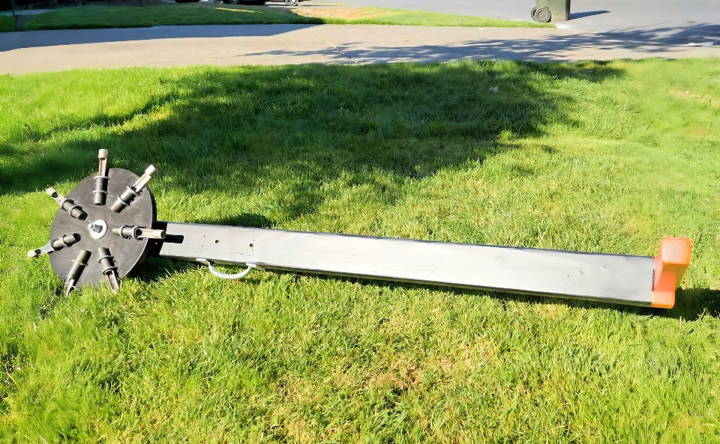
I cut a 2x4 to 4.5 feet for the frame and 21.5 inches for the handle. I was lucky that the handle fit snuggly into the frame, providing stability. After adding a couple of long screws for extra support, I rounded off the edges for a comfortable grip.
Step 5: Final Touches
Finally, I buildd a 4x4 inch spacer to sit between the wheel and the frame, preventing any unwanted contact. Using basic tools for assembly, I managed to put everything together in under two minutes.
Personalization Tips
- Weight Adjustment: The amount of weight you'll need can differ. For my lawn, 30 pounds was the minimum effective weight. After some trial, I found a range between 30 to 50 pounds worked best.
- Lubrication: Before each use, I applied a lubricant to the tines and washers. It made cleaning much easier and kept the mechanism moving smoothly.
Usage Expertise
Before aerating, I ensured my lawn was appropriately prepped. Watering my lawn a few days prior and mowing it a bit shorter than usual made the aeration process smoother. However, aerating immediately after watering isn't ideal, as overly soft soil can lead to larger, unsightly holes.
Maintenance and Care
Taking care of your homemade lawn aerator is crucial for its longevity and performance. Here's a straightforward guide to maintaining your aerator, ensuring it stays in top condition for years to come.
Regular Cleaning
After each use, remove soil and grass from the spikes or plugs. This can be done with a simple brush or hose. Keeping the aerator clean prevents rust and soil buildup, which can affect its efficiency.
Checking for Wear and Tear
Inspect your aerator regularly for any signs of damage. Look for bent spikes, loose components, or any parts that seem worn out. Promptly replace or repair any damaged parts to maintain the aerator's effectiveness.
Storage Tips
Store your aerator in a dry, covered area to protect it from the elements. If possible, hang it up to prevent it from resting on damp surfaces, which could cause rusting.
Rust Prevention
To prevent rust, you can coat the metal parts of your aerator with a thin layer of oil or a silicone spray. This is especially important if you live in a humid climate or if the aerator will be stored for a long period.
Keeping Handles in Good Shape
If your aerator has a wooden handle, check it periodically for splinters or cracks. Sand down rough areas and consider treating the wood with a sealant to protect it from moisture and decay.
Sharpening Spikes
For spike aerators, keeping the spikes sharp ensures they can easily penetrate the soil. You can sharpen them with a file or grinder, but always follow safety guidelines when doing so.
By following these simple maintenance steps, you can ensure your homemade lawn aerator remains a reliable tool for your gardening needs.
FAQs About Homemade Lawn Aerator
Discover answers to common queries about homemade lawn aerators. Learn tips, benefits, and DIY steps to improve your lawn's health.
A lawn aerator is a tool that builds small holes in the soil, allowing air, water, and nutrients to penetrate the grass roots. This helps the roots grow deeply and produce a stronger, more vigorous lawn. You need an aerator to prevent soil compaction, which can inhibit root growth and nutrient uptake.
The best time to aerate your lawn is during the growing season when the grass can heal and fill in any open areas after soil plugs are removed. Typically, this is in the early spring or fall for cool-season grasses, and late spring through early summer for warm-season grasses.
Aerate your lawn at least once a year if your soil is prone to compaction or if you have heavy clay soil. Lawns with sandy soil or those that don’t receive much foot traffic may require less frequent aeration.
Yes, a homemade aerator can be used on any type of lawn. However, the effectiveness may vary depending on the design and the materials used. Ensure that the spikes or tines are sharp and penetrate the soil to the appropriate depth for optimal aeration.
It's not recommended to use a homemade lawn aerator on wet soil. Aerating when the soil is too wet can cause further compaction and damage the structure of the soil. It's best to aerate when the soil is moist but not saturated, as this allows the aerator to penetrate the soil effectively without causing harm.
Final Thoughts
Wrapping up, DIY lawn aerator on a budget is an effective way to ensure your lawn stays healthy and vibrant. Using simple household items, making a homemade lawn aerator is both cost-effective and satisfying. By implementing these methods, you can enhance soil aeration without spending a fortune. Start your project today and enjoy a greener, healthier lawn with minimal expense.


