Building my own DIY LED cube was a thrilling experience. I started with simple materials and clear instructions. My heart raced with excitement as I assembled each part. I spent a few weekends putting it all together, but seeing the lights come alive was worth every minute.
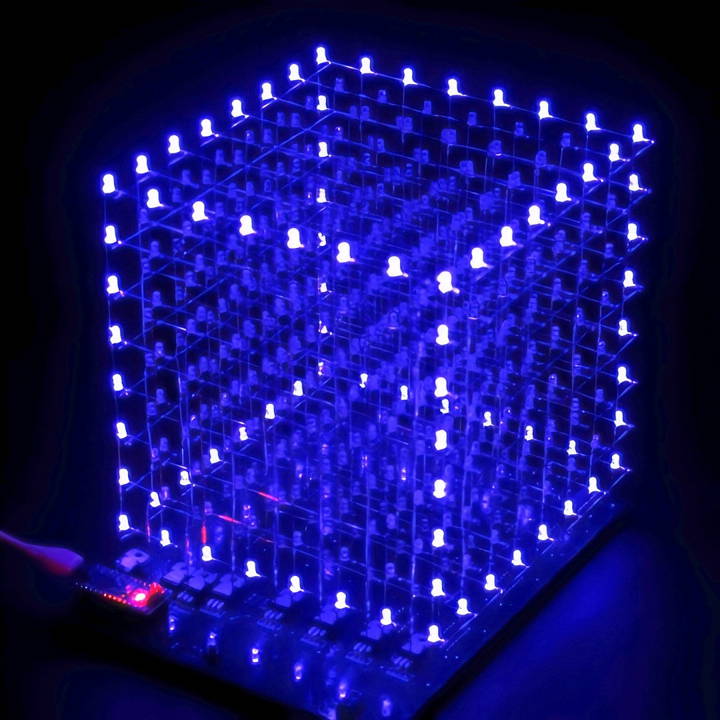
I learned so much while building the 3D LED Cube. It was challenging at times, but I never gave up. Finishing my 8x8x8 LED Cube felt like a huge achievement. I'm thrilled to share this experience and help you get started on your own DIY LED Cube.
These steps will guide you, making the process easier and more enjoyable. Give it a try, and you'll be amazed at what you can build!
What Is a LED Cube?
An LED cube is made up of light-emitting diodes (LEDs) arranged in a cubic structure. Each LED acts as a pixel, and when combined, they build a grid that can display 3D graphics. It's similar to the pixels on your TV screen, but instead of a flat image, the LED cube provides a multi-layered, volumetric display.
How Does it Work?
The cube is powered by a microcontroller, a small computer that sends signals to each LED, telling it when to turn on and off. By controlling the timing of these signals, the microcontroller can build patterns that look like moving images. It's a bit like a conductor directing an orchestra, with each LED lighting up at just the right moment to play its part in the show.
Why Build an LED Cube?
Building an LED cube is not only a fun project but also a great way to learn about electronics and programming. It's a hands-on experience that can introduce you to concepts like circuit design, soldering, and coding. Plus, at the end of it, you have a cool gadget that can light up a room with mesmerizing patterns.
Materials Needed and Why
First, let's talk about the materials you're going to need. Each component plays a critical role in building your LED cube.
- Blue LED 5mm or Blue diffused LED 3mm: These are the heart of your cube. The size you choose will affect the cube's overall look. I went with the 5mm for a more prominent look.
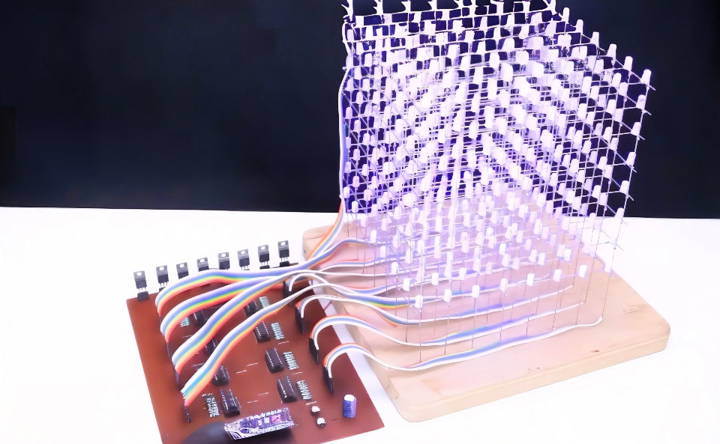
- 74HC595 Shift Register: This chip will help you control multiple LEDs with fewer GPIO pins from a microcontroller. It's essential for managing the 512 LEDs without needing 512 individual outputs.
- Prototyping Board: Before committing to a final design, you'll use this to test your circuits. It's a great way to ensure everything works correctly before you solder it onto a permanent board.
- Tinned Copper Wire: This will connect your LEDs. The tinned coating makes it easier to solder, ensuring a durable connection between components.
- BD241 Transistor: This acts as a switch, controlling the flow of power to the LEDs. It's necessary for managing the high number of LEDs without overloading your microcontroller.
Step by Step Instructions
Learn how to make your own LED cube with our comprehensive step-by-step guide. Perfect for DIY enthusiasts looking to build a custom LED cube.
Step 1: Plan Your Cube
Planning is crucial. Sketch out your cube to visualize the wiring and how the LEDs will connect. Remember, an 8x8x8 cube means eight layers of 64 LEDs each, totaling 512 LEDs.
Step 2: Test the Components
Before diving into the full build, test each LED, the shift register, and transistors to ensure they're working. Nothing's worse than finding a faulty component after everything is assembled.
Step 3: Assemble the LEDs
Start by bending the legs of your LEDs and soldering them together in grids of 8x8. These will form the layers of your cube. Precision is key, so take your time to align everything neatly.
Step 4: Wiring the Grids
Using the tinned copper wire, connect each grid to the next. Ensure your soldering is strong but not bulky, as it can obstruct the cube's aesthetics.
Step 5: Connecting to the Shift Register
The 74HC595 shift register will manage your cube's patterns. Each grid layer's positive side connects to the BD241 transistor, which then connects to the shift register. It sounds complex, but following a wiring diagram simplifies this process.
Step 6: Coding and Testing
This part requires some basic coding knowledge. You'll need to program the microcontroller to control the shift registers, lighting up the LEDs in the pattern you desire. There are many tutorials and code examples available online to help with this.
Troubleshooting and Tips
- LEDs not lighting up: Double-check your connections and ensure your soldering is solid. A loose connection is often the culprit.
- Cube patterns are off: Revisit your code. Even a small error can throw off the entire pattern sequence.
- Overheating: Ensure your transistors are correctly handling the current. Adding heat sinks can mitigate overheating issues.
Programming the LED Cube
Building an LED cube can be exciting as it animates your project. It's like making your cube dance with lights! Let's simplify the steps to keep it easy and fun.
Understanding the Basics
First, you need a microcontroller, which is the brain of your LED cube. It's a tiny computer that tells each LED when to light up. Think of it as the director of a play, cueing the actors—your LEDs—to perform.
Writing the Code
The code is a set of instructions you write for the microcontroller. It's like a recipe that tells your cube what to do. You'll use a programming language, which is just a way to write your instructions so the microcontroller can understand them.
Simple Commands
Start with simple commands, like turning an LED on or off. It's like flipping a light switch. You'll write a line of code for each action, and when you run it, you'll see the magic happen as your cube responds.
Building Patterns
Once you've got the hang of turning LEDs on and off, you can start making patterns. Combine your commands to make the LEDs light up in sequences. It's like choreographing a dance routine, step by step.
Animations and Effects
Now, let's add some flair! By changing the timing and order of your commands, you can build animations. Make your LEDs blink, fade, or chase each other around the cube. It's like making a light show for a concert.
Testing and Tweaking
After writing your code, test it out. If something doesn't look right, tweak your recipe until it's perfect. It's a bit like baking a cake—you might need to adjust the ingredients to get it just right.
Sharing Your Creations
When you're happy with your animations, share them! Most programming environments let you save your code so others can try it on their LED cubes. It's like sharing a favorite song for others to enjoy.
In short, programming your LED cube is about fun and creativity. So jump in, start coding, and light up your world with your LED cube!
Custom Animation Creation
Building custom animations for your LED cube is like painting with light; it's a process where you can express your creativity and bring dynamic stories to life. Let's explore how you can craft your own animations in a way that's easy to understand and fun to learn.
Start with an Idea
Think of an animation as a short story told with lights. What do you want to show? A bouncing ball, a spinning globe, or perhaps a simple heart that beats? Start with a concept that excites you.
Sketch It Out
Before you dive into programming, sketch your animation on paper. Draw each frame like a comic strip, showing how the lights change from one step to the next. This will be your blueprint.
Break It Down
Now, take your sketch and break it down into frames. Each frame represents a moment in your animation. It's like looking at individual pictures in a flipbook.
Code Frame by Frame
Using the programming skills from earlier, write the code for each frame. Turn on the LEDs that need to light up and turn off the ones that don't. It's like filling in the colors on a canvas, one spot at a time.
Timing Is Key
Decide how long each frame should show before moving to the next. This timing will determine how fast your animation moves. It's like setting the tempo for a piece of music.
Loop and Refine
Once you have all your frames coded, loop them to build the animation. Watch it play through and make adjustments as needed. It's like editing a movie until the final cut is just right.
Add Your Personal Touch
Now that you have the basics down add details that make your animation uniquely yours. Play with brightness, speed, and transitions. It's your chance to add signature flourishes to your work.
Share with the World
When you're proud of your creation, share it! Whether it's with friends, online communities, or at a maker fair, let others see what you've accomplished. It's like opening night for your personal light show.
Building custom animations for your LED cube is rewarding and combines skill with vision. Take it step by step and experiment. Your LED cube awaits your masterpiece.
Optimizing Performance
Optimize your LED cube to run smoothly and efficiently for the best experience without wasting energy. Here's how to tune it for peak performance.
Choose the Right Power Source
Your LED cube needs power to shine, but not all power sources are buildd equal. Use a power supply that matches the voltage and current requirements of your LEDs. It's like picking the right fuel for a car to ensure a smooth ride.
Manage Heat
LEDs can get warm, and too much heat can shorten their life. Keep your cube cool by leaving space for air to flow around it, or add a small fan if needed. It's similar to using a fan on a hot day to stay comfortable.
Adjust Brightness
Brighter isn't always better. Set the brightness of your LEDs to a level that looks good and saves power. It's like dimming the lights for a cozy atmosphere in your living room.
Efficient Coding
The way you program your cube can affect its performance. Write code that's clean and avoids unnecessary commands. It's like planning the quickest route for a trip to avoid traffic jams.
Update Firmware
Keep the software on your microcontroller up to date. Manufacturers often release updates that make things run more smoothly. It's like getting a tune-up for your car to keep it running well.
Regular Maintenance
Just like any gadget, your LED cube needs a little care. Check the connections and clean the cube regularly to prevent dust build-up. It's like tidying up your room to keep it nice and neat.
Monitor Performance
Pay attention to how your cube behaves. If you notice any flickering or dimming, it might be time to check your power supply or wiring. It's like listening to strange noises in your car that could mean a visit to the mechanic.
To optimize your LED cube's performance, focus on power, programming, and maintenance. These tips will ensure it looks great and runs efficiently for a long time.
Troubleshooting and Maintenance
Maintain your LED cube to keep it lighting up smoothly. Like a pet plant, it needs regular care. Here's how to keep it in top shape and fix common issues.
Regular Check-Ups
Just like you'd water a plant, give your LED cube regular check-ups. Look for loose wires or components that might need a bit of soldering love. A well-maintained cube is a happy cube!
Clean with Care
Dust can be an LED cube's enemy, dimming its bright lights. Gently wipe your cube with a soft, dry cloth to keep it dust-free. It's like dusting your favorite bookshelf to keep it looking great.
Update Your Software
Your cube's software is its brain. Keep it sharp with the latest updates, which can fix bugs and improve performance. It's like updating apps on your phone for the best experience.
Keep a Troubleshooting Log
When something goes wrong, write it down. Keeping a log can help you spot patterns and solve problems faster. It's like keeping a diary for your cube's health.
Simple Fixes
If an LED isn't lighting up, check if it's properly connected. Sometimes, a quick fix is all it takes. It's like checking if a lamp is plugged in when it won't turn on.
Ask the Community
There's a whole community of LED cube enthusiasts out there. If you're stuck, reach out for help. It's like asking a neighbor to help you fix a leaky faucet.
Practice Safe Soldering
If you need to solder, do it in a well-ventilated area and wear protective gear. Safety first! It's like wearing gloves when gardening to protect your hands.
Be Patient
Troubleshooting can be tricky, but patience pays off. Take a deep breath and tackle issues one step at a time. It's like solving a puzzle; each piece fits together to complete the picture.
Regular maintenance and troubleshooting common issues will keep your LED cube bright. These tips ensure long-lasting enjoyment.
FAQs About How to Make an LED Cube
Building an LED cube can be a fun and rewarding project that combines electronics and programming. Below are five frequently asked questions to help you get started on building your own LED cube.
Test your LEDs: Make sure they all work before you start soldering.
Bend the leads: Carefully bend the leads of the LEDs to form the structure of the cube.
Solder the LEDs: Connect the LEDs together in the shape of the cube, layer by layer.
Connect to the microcontroller: Use wires to connect the rows and columns of the cube to the microcontroller.
Write the code: Use a programming language like C or C++ to write the code that will control the cube.
Upload the code: Transfer the code to the microcontroller using a USB cable or other connection.
Test the cube: Run the code and make sure the cube lights up as expected. Fix any issues with the connections or code.
Short circuits: When two or more connections touch and cause a malfunction.
Faulty LEDs: Sometimes LEDs can be defective or get damaged during soldering.
Programming errors: Mistakes in the code can prevent the cube from working properly.
There are many resources available online, including:
Video tutorials: Which provide step-by-step visual guides.
Online articles and guides: That offer detailed instructions and tips.
Community forums: Where you can ask questions and get advice from others who have built LED cubes.
Absolutely! Customizing your LED cube is part of the fun. Here's how you can add variety to your cube:
Choose different colored LEDs: You can mix and match colors for a vibrant display.
Program patterns: Write code to build dynamic patterns or animations.
Use layers: Control each layer of the cube separately for complex designs.
Wrapping Up
Completing my DIY LED Cube taught me that patience and persistence pay off. I know these steps can help you make your own 3D LED Cube that shines as bright as mine.


