Like many cat owners, I found myself at my wit's end dealing with the mess my furry friend left around his litter box. Not only did he manage to get litter everywhere, but the sight and smell of an open litter box were less than appealing. That's when I decided it was time to build a custom, inexpensive, enclosed litter box. Not only to contain the mess but also to blend with our home decor. So, let's dive into how I tackled this project step by step.
Materials Needed and Their Purpose
- Plywood (* ½ inch thick): Forms the main structure of the box. Sturdy but not too heavy.
- Wood Screws (1 inch long): To assemble the plywood pieces firmly.
- Hinges: For the door, ensuring it opens and closes for easy cleaning.
- Paint (White): To give the enclosure an appealing finish that matches home decor.
- Trim Boards (1x3): For aesthetic framing around the enclosure.
- Tools (Saw, Drill, Paintbrush): Necessary for cutting wood, assembling parts, and applying paint.
Step by Step Instructions
Learn how to build a DIY litter box enclosure with our step-by-step instructions. Keep your cat's space tidy and stylish with this simple project!
Step 1: Cutting the Plywood
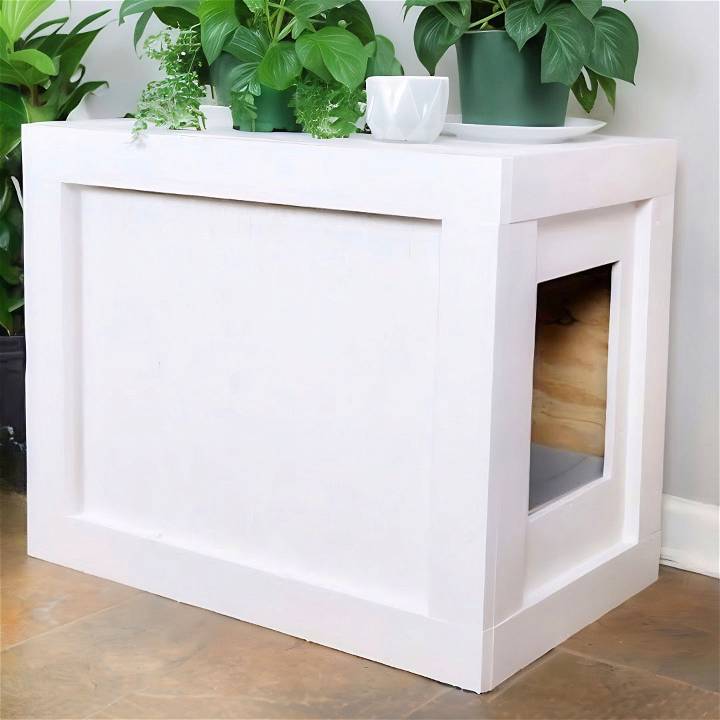
Firstly, I measured and cut the plywood into the appropriate sizes. I needed two pieces for the front and back, two for the sides, and two smaller ones for the top and bottom. Remember to include an entry hole on one of the sides for your cat to get in and out comfortably. My advice? Measure your cat; if it's larger, adjust the hole size accordingly.
Step 2: Assembling the Structure
Using the wood screws, I assembled the pieces together, excluding one side which would later become the door. It's essential to pre-drill the holes to avoid splitting the wood. Patience is key here. Take your time to ensure everything lines up correctly.
Step 3: Adding the Trim
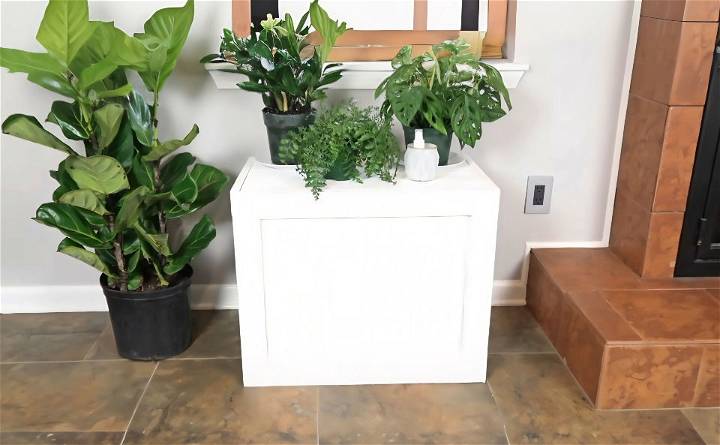
After the main structure was in place, I cut the trim boards and attached them to the front, left, and right sides. This step was crucial for me, as these boards added a decorative touch that made the enclosure look like a piece of furniture rather than just a box.
Step 4: Installing the Door
Attaching the door was perhaps the trickiest part. Hinges can be a challenge, but I positioned them on the outside to prevent any misalignment. Though it meant the hinges were visible, I ensured they looked neat and matched the overall design.
Step 5: Painting
Choosing a white paint was a no-brainer for me to match the trim in my home. I painted the exterior, leaving the inside as bare wood since it wouldn't be visible. Painting was not just about aesthetics; it also helped seal the wood, making it easier to wipe down and clean.
Step 6: Setting Up
Once the paint dried, I placed a comfy mat inside the entrance to catch any litter stuck to my cat's paws. Inside, I positioned the litter box against the side opposite the entry hole to minimize litter being kicked out.
Additional Tip
To make cleaning easier, I installed a small LED light inside and used a liner for the litter box. It made finding and cleaning clumps much easier and encouraged my cat to use his new private space.
Customization Ideas for Your DIY Litter Box Enclosure
Building a DIY litter box enclosure is not just about functionality; it's also an opportunity to add a personal touch to your home decor and make your feline friend feel special. Here are some customization ideas that can help you design a unique and appealing space for your cat's needs.
Reflect Your Home's Style
Think about the overall style of your home. Is it modern, rustic, or perhaps eclectic? Choose materials and colors that complement your interior design. For example, if you have a modern home, you might opt for sleek materials like acrylic or metal accents. For a rustic look, reclaimed wood can add warmth and character.
Personalize with Paint
Paint is a simple way to add personality to your litter box enclosure. You can choose a color that matches your walls for a seamless look or go bold with a contrasting hue. Consider using non-toxic, cat-safe paints to ensure your pet's safety.
Add Functional Decor
Consider adding elements that are both decorative and functional. A small shelf on top of the enclosure can hold plants or knick-knacks, while also providing a place for your cat to perch. Just make sure any plants are safe for cats.
Make It Cozy Inside
Inside the enclosure, build a welcoming space for your cat. Add a soft mat that can be easily removed and cleaned. If there's room, include a small toy or two for your cat to play with while they're inside.
Think About Accessibility
If you have a kitten or an older cat, make sure the entrance to the enclosure is easily accessible. A low entry point can help them get in and out without difficulty.
Keep It Fresh
Good ventilation is crucial to keep the enclosure smelling fresh. Consider adding small vents or a filtered opening to allow air to circulate.
By incorporating these ideas, build a practical and delightful litter box enclosure for your home. Make a comfortable space for your cat while matching your home's aesthetic.
Maintenance and Cleaning Tips for Your DIY Litter Box Enclosure
Keeping your DIY litter box enclosure clean and well-maintained is crucial for the health and happiness of your cat, as well as for ensuring a pleasant environment in your home. Here are some straightforward tips to help you keep the enclosure in top condition.
Regular Cleaning Schedule
Establish a routine for cleaning the litter box within the enclosure. Scoop out waste daily and change the litter according to the type of litter you use. Clumping litter may need to be changed less frequently than non-clumping varieties.
Choosing the Right Litter
Select a litter that's easy to clean and controls odor effectively. There are many options available, including clumping, non-clumping, silica gel, and natural litters. Consider trying a few types to see which works best for you and your cat.
Washable Materials
When building your enclosure, choose materials that are easy to wipe down and resistant to moisture. This will make cleaning simpler and more effective. For example, a laminated wood or plastic surface can be easily cleaned with a damp cloth.
Odor Control
Good odor control is essential. Use litter that's designed to minimize smells and consider placing a small, battery-operated air freshener inside the enclosure. Make sure it's out of reach of your cat and doesn't overpower the area.
Spot Checks
In addition to your regular cleaning routine, do quick spot checks to ensure there are no spills or accidents outside the litter box. This helps prevent odors and stains from setting in.
Replaceable Components
Design your enclosure with replaceable components, such as a removable litter tray or liner. This makes it easier to clean and refresh the litter box as needed.
Safe Cleaning Products
Use cleaning products that are safe for pets. Avoid harsh chemicals that can be harmful to your cat. There are many pet-safe cleaners available that are effective and non-toxic.
By following these tips, you'll have a clean and inviting space for your cat and keep your home odor-free and hygienic.
FAQs About DIY Litter Box Enclosures
Discover the top FAQs About DIY Litter Box Enclosures in this comprehensive guide. Get all the answers you need to build the perfect enclosure for your cat.
How can I ensure the enclosure is the right size for my cat?
To ensure the enclosure is the right size, measure your cat from nose to tail and add a few inches to each side. This will give your cat enough room to move around comfortably. The enclosure should also be tall enough for your cat to stand up without crouching.
Can I customize the enclosure to match my home decor?
Absolutely! You can paint the enclosure, add decorative elements, or use materials that complement your home's style. Just make sure any paints or finishes are non-toxic and safe for pets.
What's the best way to control odor in a litter box enclosure?
Good ventilation is key to controlling odor. Consider adding vents or a filtered opening. Using an odor-absorbing litter and regular cleaning will also help keep smells at bay.
How often should I clean the DIY litter box enclosure?
You should scoop the litter box daily and perform a deep clean of the entire enclosure at least once a week. This includes washing the litter box, wiping down surfaces, and replacing the litter.
Is it easy to build a DIY litter box enclosure if I'm not very handy?
Yes, there are many simple designs available that require minimal tools and skills. You can find plans that suit your comfort level, from basic modifications of existing furniture to building an enclosure from scratch.
Final Thoughts
Building a DIY enclosed litter box was not just about convenience; it was about making a comfortable space for my cat that also kept my home tidy and stylish. This project proved to be inexpensive, straightforward, and incredibly rewarding. If you're a cat owner facing similar litter challenges, I highly encourage you to give this a try. It's a simple solution that can significantly improve your and your cat's daily life.


