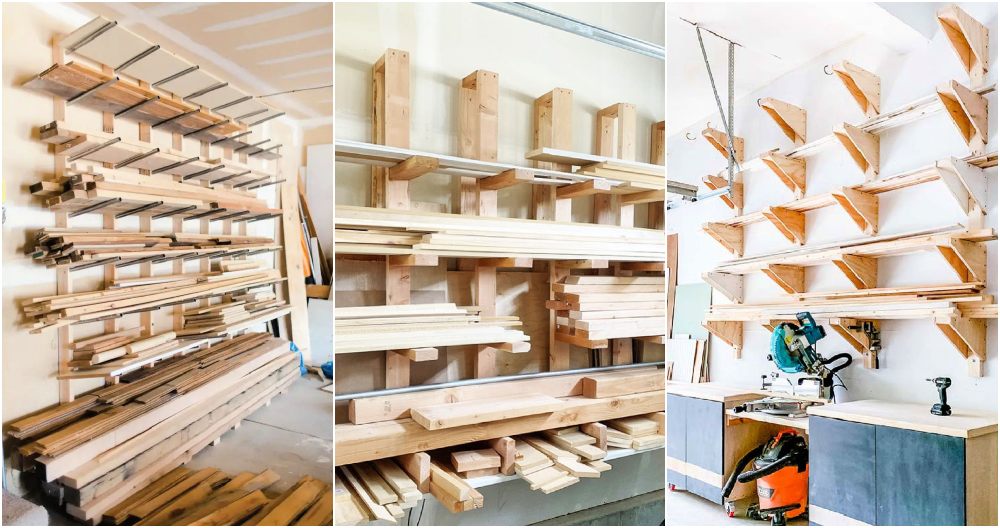
Starting a DIY lumber rack project has been one of the most useful and satisfying tasks I've done. I remember having wood scattered everywhere in my garage, making a mess and making it hard to find the pieces I needed. My plan was simple: build a wooden rack to keep everything organized and easily accessible.
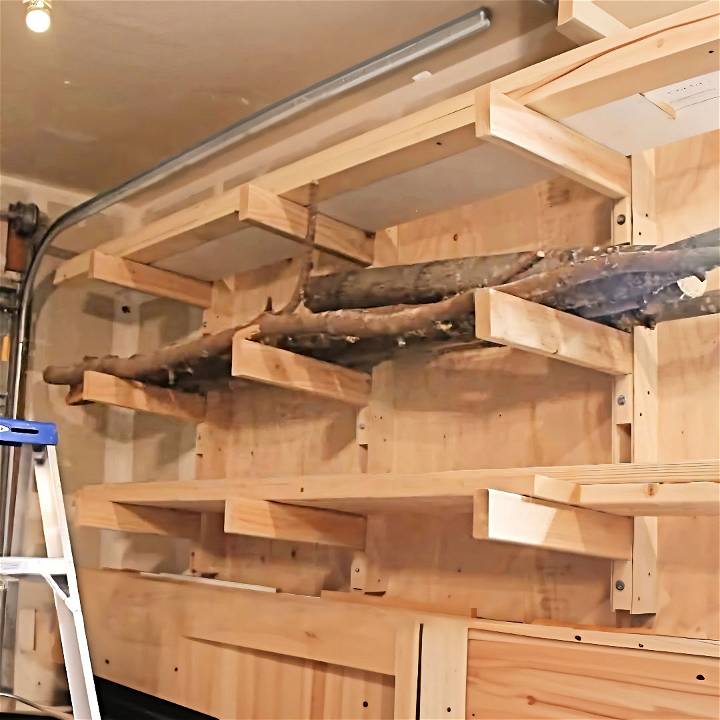
Using some basic tools and materials, I built a straightforward DIY wood storage rack. This rack not only helped me organize my space but also protected the wood from getting damaged. It was an easy project that didn't take much time.
If you struggle with wood storage, I'm sharing my experience to encourage you to build one, too—it truly makes a difference.
Why A Lumber Storage Rack?
Before diving into the construction process, it's essential to understand why a proper lumber storage is pivotal. For one, proper storage ensures your wood stays straight and true, preventing warping and bending. It also organizes your workspace, keeping lumber off the ground and out of harm's way, thereby avoiding any potential accidents.
Materials Needed
- Half-inch Plywood: Acts as the backbone of our supports, providing a solid base for the structure.
- Two-by-Fours: Serve as the vertical supports for the rack, sturdy enough to handle the weight of the lumber.
- Lag Bolts: These are crucial for securely attaching the rack to the wall, thus ensuring it can handle the load without wavering.
- Construction Screws: Used to assemble the various components of the rack together.
Each material plays a significant role in ensuring the rack's functionality and durability.
Step by Step Instructions
Learn how to build a DIY lumber rack with our easy step-by-step instructions. Organize your workshop efficiently and save space!
Step 1: Designing the Supports
The first part of the project was to cut my two-by-fours with a 5-degree angle at each end. This angle is not just a random choice—it's designed to prevent the supports from tipping forward under the weight of the lumber. I set my miter saw to 5 degrees and cut several 4-inch blocks, each destined to become a part of the support structure.
Step 2: Preparing the Supports
After cutting, each block needed a hole drilled through the center to accommodate the lag bolts. These bolts are the linchpin of the whole structure, securing the rack firmly to the wall. I took care to ensure each hole was drilled accurately, as any misalignment could compromise the integrity of the rack.
Step 3: Assembling the Supports on Plywood
Using the scraps of plywood, I cut two pieces for each set of supports, measuring about three and a half inches wide. These pieces would hold the blocks in place, so getting the size right was crucial. After laying out the blocks and plywood, I screwed them together, making sure to keep everything tight and aligned.
Step 4: Mounting the Rack
With the supports ready, I positioned them against the wall, making sure to align them with the studs. This step is crucial for the overall strength of the rack, as the lag bolts need to go into the studs to handle the weight. I marked the spots with a pencil, pre-drilled the holes to prevent the wood from splitting, and then secured each rack section with 6-inch lag bolts.
Step 5: Ensuring Everything is Level
Before loading the rack with lumber, I placed a longboard on the supports, using it as a guide to ensure everything was perfectly level. This meticulous attention to detail is what can make or break a storage solution like this. Once satisfied, I loaded the supports, marveling at how they perfectly accommodated the various sizes and weights of my lumber collection.
Customization Ideas for Your DIY Lumber Rack
When it comes to building a DIY lumber rack, customization is key. You want a storage solution that not only fits your space but also reflects your personal style and meets your specific needs. Here are some ideas to make your lumber rack uniquely yours:
Choose Your Style
- Rustic Charm: If you love a natural look, consider using reclaimed wood and keeping the finishes minimal.
- Modern Flair: For a sleeker appearance, use straight lines, painted finishes, and metal accents.
Add Some Color
- Stains: Highlight the wood's natural grain with a stain that complements your workshop.
- Paints: Go bold or subtle with a color that matches your creative space.
Functional Design
- Adjustable Shelves: Incorporate slots or holes to adjust shelf heights as your storage needs change.
- Foldable Sections: If space is limited, add parts that can fold up when not in use.
Personal Touches
- Engravings: Carve your initials or a favorite quote into the wood for a personal touch.
- Decorative Hardware: Use unique knobs or brackets to add character to your rack.
Expandability
- Modular Units: Build your rack in sections that can be easily expanded or reconfigured.
- Vertical Extensions: Plan for future growth by allowing for additional storage above your current setup.
Integration
- Tool Holders: Attach hooks or holders for frequently used tools for convenience.
- Workbench Compatibility: Design your rack to work seamlessly with your existing workbench or tools.
Incorporate these ideas to make a functional and personalized lumber rack; customize as needed to fit your woodworking journey.
Space Optimization for Your DIY Lumber Rack
Maximizing the space in your workshop is crucial, especially when storing materials like lumber. A well-designed lumber rack can save you space and keep your workshop organized. Here's how to optimize space with your DIY lumber rack:
Vertical Storage Solutions
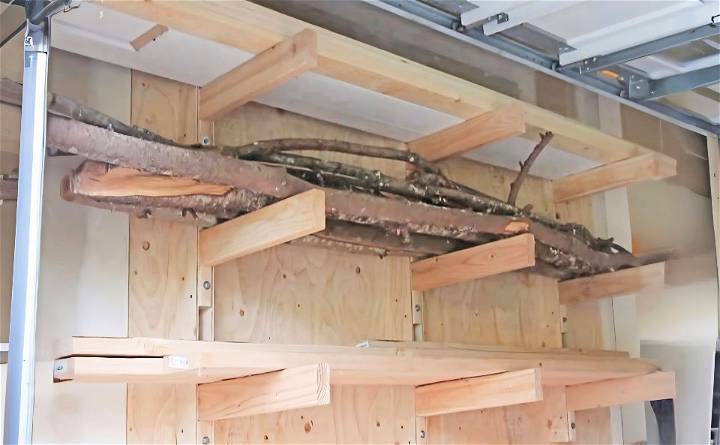
- Go Up: Utilize vertical space by building your rack upwards. Tall racks can hold more lumber without taking up additional floor space.
- Wall-Mounted Racks: Install racks on the wall to free up floor space. Ensure they are securely anchored to handle the weight of the lumber.
Modular Design
- Build in Modules: Build rack sections that can be rearranged or added to as needed. This allows for flexibility as your lumber collection grows.
- Stackable Units: Design units that can be safely stacked on top of each other, maximizing vertical space.
Pull-Out Features
- Sliding Shelves: Incorporate pull-out shelves or drawers for easy access to lumber without moving other pieces.
- Roll-Out Bins: Use bins on casters for offcuts and smaller pieces, which can be rolled out when needed.
Fold-Away Options
- Collapsible Racks: For occasional use, build a rack that can be folded flat against the wall when not in use.
- Drop-Down Shelves: Add shelves that can be folded down to provide extra space when required.
Ceiling Storage
- Overhead Racks: If you have high ceilings, consider installing racks above to store long, infrequently used lumber.
- Pulley Systems: Use a pulley system to lift and store heavy lumber overhead, keeping it out of the way until needed.
Integrated Work Areas
- Combination Units: Combine your lumber rack with a workbench or tool storage for a multi-functional space.
- Built-In Cutting Stations: Include a cutting area within the rack design to measure and cut lumber without moving it far.
Using space optimization, you'll build an efficient lumber rack that boosts workflow. Prioritize accessibility and safety. Plan well to maximize workshop space with a useful rack.
Troubleshooting Common Issues with DIY Lumber Racks
Building a DIY lumber rack is a practical project for any woodworker, but sometimes you might encounter issues. Here's a troubleshooting guide to help you solve common problems:
Rack Stability
- Solution: Ensure that all joints are properly secured with screws or bolts. For added stability, anchor the rack to wall studs or use a wider base.
Wood Warping
- Solution: Store lumber flat and support it at regular intervals to prevent warping. Use kiln-dried wood for the rack construction to minimize moisture-related issues.
Difficulty Accessing Lumber
- Solution: Organize lumber by size and type and label shelves. Consider pull-out drawers or racks for easy access.
Insufficient Space
- Solution: Re-evaluate the layout of your workshop. Utilize vertical space or build a modular rack system that can be expanded as needed.
Rack Deterioration
- Solution: Regularly inspect your rack for signs of wear and tear. Treat the wood with a sealant to protect against moisture and pests.
Safety Concerns
- Solution: Do not overload the rack. Follow the recommended weight limits and distribute the load evenly.
Assembly Difficulties
- Solution: Double-check all measurements before cutting. If pre-drilled holes don't align, re-measure and adjust as necessary.
Moving the Rack
- Solution: If you need to move the rack, disassemble it into manageable sections. Use furniture sliders to protect your floor.
Aesthetic Issues
- Solution: Sand any rough edges and apply a finish that matches your workshop's style. Add trim or molding for a finished look.
Cost Overruns
- Solution: Plan your budget carefully. Track all expenses and shop around for the best deals on materials.
By addressing these common issues, you can ensure that your DIY lumber rack is both functional and durable. Regular maintenance and organization are key to a successful woodworking storage solution.
FAQs About DIY Lumber Rack
Discover the FAQs about DIY lumber rack: construction tips, materials needed, and storage advice for your woodworking projects.
Before starting your DIY lumber rack project, consider the space you have available, as it will determine the size and design of your rack. If space is limited, look for designs that utilize walls or ceilings. Also, think about the cost and ways to obtain materials affordably, like recycling or sourcing from places like Craigslist or Facebook Marketplace. Lastly, consider the purpose of your rack and the types of lumber you frequently use, as different materials may require different storage conditions.
Yes, even those with basic carpentry skills can build a lumber rack. There are designs available that do not require complicated measurements or extensive cut lists. For example, some racks can be built using exposed framing on the inside of a wall, commonly found in garages or sheds.
Absolutely! One of the most cost-effective designs is the Ceiling-Mounted Lumber Storage Rack, which allows for the storage of longboards overhead and can be easily removed when not in use. Another budget-friendly option is the Overhead Lumber Storage Rack, which accommodates boards of various sizes and is relatively cheap to execute.
If you’re short on space, consider building a Scrap Wood Lumber Rack using leftover materials. This not only recycles unused wood but also provides a neat storage solution. Additionally, wall-mounted racks can save floor space and keep your lumber organized and accessible.
To ensure your lumber rack is sturdy and safe, use heavy-duty hardware like lag screws to secure the rack to wall studs. It's also important to distribute the weight evenly across the rack and not overload it. Consider adding diagonal braces for extra stability, especially if you're storing heavy lumber. Regularly check the rack for any loose screws or signs of wear and tear. Safety should always be a priority in your workshop.
Final Thoughts
Building a DIY lumber rack is a practical and easy way to organize your workshop. Get started on your project today, and enjoy the neat and orderly space it brings!


