Making a beautiful DIY macrame wall hanging was easier than I thought. One afternoon, I gathered a few simple materials: cotton rope, a wooden dowel, and scissors. I started with a basic knot that I quickly learned from a short video. Soon, I found myself in a relaxed state, enjoying the rhythmic process of macrame.
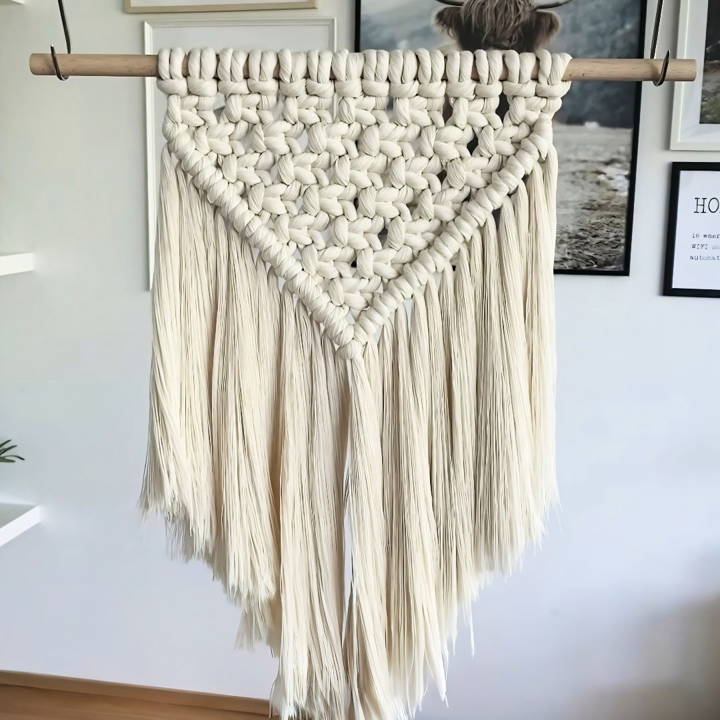
By the end of the day, I had crafted a lovely piece to hang in my living room. This experience was both satisfying and rewarding, bringing a creative touch to my home decor. I encourage you to try this easy DIY macrame wall hanging tutorial. It is an enjoyable way to add a personal touch to your space.
Materials Needed and Their Importance
Discover essential materials like dowel rods and macrame cords for DIY projects, and learn their importance in crafting perfect creations.
Dowel Rod
Choosing a dowel rod as the base for my wall hanging provided a straight, stable foundation to work with. Its rigidity and uniformity made it easier to manage the cords and ensure even spacing.
Macrame Cord
Opting for a 9mm single twist macrame cord in natural color was a decision influenced by ease and aesthetics. The thickness of the cord made knotting simpler and quicker, enhancing the visual texture of the piece without compromising on detail.
Step by Step Instructions
Learn how to make a lovely DIY macrame wall hanging with our easy, step-by-step instructions. Perfect for beginners and home decor enthusiasts!
Preparation: A Step Often Overlooked
Before diving into the knots, I cut the cords to length, adhering to a strategic approach. Longer cords were allocated for the middle of the hanging, where the pattern would consume more material and progressively shorter ones towards the ends. This little bit of planning helped conserve cord, a tip I wish I had known before starting.
The Foundation: Lark's Head Knot
The lark's head knot secured my cords to the dowel rod, marking the start of the project. A crucial tip here was to maintain uniformity in tension and spacing. Attaching the cords at this initial stage required patience and precision, as it set the tone for the rest of the project.
Building the Pattern with Square Knots
The square knot, a basic yet versatile knot within the macrame world, was the cornerstone of this project. Alternating square knots formed the arrow-like pattern that emerged as the piece progressed. Here, consistency in tightness and spacing was paramount. I learned to adjust the tension uniformly to prevent any distortions in the pattern.
Making Dimension with Double Half Hitch Knots
The double half-hitch knots added complexity and depth. These knots were a bit challenging due to their need for consistent tension and direction. Holding the travel cord firmly in one hand, I guided the knots to follow the contour of the preceding square knots. This part of the process was meticulous but incredibly rewarding as the intricate details began to take shape.
Final Touches: Trimming and Fringe
Trimming the fringe was both therapeutic and nerve-wracking. I started by cutting a straight baseline before shaping the fringe to mirror the pattern's arrow shape. Brushing out the fringe was a labor of love, requiring more time than anticipated, but adding a soft, organic texture brought the piece to life.
This project, though termed 'easy,' taught me the importance of patience, precision, and planning in macrame. Each step, from cutting the cords to the final brush of the fringe, was a learning curve. The satisfaction of seeing my wall hanging come together was unparalleled.
Customization Ideas for Your Macrame Wall Hanging
Making a macrame wall hanging is not just about following a pattern; it's about expressing your creativity and making something that's uniquely yours. Here are some ideas to customize your macrame piece:
Incorporate Color:
- Dye Your Cords: Before you start knotting, consider dyeing your cords in colors that match your decor or personal style. Natural dyes like turmeric for yellow or beetroot for pink can add a unique touch.
- Ombre Effect: Make a gradient by dip-dyeing the finished wall hanging. Start with a dark shade at the bottom and gradually lighten the color as you move up.
Add Texture and Dimension:
- Mix Different Cord Thicknesses: Use a combination of thick and thin cords to add texture to your wall hanging.
- Incorporate Beads: Wooden, ceramic, or glass beads can be threaded onto your cords at various points to make patterns or add a bohemian flair.
Personalize with Objects:
- Feathers and Shells: Attach feathers or shells for a nature-inspired look. Ensure they are securely fastened to withstand movement.
- Memorabilia: Intertwine small items that hold sentimental value, such as vintage buttons or family heirlooms, into your design.
Play with Patterns:
- Experiment with Knots: Beyond the basic square and spiral knots, explore more intricate knots like the Josephine or Berry knot to add complexity to your piece.
- Asymmetry: Instead of a symmetrical design, try an asymmetrical pattern for a modern twist.
Functional Additions:
- Pockets: Weave in pockets to hold small plants or use as storage for lightweight items.
- Fringe: Add a fringe at the bottom for a classic macrame look. Comb out the cords for a fluffy effect, or twist them for a spiral finish.
The beauty of DIY is in making something that resonates with you. Don't be afraid to experiment, and let your creativity lead the way.

Advanced Techniques for Experienced Crafters
For those who have mastered the basics of macrame, exploring advanced techniques can be a rewarding way to expand your skills and make intricate, eye-catching designs. Here's a guide to some sophisticated macrame methods:
Micro-Macrame
- Precision is Key: Micro-macrame involves working with thin cords and making small, detailed knots. Use a pinboard to keep your work in place and maintain even tension.
- Intricate Jewelry: Apply this technique to make delicate bracelets, earrings, or necklaces. The fine detail allows for complex patterns on a small scale.
Double Half Hitch Patterns
- Make Shapes: Use double half-hitch knots to form geometric shapes and patterns. This can add a modern touch to your wall hangings or plant hangers.
- Layering: Build layers of these knots to make depth and texture in your work.
Cavandoli Macrame
- Tapestry-Like Designs: This style is characterized by its flat, two-dimensional patterns that resemble tapestries. It's perfect for making detailed pictorial wall hangings.
- Color Blocking: Use different colored cords to emphasize the design and add a contemporary feel.
Working with Mixed Media
- Combine with Other Crafts: Integrate elements of weaving or embroidery into your macrame. This fusion can result in unique, multidimensional pieces.
- Incorporate Different Materials: Experiment with adding metal, wood, or glass components to your macrame for a mixed-media effect.
Sculptural Macrame
- Think 3D: Move beyond flat wall hangings and make three-dimensional sculptures. This can be achieved by varying knot tightness and using a supportive frame.
- Interactive Art: Consider making pieces that can change shape or form, adding an interactive element to your craft.
Innovate traditional macrame to develop a unique style and make stunning art. Document and share your process to inspire the crafting community.
Troubleshooting Common Issues in Macrame
When crafting a macrame wall hanging, you might encounter a few hiccups along the way. Here's a helpful guide to solving some common issues, ensuring your project turns out beautifully:
Uneven Tension:
- Problem: Knots that are too tight or too loose can distort the shape of your work.
- Solution: Practice maintaining consistent tension by pulling each knot with the same force. Use a dowel or a rod to help keep your work straight.
Knot Confusion:
- Problem: Mixing up knot types or losing your place in a pattern.
- Solution: Keep a pattern guide or a diagram handy. Mark completed sections with colored pins or clips to track your progress.
Twisted Cords:
- Problem: Cords may twist and tangle, making it hard to work with them.
- Solution: Hang your work vertically and comb through the cords regularly. Use swivel hooks to prevent twisting if you're working with long lengths.
Frayed Ends:
- Problem: The ends of your cords can fray, leading to a messy look.
- Solution: Apply a small amount of clear glue or tape to the ends before you start knotting. Trim any frayed ends with sharp scissors for a clean finish.
Dropping Stitches:
- Problem: Accidentally undoing knots can be frustrating.
- Solution: Secure loose ends with clips when you pause your work. Double-check each row before moving on to the next.
Color Bleeding:
- Problem: Dyed cords may bleed color onto other cords or your hands.
- Solution: Pre-wash dyed cords in cold water with a color fixative. Test a small section before starting your project.
Inconsistent Patterns:
- Problem: Patterns may not align or look uniform.
- Solution: Count and measure your cords carefully before starting. Use a ruler or measuring tape to ensure spacing is even between knots.
Fixing these issues will help you make a sturdy and stylish macrame masterpiece. Patience and practice are essential. Keep going, and redo if necessary. It will be worth it!
FAQs About DIY Macrame Wall Hanging
Discover answers to common questions about DIY macrame wall hanging, including tips, materials, and easy step-by-step instructions for beginners!
Here’s a simple guide to preparing your cords:
Measure and cut: Determine the length of your wall hanging and cut cords twice that length (plus some extra for knots).
Attach to dowel: Use a lark’s head knot to attach the cords to your dowel rod.
Organize: Keep cords neatly arranged to avoid tangling as you work.
The foundational knots for macrame wall hangings include:
Square knot: A versatile knot used for the main sections of many designs.
Diagonal double half hitch: Makes diagonal lines and patterns.
Lark's head knot: Used to attach cords to the dowel.
Berry knot: A decorative knot that adds texture.
Absolutely! There are many beginner-friendly tutorials available that guide you through the process step-by-step. Start with simple patterns and as you gain confidence, you can try more complex designs.
You can find inspiration and patterns from:
Online tutorials: Video tutorials are great for visual learners and often include step-by-step instructions.
Macrame books: Look for books dedicated to macrame, which often include patterns for various skill levels.
Social media: Platforms like Instagram and Pinterest are full of creative macrame designs.
Macrame communities: Join online groups or forums to connect with other enthusiasts and share tips.
Finishing the edges of your macrame wall hanging can be done in a few steps:
Trimming: Once you've completed your design, trim the ends of your cords to your desired length and shape (straight, diagonal, or curved).
Fraying: If you want a softer look, use a comb to fray the ends of your cords.
Sealing: For a more durable edge, you can apply a small amount of clear fabric glue to the tips to prevent fraying.
Conclusion
Trying this DIY macrame wall hanging will surely bring joy and creativity into your life, as it did for me. It's simple and fun, and you'll be proud of what you make. Get started now, and you will see how these easy steps can transform your walls!


