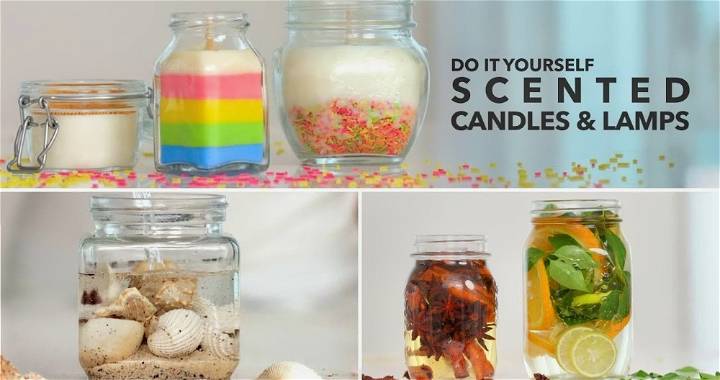
Making homemade DIY mason jar candles is a creative and fulfilling way to bring warmth and aroma into your home. Making jar candles allows for personalized touches, making each candle a unique piece of art. From selecting your favorite scents to choosing the colors that fit your decor, the process offers endless possibilities for customization. This hands-on activity is not only enjoyable but can also serve as a thoughtful gift or elegant addition to any setting.
Before you start, gathering the right supplies is crucial for a smooth candle-making experience. Our step-by-step instructions will guide you through making various types of mason jar candles, including oil lamps and scented candles. Whether you prefer a calming lavender aroma or the invigorating scent of citrus, we've got you covered. And for those who love a good visual aid, our video tutorial will ensure you're on the right track. Ready to dive into the creative process of making your own mason jar candles? Let's explore the next section to begin our candle-making journey.
Gather Your Supplies
Before you begin, ensure that you have all the necessary supplies. You will need:
- Glass jars (Mason jars or old jam bottles work well)
- For Oil Lamps:
- Floating wick
- Vegetable oil (sunflower or canola)
- Water
- Fruits, herbs, or spices
- Essential oils
- Food coloring (optional)
- Decorative items (optional)
- For Scented Candles:
- Candle wick
- Wooden stick or spoon (to secure the wick)
- Soy wax
- Wax color or crayons (for coloring)
- Essential oils
- Decorative elements like sprinkles or glitter (optional)
Step-by-Step Instructions:
Learn how to make homemade DIY mason jar candles with our step-by-step guide below:
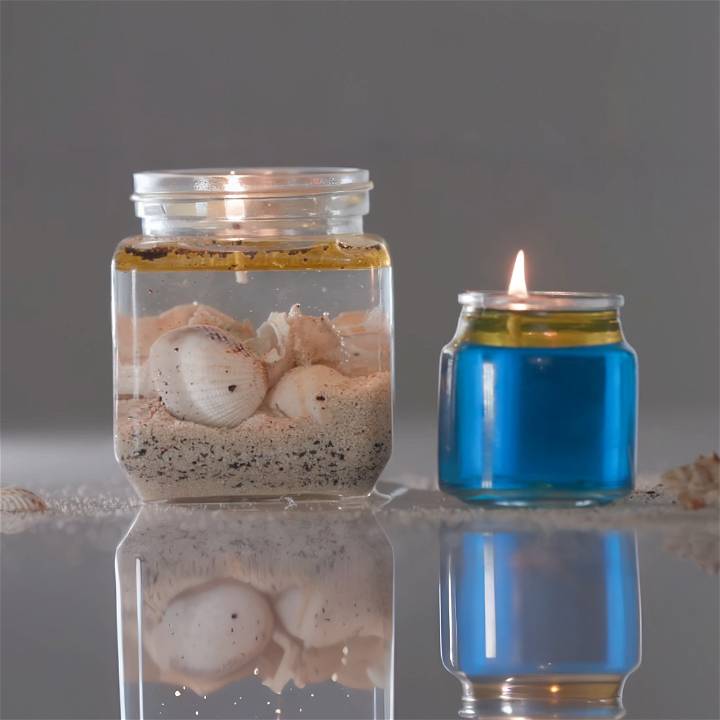
Making the Oil Lamp
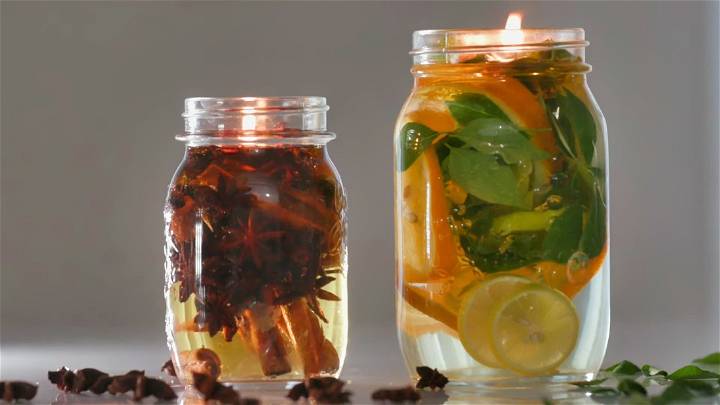
- Infuse Your Oils: Choose your desired fruits, herbs, or spices for infusion. For example, cinnamon, star anise, and apple peels. Add these to a pot with a few tablespoons of vegetable oil and let it simmer on low heat until the oil adopts a fragrant aroma. After cooling, strain out the solid elements but keep them for decoration.
- Assemble Your Lamp: Place the decorative spices in your jar. Fill it almost to the top with water, leaving room for a thin layer of infused oil. Carefully pour the oil to form a 1cm thick layer on top of the water.
- Add the Floating Wick: Place a floating wick on top of the oil layer. The wick will absorb the oil and, once lit, will diffuse the scent throughout your space.
- Quick Version: For a faster method, skip the oil infusion step and simply add a few drops of essential oil to your decorative jar filled with water and oil.
Making the Scented Candle
- Prep the Wick: If using an uncoated wick, first dip it in wax and allow it to dry. Secure one end to the bottom of the jar with a bit of wax. Use a stick or spoon to keep the wick centered and teach by laying it across the jar's opening and wrapping the wick around.
- Melt the Soy Wax: Cut or grate your soy wax into small pieces. Melt it in the microwave in 30-second bursts until fully liquid.
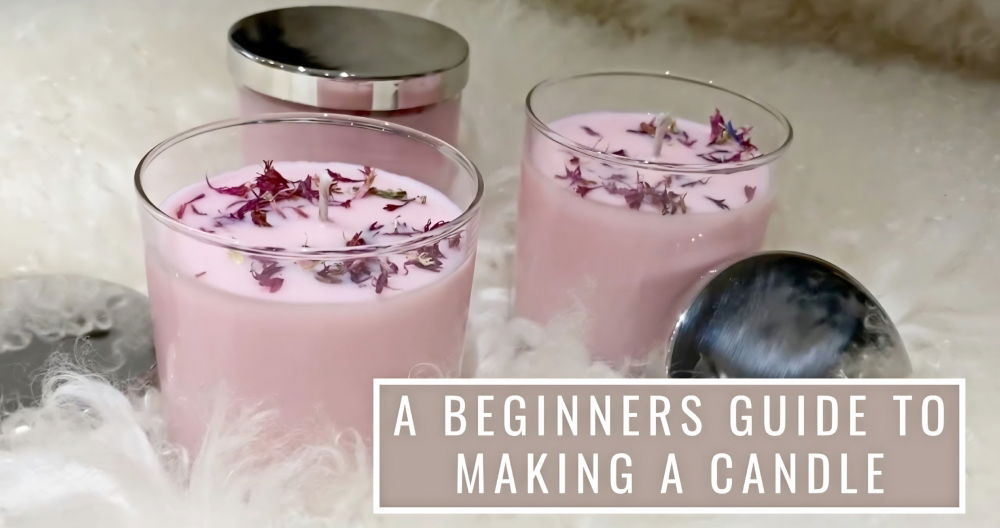
- Customize Your Candle: Now it's time to get creative. You can color the wax with bits of crayon, add essential oils for scent, or even sprinkle decorative elements like glitter into the jar.
- Pour & Set: Carefully pour the wax into the prepared jar. Let it set completely before cutting off any excess wick.
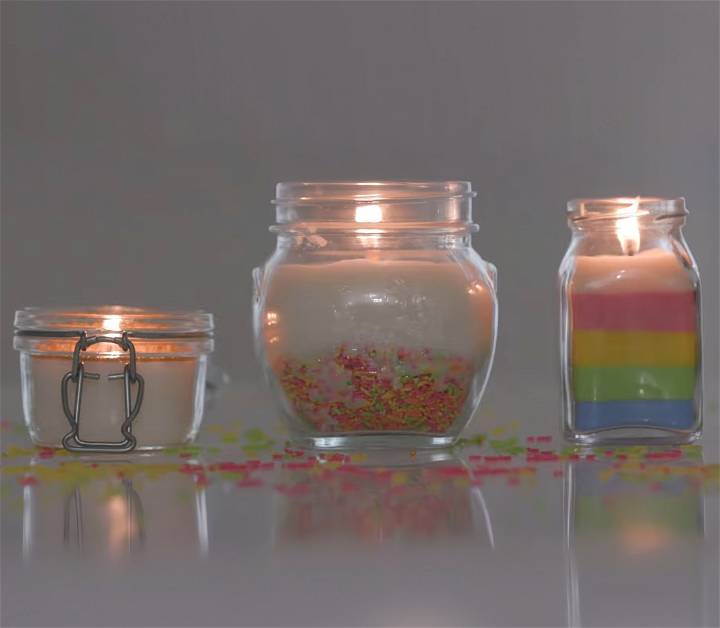
- Layered Candles: For layered candles, separate the melted wax into portions and mix different colors or scents into each. Pour each layer into the jar, allowing each to set before adding the next.
Video Tutorial
For a step-by-step video tutorial on making DIY Mason Jar Candles, watch this YouTube video.
It complements this guide splendidly by offering a visual representation of each technique discussed, making the process clearer and more enjoyable to follow.
This guide aimed to demystify the process of making your own mason jar candles and oil lamps, proving that it is both an accessible and delightful activity. Whether it's for decoration, setting a mood, or as homemade gifts, the possibilities are endless. Happy crafting!
Safety Tips for DIY Mason Jar Candles
Making your own mason jar candles can be a rewarding DIY project. However, ensuring the safety of your home and loved ones is paramount. Pay attention to the following safety tips to enjoy your candles worry-free.
Fire Safety
The allure of a gently flickering candle is undeniable, yet it's crucial to remember that it is an open flame requiring vigilance. Never leave a burning candle unattended. This simple rule can prevent most candle-related accidents. Additionally, be mindful of where you place your candles. Keep them away from flammable objects such as curtains, books, and furniture. A clear, stable surface away from pets and children is ideal.
Heat Resistance of the Jar
Not all mason jars are maked equal, especially when it comes to heat resistance. For candle making, it's essential to use mason jars specifically designed for this purpose. These jars have been tested to withstand the heat generated by a candle without cracking, which could lead to a fire. Regular mason jars, while sturdy for canning or storage, may not offer the same level of safety when exposed to prolonged heat.
Proper Ventilation
Enjoying your DIY mason jar candles in a well-ventilated area is not only a matter of comfort but also of health. Burning candles consume oxygen and produce smoke, especially if the wick becomes too long or the candle burns too low. Using candles in well-ventilated areas ensures that there is a fresh supply of air, minimizing smoke build-up and ensuring a cleaner burning process.
By following safety tips, enjoy DIY candles and keep your home safe. Remember, safety first in DIY.
Troubleshooting DIY Mason Jar Candles
Making your own mason jar candles can be a rewarding DIY project. However, you might encounter some issues along the way. Let's address common problems such as candles not staying lit, uneven burning, and frosty wax appearance, and provide solutions to ensure your candles turn out beautifully.
Candle Won't Stay Lit
Common Reasons and Solutions:
- Poorly Centered Wick: If the wick is not centered, it might not be able to draw enough wax to keep the flame alive. Solution: Always ensure the wick is centered when you pour the wax. Use a wick-centering tool or a homemade guide to keep it straight.
- Draft in the Room: Airflow can extinguish the flame. Solution: Light your candle in a well-protected area where drafts are minimal.
- Wrong Type of Wax for the Container: Some waxes burn better in certain types of containers. Solution: Research and choose the wax type best suited for mason jars, typically soy or paraffin wax.
Uneven Burning
Why It Happens and How to Prevent It:
- Wick Size: A wick that's too small can cause tunneling, leading to uneven burning. Solution: Use a wider wick suitable for the diameter of your mason jar.
- Incorrect Pouring Temperature: If the wax is poured too hot or too cold, it can affect how evenly the candle burns. Solution: Aim to pour your wax when it reaches about 120-140°F (49-60°C), depending on the wax type.
Frosty Wax Appearance
Causes and Prevention:
- Cooling Too Quickly: A frosty appearance usually occurs in soy wax candles and happens when the wax cools and shrinks away from the container. Solution: Ensure a slow cooling process, perhaps by wrapping your candles in a towel or placing them in a warm area.
- Pouring Temperature: Pouring your wax at the correct temperature can also prevent frosting. Solution: Heat your wax to the manufacturer's recommended temperature before pouring.
By tackling these common problems with easy fixes, you'll improve your candle-making and have lovely DIY mason jar candles. Remember, practice makes perfect!
Advanced Techniques for DIY Mason Jar Candles
Making DIY mason jar candles can transform your space with light, fragrance, and style. Dive into these advanced techniques to elevate your candle-making skills.
Layering Different Colored Waxes
Step-by-Step Guide:
- Preparation: Start by choosing colors that complement each other. You'll need separate containers for melting each color of wax.
- First Layer: Melt your base color wax following the manufacturer's instructions. Pour it into the mason jar to form the bottom layer. Let it cool and solidify completely before proceeding.
- Adding Layers: Repeat the melting process for your next color. Cool the melted wax slightly, then gently pour it over the solidified layer, ensuring it doesn't mix. Allow each layer to cool and harden before adding the next.
- Finishing Touches: Once you've added all your layers, insert a wick into the center. You may need to secure the wick with a holder or by dipping it in melted wax to keep it centered as the candle cools.
Tips:
- Experiment with angles by tilting your jar for a sloped layer effect.
- Keep layers thin for faster cooling and to add more colors.
Adding Essential Oils Safely
Importance of Quality:
Using high-quality, skin-safe essential oils is crucial to prevent irritation or allergic reactions. Moreover, the right oils ensure a clean and pleasant scent throw.
Dilution Ratios:
- A safe rule of thumb is to use about 6 to 10 drops of essential oil per ounce of wax. This ratio can vary based on the oil's potency and the wax type.
- Stir the oil evenly into the melted wax to ensure consistent fragrance distribution.
Safety Tips:
- Always add essential oils to wax at the recommended temperature to prevent the oil from evaporating too quickly or catching fire.
Embedding Decorative Elements
Ideas and Instructions:
- Choose Your Elements: Select non-flammable, heat-resistant items like dried flowers, herbs, or coffee beans. Ensure they're completely dry to prevent mold.
- Layering: Start by placing a thin layer of wax at the bottom of your jar. Once slightly cooled but still tacky, add your decorative items around the sides, pressing them gently into the wax to secure.
- Sealing: Pour another layer of clear wax over the decorations to encase them, then proceed with adding your colored layers or simply fill the jar with the base wax.
Design Tips:
- Consider the candle's aesthetics as it burns. Place decorative elements where they can be best appreciated, typically near the jar's sides.
- Be mindful of the placement of larger items to ensure they don't interfere with the wick or burning process.
These advanced techniques will make your DIY mason jar candles look better and smell amazing. Practice and get creative with colors and scents to craft unique candles.
Additional Considerations for DIY Mason Jar Candles
Making your own mason jar candles is not just about mixing wax and wicks; it's about crafting an experience, a mood, or even a statement. Whether you're making candles for personal use or as thoughtful gifts, considering the type of wax, embracing sustainable practices, and personalizing your creations can elevate your candle-making project from simple to extraordinary.
Candle Wax Types
When deciding on the type of wax for your candles, consider the following options, each with its own set of characteristics:
- Soy Wax: Made from soybeans, this natural and renewable resource burns cleaner and longer than paraffin wax. It's biodegradable, making it an eco-friendly choice. However, soy candles may not hold fragrance as well as other types of wax.
- Beeswax: Praised for its natural, honey-scented aroma and non-toxic burn, beeswax is a premium option. It purifies the air by releasing negative ions when burned. The downside? Its higher price point and the fact that it's harder to dye due to its natural yellow color.
- Paraffin Wax: A petroleum by-product, paraffin wax is the most common and cheapest option. It holds color and fragrance well. However, it's not the most eco-friendly choice due to its non-renewable origin and potential to release harmful toxins when burned.
Sustainable Practices
Making mason jar candles can be a wonderfully sustainable craft if you make mindful choices:
- Eco-Friendly Wax: Opt for soy wax or beeswax for a more environmentally friendly candle. These natural options not only burn cleaner but also support sustainable farming practices.
- Recycled Jars: Reuse old mason jars or seek out recycled glass jars. Not only does this practice reduce waste, but it also gives your candles a charming, rustic look.
- Natural Fragrances: Consider using essential oils for scenting your candles. They're derived from plants and can provide aromatherapy benefits, unlike synthetic fragrances that may contain toxins.
Gifting Ideas
Homemade mason jar candles make for heartfelt and personalized gifts. Here are some tips to make your candle gifts even more special:
- Custom Labels: Design your own labels with thoughtful messages, the candle scent, or care instructions. This adds a professional touch and makes the gift feel more personal.
- Decorate the Jar: Get creative with ribbon, twine, or fabric. Decorating the lid or wrapping the jar can match the recipient's style or the occasion.
- Include a Note: A handwritten note explaining the scent choice, the story behind the candle, or simply expressing your wishes can make the gift feel more intimate and special.
By considering these additional elements when making your DIY mason jar candles, you not only enhance the quality and appeal of your candles but also imbue them with personal values and thoughtful touches that resonate with your recipients.
FAQs Aboutdiyy Mason Jar Candles
Your go-to guide for making DIY Mason Jar Candles. Get answers to all your burning questions in one convenient place.
How long do the fruit and spice lamps last?
The lifespan of fruit and spice lamps varies significantly based on the type of fruits and spices used, as well as environmental factors like humidity and temperature. Generally, these lamps can retain their scent and visual appeal for 1 to 2 weeks. However, they start to decompose over time, so it's best to replace them every week for optimal freshness.
Where can I get essential oils for the candles?
You can purchase essential oils for candle-making from health food stores, online marketplaces, craft stores, and speciality retailers focused on natural or handmade goods. Look for pure, high-quality essential oils for the best fragrance and burning experience.
Did you add oil to the water first in the jar before adding essential oils for the fruit and leaf lamps?
Yes, it's recommended to add a carrier oil, such as almond or olive oil, to the water in the jar before adding essential oils. This helps to disperse the essential oils more evenly, as they do not naturally mix with water.
Where can I source soy wax for the candles?
Soy wax can be sourced from craft stores, online retailers, or suppliers specializing in candle-making materials. Purchasing in bulk can often save money if you plan on making candles frequently.
Can you use mason jars for scented candles?
Yes, mason jars are a popular choice for making scented candles due to their heat-resistant glass and aesthetic appeal. Ensure they are thoroughly cleaned and completely dry before use.
Can paraffin wax be used instead of soy wax for making scented candles?
Yes, paraffin wax is another common choice for making scented candles. While it is less environmentally friendly than soy wax, it is widely available and can hold scent and colour well.
Will sprinkles made of plastic burn when lighting the candles?
Avoid using plastic sprinkles in candle making, as they can melt and potentially catch fire. If you're looking to add a decorative touch, opt for natural, non-flammable materials like dried herbs or flower petals.
How much essential oil should be added to the candles?
A general rule of thumb is to add about 6 to 10 drops of essential oil per ounce (30ml) of wax, depending on the oil's potency and your scent strength preference. Remember, it's easier to add more scent but impossible to remove it, so start with less and adjust as needed.
Why was there no fragrance with the oil lamp method?
There can be several reasons for a lack of fragrance when using oil lamps, such as not using enough essential oils, the quality of the essential oils, or the type of carrier oil used. Ensure you're using high-quality, pure essential oils and appropriate quantities to achieve the desired fragrance.
How do you prevent glass jars from cracking when lighting candles inside them?
To prevent glass jars from cracking:
- Ensure the glass is at room temperature before pouring in hot wax.
- Avoid placing the jars on cold surfaces immediately after pouring the wax.
- Consider pre-heating the jars slightly in an oven (not too hot, just warm).
- Allow the candles to cool gradually, away from drafts or cold air.
By following these FAQs and tips, you can enhance your candle and lamp making projects, making them more enjoyable and successful!
Conclusion:
In conclusion, mastering the art of making homemade DIY mason jar candles is both rewarding and creatively fulfilling. From gathering your supplies to following our step-by-step instructions, every aspect of the process offers a chance to customize your creations. Remember to prioritize safety as you explore the varied techniques, such as layering waxes or embedding decorative elements.
This guide not only walks you through troubleshooting common issues but also encourages the use of sustainable practices. Whether it's for personal use or as thoughtful gifts, these candles add a warm, personal touch to any space. So, light up your life with the glow of a candle you've made yourself and enjoy the ambiance it brings to your home.


