Making a DIY masquerade mask can be a fun and satisfying project. This tutorial will guide you through the process with easy steps. You don't need to be an expert to follow along. A mask design idea is all you need to start. Gather materials like a plain mask, paint, and decorative items. This ensures you have everything needed for a personalized creation.
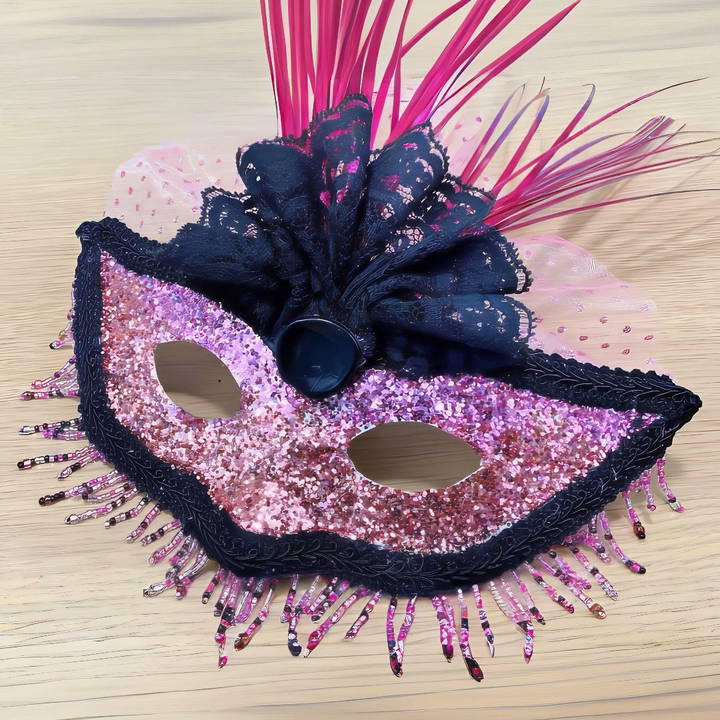
We'll walk you through each part of making your unique DIY masquerade mask. From selecting your mask design idea to adding the final touches, everything is covered. Each section provides simple instructions and helpful tips.
Get ready to enjoy a hands-on, creative project that's both enjoyable and straightforward. Ready to get started? Continue reading to explore the first step.
Materials Needed
Let's start with the materials you'll need and why each is essential:
- Cardboard: The foundation of our mask for its sturdiness.
- X-acto Knife or Scissors: For cutting out the mask shape and eye holes.
- Hot Glue Gun: Essential for attaching decorations securely.
- Beaded Trim and Glitter: To add elegance and sparkle to your mask.
- Mod Podge: A glue and finish that helps glitter stick smoothly.
- Elastic Band or Ribbon: To wear the mask comfortably.
- Needle and Thread: For sewing decorative elements like lace or tulle.
- Miscellaneous Decorations: Broken jewelry pieces or any other small embellishments to add pizzazz.
Step by Step Instructions
Learn how to craft a pretty DIY masquerade mask with our step-by-step instructions. Perfect for parties, holidays, and events!
Step 1: Creating the Base of the Mask
Learn how to make the base of the mask, draw and cut the mask shape, and adjust the eye holes for a perfect fit. step-by-step guide for beginners.
Drawing and Cutting the Mask Shape
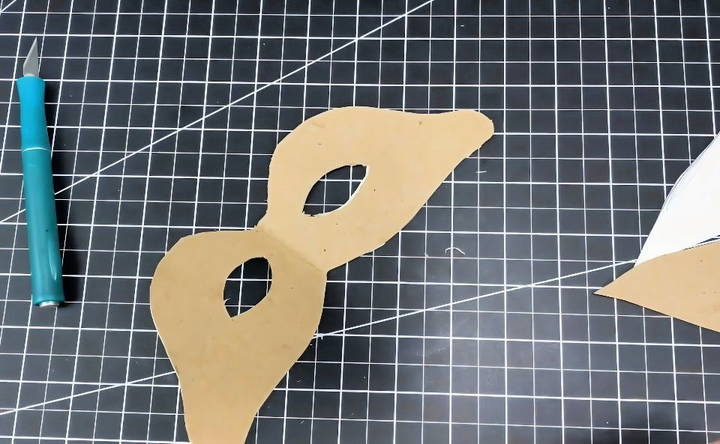
First, I began by freehanding my masquerade mask design on a piece of cardboard. This piece of cardboard was actually the cover of one of my old sketchbooks, proving that you can use whatever you have handy. I folded the cardboard in half and used an X-acto knife to cut it out, ensuring it's symmetrical on both sides. If you're not comfortable freehanding the design, you can easily find a masquerade mask template online. Just print it out and trace it onto your cardboard.
Adjusting Eye Holes
Next, I tried the cut-out mask on my face to see how it fit and marked the areas that needed adjustments. The eye holes were a bit small, so I carefully enlarged them with my X-acto knife, making sure they were both even and comfortable.
Step 2: Adding the Nose Piece
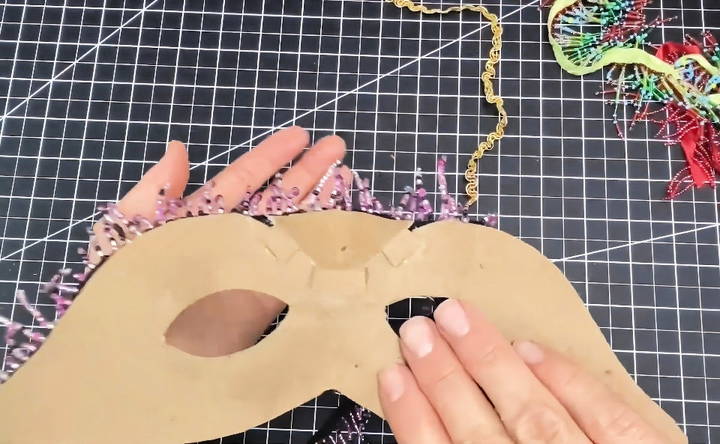
A crucial yet often overlooked detail is the nose piece. I used leftover cardboard to create a small, curved piece that would sit comfortably on the bridge of my nose. Using the edge of my table, I bent the cardboard slightly to give it a rounded shape, then hot glued it onto the mask using tabs. This addition made the mask significantly more comfortable to wear.
Step 3: Shaping the Mask
To give the mask a more natural, rounded shape, I used the edge of my table to gently curve it. This involved lightly pressing and bending the cardboard along the edges.
Step 4: Decorating the Mask
Learn how to perfectly decorate masks with our guide on choosing and attaching decorations, applying glitter, and adding the trim.
Choosing and Attaching Decorations
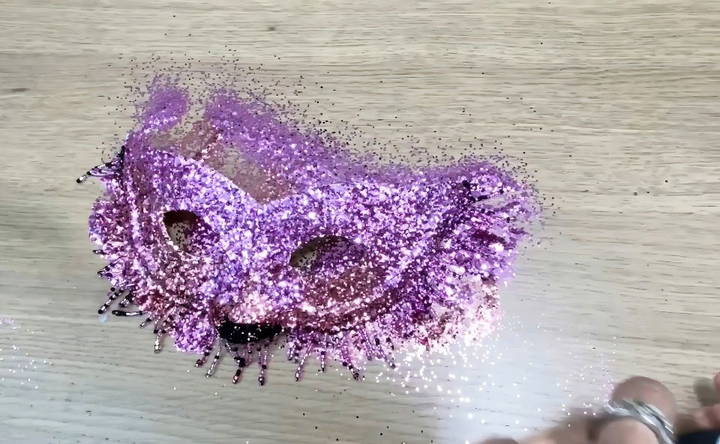
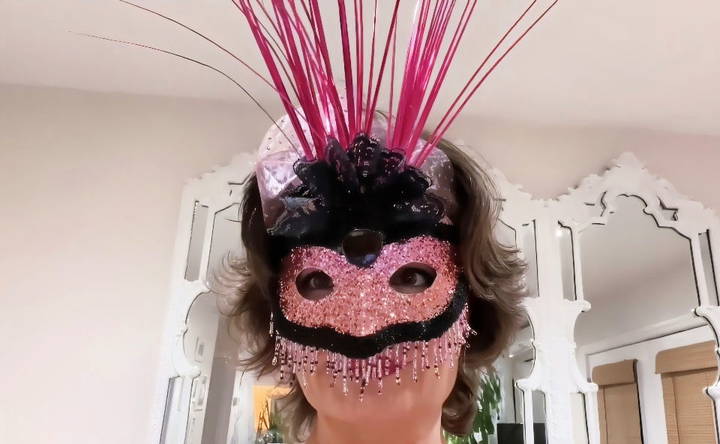
This is where you can let your creativity run wild. I spent some time going through my craft materials to decide on the theme of my mask. Eventually, I opted for a beaded trim and two shades of glitter.
Applying Glitter
Using a brush, I applied a generous layer of Mod Podge all over the front of the mask. While the Mod Podge was still wet, I sprinkled glitter evenly across the surface and then let it dry for a few hours. This step can be messy but is incredibly rewarding once you see the dazzling result.
Adding the Trim
Once the Mod Podge and glitter were fully dry, I used my hot glue gun to attach beaded trim around the edges of the mask. This step not only added an extra layer of visual appeal but also gave the mask a more polished and professional look.
Step 5: Creating Additional Decorations
Learn how to make stunning additional decorations with our step-by-step guides on making a tulle fan and lace fan. perfect for any event decor!
Making a Tulle Fan
For an extra touch of flair, I decided to add a fan-shaped decoration made from tulle. Using needle and thread, I sewed a simple running stitch along one edge of a strip of tulle and then pulled it tight to gather it into a fan shape. A quick knot at the end secured it in place.
Lace Fan
Similarly, I used stretchy lace and repeated the same running stitch technique to create another fan. This added a different texture and depth to the mask.
Step 6: Final Touches
Perfectly complete your project with final touches, assembling decorations, and attaching the elastic band for a flawless finish.
Assembling Decorations
I used hot glue to attach the tulle and lace fans in the center of the mask. To cover the sewing and glue marks, I added a broken piece of an old earring. This small piece turned out to be the perfect finishing touch, proving that it's worthwhile to save those little random broken things—you never know when they'll come in handy!
Attaching the Elastic Band
To make sure the mask would stay securely on my face, I attached a piece of elastic to both sides. You could also use ribbon if you prefer a more traditional tie. The elastic band offered just the right amount of stretch and comfort, making it easy to wear for extended periods.
Customization Tips for DIY Masquerade Masks
Making a masquerade mask that reflects your personal style is a fun and rewarding project. Here are some tips to help you customize your mask for that perfect fit and look:
- Choose Your Base Wisely: Start with a mask shape that complements your face. Whether it’s a full-face mask, a half-mask, or an eye mask, pick a base that feels comfortable and suits the occasion.
- Select a Theme: Decide on a theme that resonates with you. It could be inspired by your favorite colors, a character from literature or film, or even a specific era or culture.
- Play with Colors: Colors can set the mood for your mask. Use a color wheel to find complementary shades that will make your design pop. Remember, lighter colors can make features stand out, while darker colors can give a more mysterious vibe.
- Experiment with Textures: Mix and match different materials to add depth to your mask. Consider lace, velvet, or even metal filigree for a touch of elegance.
- Add Personal Touches: Incorporate elements that are uniquely you. This could be a signature pattern, a monogram, or a symbol that has personal significance.
- Consider the Details: Small details can make a big difference. Think about adding trim, edging, or beading along the edges of your mask for a finished look.
- Securely Attach Decorations: When adding decorations like feathers or jewels, ensure they are securely attached. Use strong glue or stitch them on to prevent any mishaps during your event.
- Adjust for Comfort: Make sure your mask fits well. Add foam padding where needed, and adjust the straps so that the mask sits comfortably without slipping.
- Keep it Practical: While aesthetics are important, don’t sacrifice functionality. Ensure you have good visibility and that the mask doesn’t obstruct breathing.
By following these tips, you’ll be able to create a masquerade mask that’s not only stylish but also a true reflection of your personality.
Decoration Techniques for DIY Masquerade Masks
Decorating your DIY masquerade mask is where you can truly let your creativity flow. Here are some techniques to help you embellish your mask beautifully and effectively:
- Layering: Start with a base color and add layers of paint or fabric to create depth. Use lighter shades to highlight and darker shades to shadow.
- Gluing: For attaching items like sequins, beads, or rhinestones, use strong craft glue. Apply a small dot of glue and place your decoration with tweezers for precision.
- Sewing: If you’re adding fabric or lace, sewing can provide a more secure attachment than glue. Use a thread that matches your mask’s base color for a seamless look.
- Stenciling: Create intricate patterns using stencils. Secure the stencil onto the mask and use a sponge or brush to apply paint or glitter.
- Texturing: Add texture to your mask with materials like tissue paper, leather, or embossed foils. Crumple, layer, or twist these materials to create interesting effects.
- Feathering: Feathers can add a dramatic flair. Choose feathers that complement your mask’s color scheme and attach them from the top or sides, fanning outwards.
- Beading: String beads together to create elegant borders or patterns. You can stitch them on or glue them in place for a dazzling effect.
- Using Natural Elements: Incorporate pressed flowers, leaves, or even small twigs for a unique, organic look. Ensure they are treated to last longer and are securely attached.
- Adding Sparkle: Glitter or metallic paints can add a touch of glamour. Use a fine brush for detailed work or sprinkle glitter over wet paint for a dispersed sparkle.
- Final Touches: Once you’ve added all your decorations, seal your mask with a clear varnish or spray to protect it and give it a finished shine.
The key to successful decoration is patience and practice. Take your time with each technique, and don’t be afraid to experiment.
FAQs About DIY Masquerade Mask
Find answers to FAQs about DIY masquerade masks. Learn tips, materials, and techniques to create stunning masks for any occasion.
Comfort is key for a mask you’ll wear for an event. Start with a lightweight base like paper mache or fabric that conforms to your face. Ensure the eye holes are large enough for visibility without compromising the mask’s structure. Use soft materials like felt for areas that touch your skin and adjustable straps or elastic bands to keep the mask in place.
Yes, you can! Create a mask that fits over your glasses by building a larger frame or attaching a mask directly to your glasses with non-damaging adhesive. Some DIYers even incorporate the glasses into the mask design for a seamless look.
For beginners, consider starting with a half-face mask decorated with a few sequins and feathers on one side. Another easy option is a lace mask—you can cut lace according to a template and attach it to a mask base with hot glue.
To make your mask unique, think about adding bold colors, glitter, and textures. Use thematic decorations like butterflies or leaves for a nature-inspired look, or go for a classic Venetian style with gold or silver paint and intricate patterns. Don’t be afraid to get creative with 3D elements like raised designs or additional layers of material.
To make sure your masquerade mask lasts through several events, start with a sturdy base material like leather or thick paper mache. When decorating, use high-quality adhesives like fabric glue or epoxy resin for embellishments that won’t easily fall off. Consider reinforcing the mask with a thin layer of clear varnish or sealant to protect the paint and decorations from wear and tear.
Conclusion
Making your own DIY masquerade mask from cardboard can be a truly rewarding experience. It allows you to repurpose materials, unleash your creativity, and end up with something uniquely yours. I hope this guide has provided you with clear, practical steps and inspired you to create your own stunning mask. Enjoy the process and let your creativity shine!


