Making DIY Mickey ears at home can be a fun and rewarding project. With some basic materials like felt, glue, and a headband, you can make personalized Mickey ears for any occasion. This simple guide breaks down each step, making it easy to follow and understand. You'll find it helpful whether making them for yourself or as a gift for someone special.
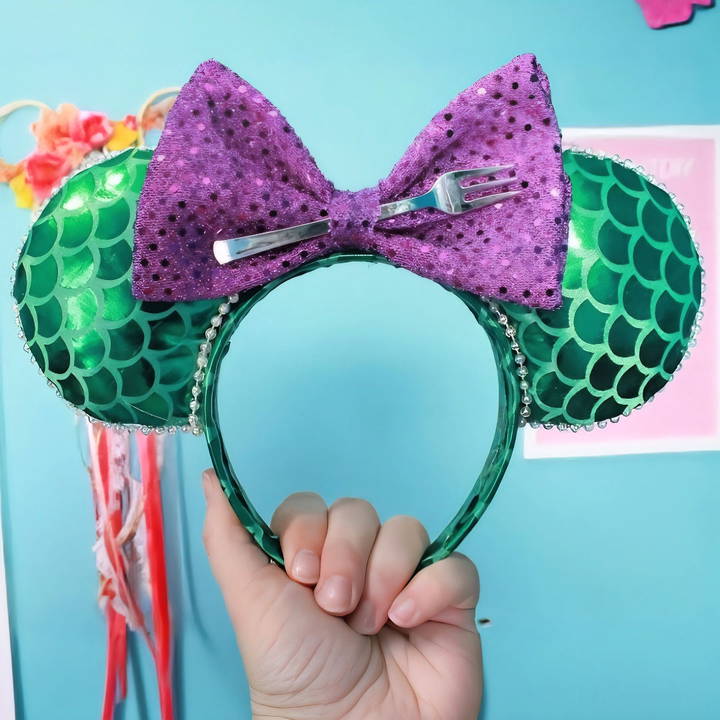
Start by gathering your materials and following the outlined steps carefully. Each detail matters to ensure your Mickey ears look great and are durable. By the end of this guide, you'll have a custom pair of DIY Mickey ears you'll be proud of.
Ready to get creative? Let's dive in and start crafting your unique Mickey ears!
Materials Needed and Why
Before we dive into the creation process, let's talk about what you'll need and why:
- Ear Templates: Essential for getting the shape just right. Think of them as your map to the magical world of Mickey ears.
- Scissors: Your crafting wand, needed for cutting templates and fabric.
- Writing Instrument: A disappearing ink pen is ideal for marking on fabric without leaving a permanent mark.
- Tiny Dinglehopper (Fork): Surprisingly handy for adding intricate details or adjustments.
- Fabric & Ribbon: The essence of your creation - choose fabrics that speak to your theme or character inspiration.
- One-Inch Headband: The foundation of your Mickey Ears; it's important for it to be comfortable and sturdy.
- Accent Trim (Optional): For those who wish to add a little extra sparkle or theme-specific detailing.
- Hot Glue Gun with Sticks: The magic that binds everything together, no sewing required.
- Stuffing: To give your ears that plump and lively look.
- Cardboard: Offers structure to your ears, ensuring they stand proud and don't flop.
With these materials at hand, you're ready to embark on your crafting journey.
Step by Step Instructions
Make perfect mickey ears with our step-by-step guide. Learn how to make your ears, add finishing touches, and craft a bow effortlessly!
Making Your Ears
- Trace and Cut Your Cardboard: Begin by tracing the ear templates onto your cardboard four times (for a pair of ears) and cut them out. Thinner cardboard is recommended for ease of cutting.
- Trace and Cut Your Fabric: Using your disappearing ink pen, trace the ear cutting line template onto your fabric and cut out four pieces. This step shapes the visible part of your ears.
- Attach Fabric to Cardboard: Lay the cardboard piece on the wrong side of your fabric. Apply hot glue around the edges and fold the fabric over, securing it to the cardboard. Remember to leave the bottom open for stuffing.
- Stuffing Your Ears (Optional): Gently stuff your fabric-covered cardboard to give your ears a fuller look. Avoid over-stuffing to prevent tearing, especially with delicate fabrics.
- Close and Seal: Once stuffed to your liking, apply hot glue to close the bottom. Then, bring the two halves of your ear together, applying glue around the edge and pressing firmly to seal. This step starts to bring the iconic Mickey Ear shape to life.
Adding The Finishing Touches
- Decorating with Trim: If you've chosen to use accent trim, now's the time to add it around the edges of your ears for that extra flair.
- Prepping Your Headband: Cover your headband with a strip of fabric using hot glue for a cohesive look. This also makes attaching the ears easier and more seamless.
- Attaching the Ears: Measure and mark where you want your ears to be on the headband (approximately 2.5 inches apart works well). Apply a generous amount of hot glue on the bottom of your ears and press them onto the headband firmly.
Making Your Bow
- Cutting Your Fabric: Cut a piece of fabric (about 6x7 inches) for your bow. This size is generally versatile and works well for a noticeable but not overpowering bow.
- Forming the Bow: Lay your fabric flat, place a strip of felt slightly smaller than your fabric on top (this adds structure), fold the fabric over the felt, and secure with hot glue. Pinch the center to form a bow shape and glue to hold.
- Adding the Bow to Your Ears: Lastly, use hot glue to attach the bow to the center of your headband, right between the ears.
Customization Ideas for DIY Mickey Ears
Creating your own Mickey ears is not just a fun DIY project; it's also a chance to express your individuality. Here are some ideas to help you customize your Mickey ears and make them truly one-of-a-kind.
- Choose Your Theme: Start by picking a theme that resonates with you. It could be your favorite Disney movie, character, or even a color scheme. For example, if you love ‘The Little Mermaid,' you might choose a seafoam green fabric with seashell accents.
- Add Personal Touches: Personalize your ears with initials, names, or important dates. You can use embroidery, fabric paint, or iron-on letters to add these details.
- Play with Textures: Mix and match different materials to make contrast. Combine smooth satin with rough burlap, or pair shiny sequins with matte felt. This adds depth and interest to your ears.
- Incorporate Accessories: Attach bows, flowers, or even small plush toys to your ears. If you're a fan of ‘Beauty and the Beast,' consider adding a red rose to signify the iconic enchanted flower.
- Light It Up: For something truly eye-catching, incorporate LED lights into your design. Outline the ears with tiny lights, or fill them with a soft glow. Just make sure the battery pack is hidden and secure.
- Think Seasonal: Reflect the seasons or holidays in your design. Use pastels for spring, bright colors for summer, warm tones for fall, and glitter or snowflake patterns for winter.
- Interactive Elements: Add elements that move or change. Attach charms that dangle, or use reversible sequins that change color when you swipe them.
By following these tips, you'll be able to craft Mickey ears that are not only fun to make but also a reflection of your personality and style.
Troubleshooting Common Issues
When crafting DIY Mickey ears, you might run into a few snags. Here's a helpful guide to troubleshooting common issues so you can keep your project on track.
Fabric Won't Stick
- Solution: Ensure you're using the right adhesive for your material. Fabric glue works well for most fabrics, but for heavier materials, you might need a hot glue gun. Always apply glue evenly and press firmly.
Ears Don't Stand Up
- Solution: Stiffen your ears by using thicker cardboard or adding an extra layer. Make sure they're securely attached to the headband with enough surface area to hold them upright.
Decorations Fall Off
- Solution: Decorations need a strong bond to stay put. Use a stronger adhesive or sew them on for added durability. If you're using sequins or beads, clear nail polish can help secure them.
Ears Are Uncomfortable
- Solution: Comfort is key! If the headband is too tight, wrap it with soft fabric or padding. Adjust the placement of the ears to ensure they're not too close to the headband edges.
Colors Fade
- Solution: Protect your ears from sun damage by using UV-resistant spray. For indoor storage, keep them away from direct sunlight and in a cool, dry place.
Ears Look Uneven
- Solution: Measure twice, cut once. Use templates for consistency, and double-check your measurements before cutting. Symmetry is important for a polished look.
By anticipating these issues and knowing how to fix them, you'll be better prepared to make a pair of Mickey ears that are both charming and durable.
FAQs About DIY Mickey Ears
Get answers to common questions about DIY Mickey ears, including materials, steps, and tips for making your own magical accessory.
When selecting fabric for your Mickey Ears, consider using materials with a little stretch to make it easier to cover the ear shapes smoothly. For the bow, you can use almost any fabric, with or without stretch. The key is to find a fabric that complements your design and is easy to work with.
Yes, you can create Mickey Ears without sewing by using a hot glue gun as your main adhesive. There are no-sew options available that guide you through the process using adhesives and simple techniques that don’t require any sewing skills.
Personalize your Mickey Ears by choosing unique fabrics, adding trim, decorations, or even lights for a special touch. You can also make themed ears to match your favorite Disney characters or to complement your outfit for a trip to the Disney parks.
For a perfect bow, consider using a stiffener if your fabric is too soft. Cut the fabric and stiffener to the desired size, fold the fabric around the stiffener, and secure the edges with hot glue. Be sure to tuck in all raw edges for a neat finish. You can adjust the size and shape of the bow to your preference.
Comfort is key when making your own Mickey Ears. Choose a headband that fits well and doesn't pinch. Cover the headband with soft fabric or padding to prevent it from digging into your scalp. When attaching the ears, make sure they are securely fastened but not too tight, as this can cause the headband to become uncomfortable after prolonged wear. Additionally, consider the weight of your decorations; heavier embellishments may make the ears less comfortable over time.
Conclusion
In conclusion, making DIY Mickey ears is a fun and rewarding project for all ages. With just a few materials and some creativity, you can make charming accessories perfect for any Disney fan. By following simple steps on how to make Mickey ears, you can personalize your ears in countless ways. Enjoy the process and show off your unique creations with pride!


