I've always loved the idea of enhancing outdoor spaces with functional and stylish furniture. One of my favorite projects to date has been building a DIY mini fridge cabinet. This isn't just any cabinet—it's designed for semi-outdoor use, providing storage, style, and a spot for a mini fridge on a covered back porch.
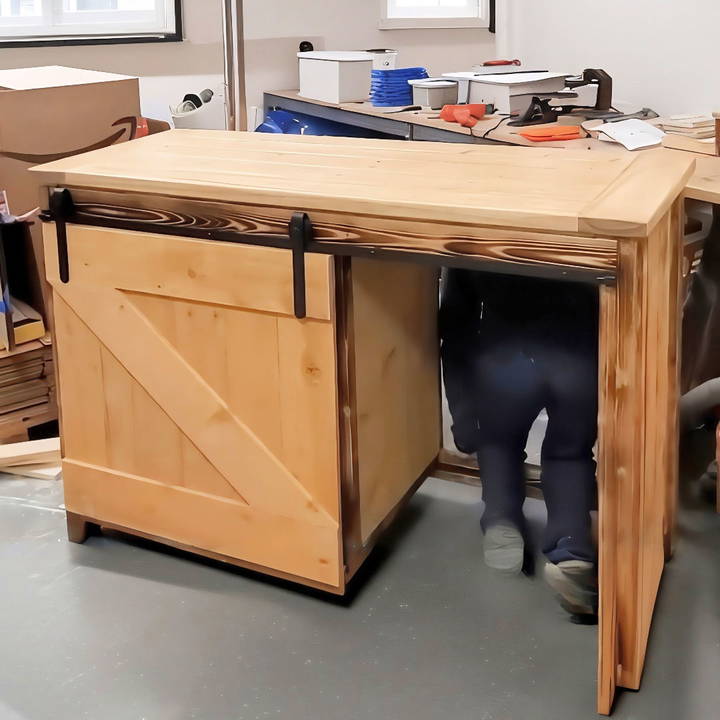
I'm excited to share my experience building this cabinet from scratch, complete with a sliding barn door for storage and an open space for a mini fridge.
Materials You'll Need: My Go-To Tools and Supplies
From my experience, having the right materials and tools is crucial to success in any DIY project. Here's what I used for this project:
- Plywood Sheets (3/4 inch thick): The primary material for constructing the cabinet body and shelves.
- 2x4 Lumber: For framing and additional support.
- Sliding Barn Door Hardware Kit: This kit includes rails, wheels, and mounting hardware for the sliding door. I found it essential for adding a rustic touch.
- Pocket Hole Screws: These are used to join wood pieces together securely.
- Wood Glue: To strengthen joints.
- Clamps: Various sizes to hold pieces together during assembly.
- Biscuit Joiner: For precise joinery.
- Circular Saw and Miter Saw: To cut plywood and lumber to size.
- Drill and Bits: For making pocket holes and driving screws.
- Sandpaper (80 to 220 grit): To smoothen the wood surfaces.
- Wood Filler: To fill gaps and ensure a uniform surface before staining.
- Pre-Stain Conditioner, Stain, and Polyurethane Finish: To finish and protect the wood.
Each tool and material played a key role in the build. I learned to keep them organized and within reach to avoid the hassle of searching for what I needed during the build.
Step by Step Instructions
Make your own DIY mini fridge cabinet with our step-by-step guide, from design to final assembly. Perfect for stylish storage solutions!
Step 1: Designing the Mini Fridge Cabinet
Before cutting any wood, I spent some time designing the cabinet on paper. I measured the mini fridge dimensions and allowed a few extra inches for ventilation. It's crucial to get these measurements right—trust me, you don't want to end up with a cabinet that's too snug or too loose.
Key Design Features:
- Sliding Barn Door: Offers easy access to storage shelves and adds a rustic, stylish look.
- Open Space for the Mini Fridge: This section is sized based on the fridge dimensions and allows for proper ventilation.
- Durable for Outdoor Use: Since this cabinet is meant for a covered porch, it must withstand humidity and temperature fluctuations.
Step 2: Cutting and Preparing the Wood
Once I had my design finalized, I got to work cutting the plywood and lumber. I used a circular saw for the larger cuts and a miter saw for the precise angles and smaller pieces. Here's a tip: always double-check your measurements before cutting. I had to remind myself more than once that "measure twice, cut once" is the golden rule!
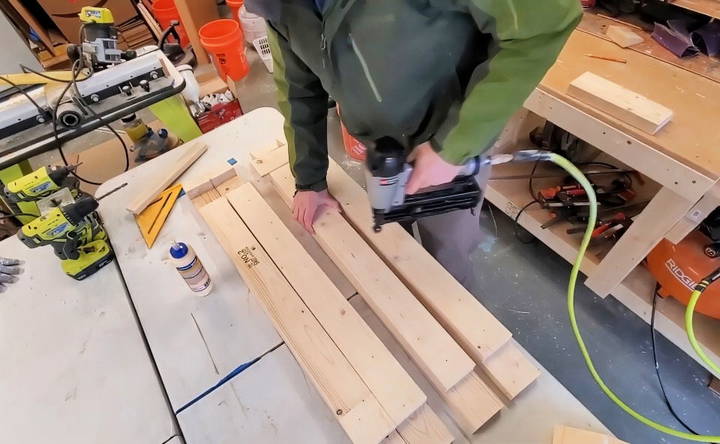
For the top of the cabinet, I decided to use 2x6 boards joined together. When I first glued and screwed them together using pocket holes, I noticed gaps. The pocket hole method didn't work as well as I hoped, and the boards weren't sitting flush. After some frustration, I learned that proper clamping and edge preparation are vital.
Step 3: Assembling the Cabinet Frame
I started assembling the frame using pocket hole joinery. Pocket holes are fantastic for making strong joints that are hidden from view, but they need to be done carefully. After struggling with some gaps, I realized I needed better clamping and edge preparation. Here's where I used a biscuit joiner to build more precise joins.
- My Advice: If you're working with boards that aren't perfectly straight, consider using a straight edge guide to cut clean edges. This way, the boards join seamlessly.
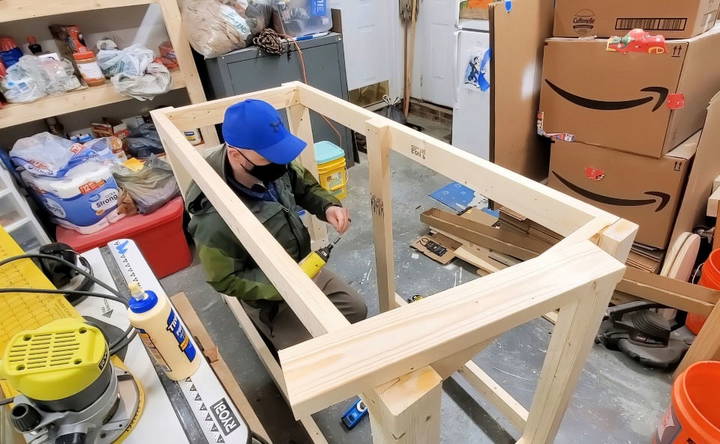
Step 4: Building the Sliding Barn Door
The sliding barn door was a new challenge for me. I installed the rail system and attached the wheels to the door. Initially, the wheel wasn't clearing the top rail, so I had to add two layers of material to lift the rail higher. This adjustment worked perfectly, and the door slid smoothly afterward.
- Tip: Always do a dry run before finalizing the installation. I learned this the hard way when the wheel didn't clear the rail properly, and I had to disassemble and readjust everything.
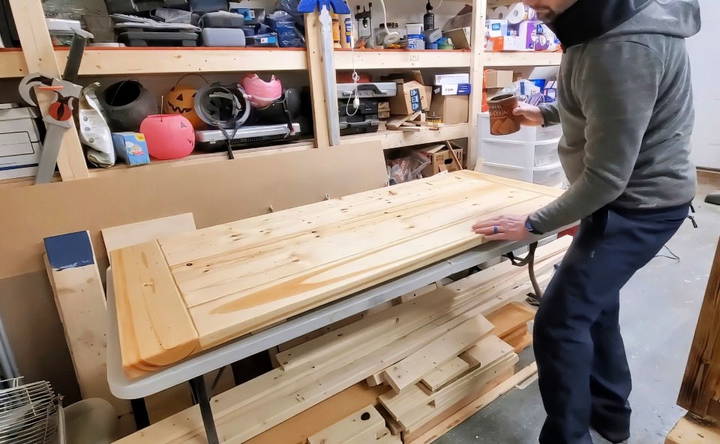
Step 5: Adding Shelves and Final Touches
With the frame and door in place, I added shelves inside the cabinet. I used pocket screws and wood glue to secure them. Make sure to leave enough space for whatever you plan to store inside. I went with adjustable shelves to allow flexibility.
For the top, I sanded everything down to a smooth finish. Sanding can be time-consuming, but it's worth it. A smooth surface makes all the difference when applying the finish. I also used wood filler to seal any cracks or imperfections, wiping off the excess to ensure a clean finish.
Step 6: Finishing the Cabinet with Stain and Polyurethane
To protect the wood and give it a rich color, I applied a pre-stain wood conditioner followed by a golden oak stain. I found that applying the conditioner helped the stain soak evenly into the wood. Without it, the wood can look blotchy—an unpleasant surprise I've encountered in past projects.
- Sealing the Wood for Outdoor Use: I chose water-based polyurethane because it dries clear without that yellowish tint that oil-based finishes can leave. I applied four coats for durability, considering this cabinet would be exposed to outdoor elements.
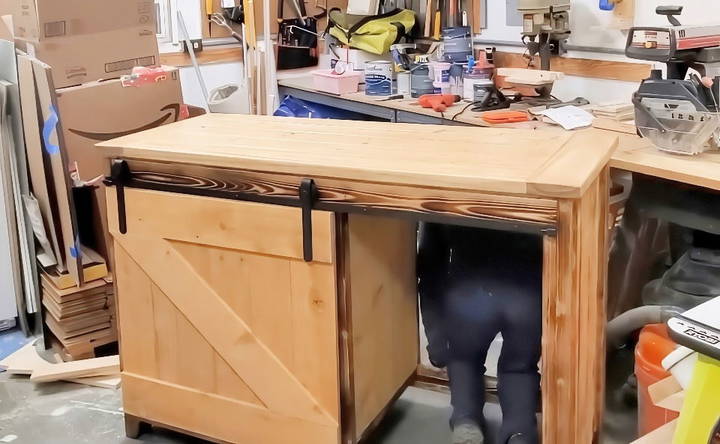
Step 7: Installing the Cabinet Top and Final Assembly
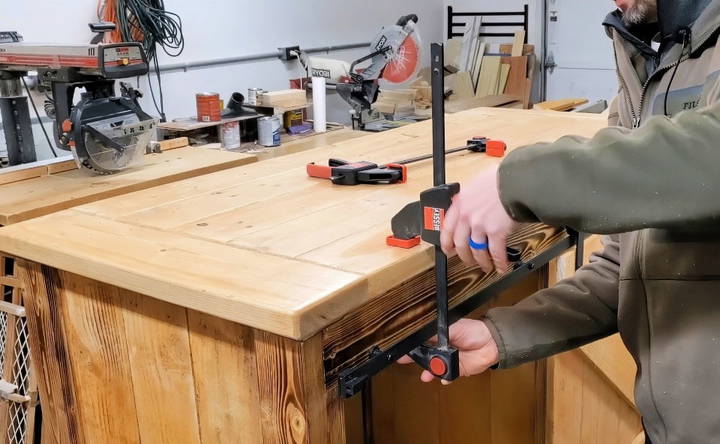
Attaching the cabinet top was another lesson in patience. I used special tabletop fasteners that allow the wood to expand and contract—a necessary feature for outdoor furniture. I had to use my biscuit joiner to build slots for these fasteners. Once they were in, I carefully clamped the top down to prevent it from moving while screwing it into place.
Step 8: Final Adjustments and Review
Once everything was assembled, I made some final adjustments, like trimming any excess wood and smoothing out the edges. I also made a custom plug for a hand slot at the back of the cabinet, making it easier to move without putting stress on the wood top.
Customization Ideas
Customizing your DIY mini fridge cabinet can make it unique and better suited to your needs and style. Here are some easy and creative ideas to personalize your project:
Design Variations
- Rustic Style: Use reclaimed wood for a vintage look. Add metal handles and hinges for an industrial touch.
- Modern Style: Opt for sleek, smooth surfaces. Use neutral colors like white, black, or grey.
- Vintage Style: Paint the cabinet in pastel colors. Add decorative knobs and handles.
Color and Finish Options
- Paint: Choose a color that matches your room decor. Use chalk paint for a matte finish or glossy paint for a shiny look.
- Stain: Highlight the natural wood grain with a wood stain. Choose from light, medium, or dark stains, depending on your preference.
- Decorative Elements: Add stencils or decals for a fun design. Use wallpaper or contact paper on the cabinet doors for a unique pattern.
Functional Additions
- Shelves: Add extra shelves inside the cabinet for more storage. Use adjustable shelves to accommodate different items.
- Countertop: Install a countertop on top of the cabinet for additional workspace. Choose materials like butcher block, granite, or laminate.
- Wheels: Attach wheels to the bottom of the cabinet for easy mobility. Choose locking wheels to keep the cabinet in place when needed.
Space Optimization
- Compact Designs: Build a slim cabinet that fits in tight spaces. Use vertical space by making a taller cabinet.
- Multi-functional Use: Add hooks or racks on the sides for hanging items. Incorporate a small drawer for utensils or other small items.
Personal Touches
- Handles and Knobs: Choose unique handles and knobs that reflect your style. Mix and match different styles for a quirky look.
- Lighting: Install LED strip lights inside the cabinet for better visibility. Use battery-operated lights for an easy installation.
- Labels: Add labels to the shelves or drawers for better organization. Use chalkboard paint on the doors to write notes or labels.
By incorporating these customization ideas, you can build a mini fridge cabinet that is not only functional but also a reflection of your personal style.
Troubleshooting
Building a DIY mini fridge cabinet can be a rewarding project, but sometimes things don't go as planned. Here are some common issues you might encounter and how to solve them:
1. Uneven or Wobbly Cabinet
Problem: The cabinet is not stable or has uneven legs.
Solution:
- Check the Surface: Ensure the floor where the cabinet will sit is level.
- Adjust the Legs: If the cabinet has adjustable legs, tweak them until the cabinet is stable.
- Use Shims: Place small shims under the legs to balance the cabinet.
2. Doors Not Closing Properly
Problem: The cabinet doors are misaligned or don't close fully.
Solution:
- Check Hinges: Tighten any loose screws on the hinges.
- Adjust Hinges: If the hinges are adjustable, align them so the doors close properly.
- Sand Edges: Lightly sand the edges of the doors if they are sticking.
3. Gaps Between Panels
Problem: There are visible gaps between the panels of the cabinet.
Solution:
- Reassemble Panels: Disassemble and reassemble the panels, ensuring they fit snugly.
- Use Wood Filler: Fill small gaps with wood filler and sand smooth once dry.
- Add Trim: Cover larger gaps with decorative trim or molding.
4. Paint or Stain Issues
Problem: The paint or stain is uneven or peeling.
Solution:
- Prep Surface: Ensure the wood is clean, dry, and sanded before applying paint or stain.
- Apply Even Coats: Use thin, even coats and allow each coat to dry completely before adding another.
- Seal Finish: Apply a clear sealant to protect the paint or stain and prevent peeling.
5. Difficulty Cutting Materials
Problem: Cutting wood or other materials is challenging or results in rough edges.
Solution:
- Sharp Blades: Ensure your saw blades are sharp and appropriate for the material.
- Steady Cuts: Make slow, steady cuts to avoid splintering.
- Sand Edges: Smooth rough edges with sandpaper after cutting.
6. Fridge Not Fitting
Problem: The mini fridge does not fit properly in the cabinet.
Solution:
- Measure Accurately: Double-check the dimensions of the fridge and the cabinet opening before assembly.
- Adjust Opening: If possible, adjust the size of the cabinet opening to fit the fridge.
- Remove Obstacles: Ensure there are no obstructions inside the cabinet that prevent the fridge from fitting.
7. Poor Ventilation
Problem: The fridge overheats due to poor ventilation.
Solution:
- Add Vents: Install ventilation holes or grills in the cabinet to allow air circulation.
- Leave Space: Ensure there is enough space around the fridge for air to flow freely.
- Use Fans: Consider adding small fans to improve airflow if necessary.
8. Loose Shelves
Problem: Shelves inside the cabinet are not secure or wobble.
Solution:
- Secure Brackets: Tighten any loose screws or brackets holding the shelves.
- Add Support: Install additional brackets or supports if needed.
- Use Adhesive: Apply a small amount of wood glue to secure shelves in place.
By addressing these common issues, you can ensure your DIY mini fridge cabinet is both functional and durable.
FAQs About DIY Mini Fridge Cabinets
Discover answers to your FAQs about DIY mini fridge cabinets, including materials, assembly tips, and design ideas in our comprehensive guide.
First, measure the dimensions of your mini fridge (height, width, and depth). Add a few inches to each dimension to ensure proper ventilation and ease of access. This extra space helps prevent overheating and allows for easy placement and removal of the fridge.
Yes, you can customize your mini fridge cabinet to fit your style and needs. Some popular design options include:
Barn door style: Adds a rustic touch.
Floating wall-mount: Saves floor space.
Bookshelf concealment: Hides the fridge behind a bookshelf facade.
Here are some helpful tips:
Plan ahead: Sketch your design and make a list of materials.
Measure twice, cut once: Ensure accuracy to avoid mistakes.
Ventilation: Include vents or gaps for airflow to prevent overheating.
Use caster wheels: For easy mobility, especially if you plan to move the cabinet frequently.
Proper ventilation is crucial to prevent your mini fridge from overheating. Here are some tips:
Leave space around the fridge: Ensure there are at least 2-3 inches of space on all sides.
Install vents: Add ventilation grilles or cutouts on the sides or back of the cabinet.
Use a fan: Consider installing a small fan to improve airflow, especially if the cabinet is in a confined space.
Absolutely! Here are some ideas for additional features:
Shelving: Add shelves above or beside the fridge for extra storage.
Lighting: Install LED lights inside the cabinet for better visibility.
Power strip: Include a built-in power strip for easy access to outlets.
Lock: Add a lock to keep the contents secure, especially useful in shared spaces.
Conclusion: Lessons Learned and Future Projects
Reflecting on this build, I realize how much I learned about joinery, finishing, and working with larger projects. I encountered challenges, like dealing with wood movement and imperfect edges, but each challenge taught me something valuable. For my next project, I plan to invest in better bar clamps, as I realized how crucial they are for achieving tight, gap-free joints.
This DIY mini fridge cabinet has been one of my most rewarding projects, not only because it looks great and serves its purpose but also because it pushed me to refine my skills. I hope sharing my experience inspires you to tackle your own projects. Remember, the key is to learn and improve with each build—and not to be afraid of making mistakes along the way!


