Building a DIY misting system can be a simple and fun project to cool down your outdoor space. All it takes is a few supplies and some basic know-how. This guide will walk you through the necessary steps to make your very own misting system or even a DIY misting fan. With this, you can enjoy a refreshing mist on hot days right in your backyard.
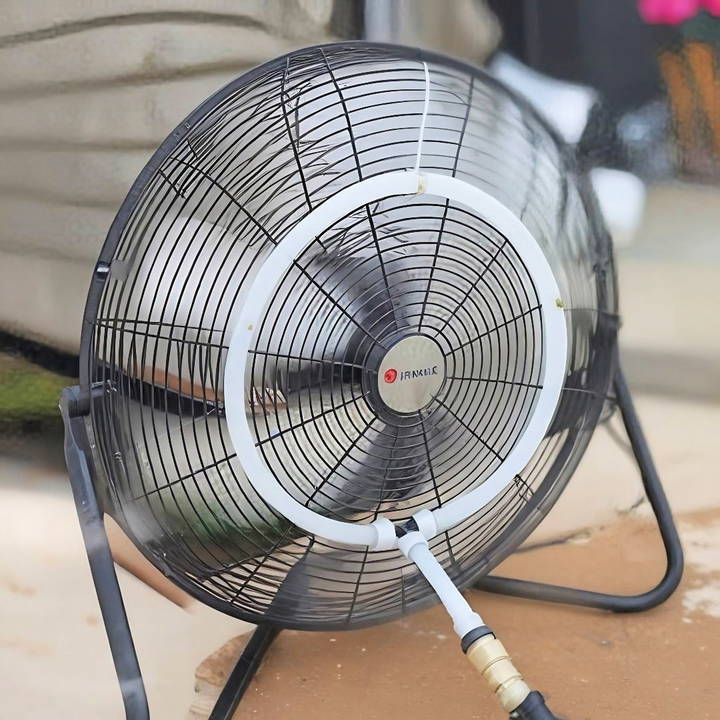
To begin, gather the essential tools and materials, such as tubing, misting nozzles, and a water supply. We'll explain how to connect and secure these parts for a functional setup. You can also learn how to make a misting fan for portable cooling.
Keep reading to get detailed, step-by-step instructions and make your outdoor area more comfortable.
Materials Needed and Why
- PEX Tubing: Chosen for its flexibility and durability. It's essential for building a custom-size ring to fit around the fan.
- Misting Nozzles: They are crucial for building the fine mist needed to cool down the area without making it excessively wet.
- PEX Expansion Tool (optional): Only necessary if you're using PEX A tubing, which requires expansion to fit the fittings. A great investment if you plan on doing more PEX-related projects.
- Garden Hose Adapter: This connects your garden hose to the PEX tubing, ensuring a steady water supply.
- Teflon Tape: Helps prevent leaks at threaded connection points.
- Barb Fittings (or SharkBite fittings for an easier alternative): These are used to connect all your components securely.
Step by Step Instructions
Learn how to make your own DIY mister with our step-by-step guide. From planning to testing, get detailed instructions for each stage.
Step 1: Planning and Measuring
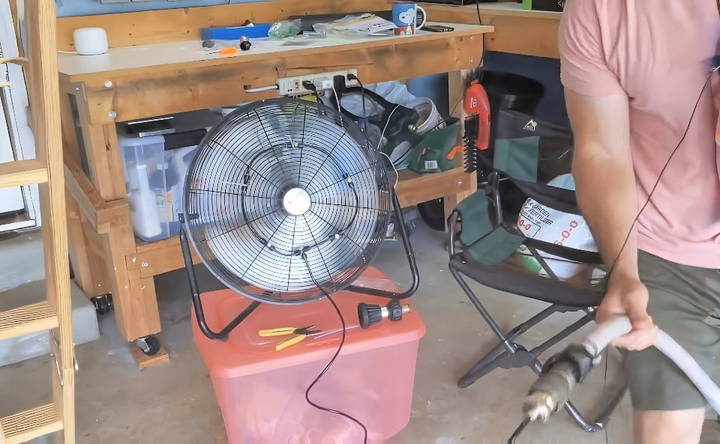
First, measure the circumference of the fan you plan to attach the mister to. This will determine the length of PEX tubing you'll need. For my fan, a length of about 37 inches was perfect.
Step 2: Cutting and Preparing the Tubing
Cut the PEX tubing to your measured length. If you're using a PEX expansion tool, prepare the ends of the tube for the fittings. For those without the tool, push-to-connect or SharkBite fittings are an excellent, tool-free alternative.
Step 3: Attaching the Misting Nozzles
Drill holes in the PEX tubing where you want to place your misting nozzles. In my project, three nozzles provided an ample mist. Make sure the holes are slightly smaller than the nozzle threads for a snug fit.
Step 4: Connecting to Water Source
Attach the garden hose adapter to one end of the PEX tubing using barb fittings (or a SharkBite fitting if you prefer). Use Teflon tape on the threads to prevent leaks.
Step 5: Assembling the Misting Ring
Form the PEX tubing into a circle and connect the ends with another barb fitting. Adjust the placement of your misting nozzles as needed.
Step 6: Mounting and Testing
Secure your new mister ring to the fan using zip ties or a more permanent mounting solution based on your preference. Connect the garden hose to the adapter, turn on the water, and test your mister. Adjust the nozzle direction for optimal cooling and coverage.
Troubleshooting Common Issues
Through trial and error, I encountered and addressed a few snags:
- Leaks at Connection Points: Double-check all connections and ensure Teflon tape is properly used on threaded connections.
- Uneven Mist: Ensure nozzles are evenly spaced and securely fastened. Adjust as necessary for uniform mist distribution.
- Water Pressure Too High or Low: Experiment with different nozzle sizes and quantities. A water pressure gauge can also help you find the perfect balance.
Customization Ideas for Your DIY Mister
Making a DIY mister is not just about functionality; it's also an opportunity to add a personal touch to your home or garden. Here are some customization ideas that can help you tailor your mister to your specific needs and preferences:
Choose Your Style:
- Thematic Design: Match your mister to the theme of your garden or patio. For a tropical feel, use bamboo or rattan materials. For a modern look, opt for sleek metals or PVC.
- Color Coordination: Paint the mister's components to complement your outdoor furniture or garden palette. Use weather-resistant paint for durability.
Functionality Tweaks:
- Adjustable Nozzles: Install nozzles that allow you to control the mist's intensity. This way, you can have a light mist on cooler days or a heavier spray during the heat.
- Directional Control: Set up your mister with the ability to pivot or rotate, directing the mist exactly where you want it.
Enhance the Ambiance:
- LED Lights: Integrate LED lights into your mister system for a magical nighttime atmosphere. Choose lights that can change colors for different occasions.
- Aromatic Experience: Add a compartment for essential oils so that your mister also disperses a pleasant scent, building a relaxing environment.
Smart Integration:
- Automated Timers: Connect your mister to a timer or a smart home system to schedule misting times. This is especially useful for maintaining optimal humidity for plants.
- Remote Control: Use a remote control or smartphone app to turn your mister on and off from anywhere in your home.
Eco-Friendly Options:
- Solar Power: Power your mister with solar panels to reduce energy consumption and enjoy an eco-friendly cooling solution.
- Rainwater Harvesting: Collect rainwater in a barrel and use it for your mister, conserving water and reducing your utility bills.
Use these ideas to make a mister that reflects your personality and lifestyle. The key to a successful DIY project is to have fun and be creative!
Advanced Techniques for DIY Mister Enthusiasts
For those who love to tinker and optimize, taking your DIY mister to the next level can be both a fun and rewarding project. Here are some advanced techniques that can enhance the performance and functionality of your mister:
Automated Misting System:
- Microcontroller Use: Incorporate a microcontroller like an Arduino or Raspberry Pi to automate your mister. You can program it to mist at certain intervals or when the temperature reaches a specific point.
- Sensors Integration: Add humidity and temperature sensors to your system. This allows the mister to react to environmental changes, providing the right amount of moisture when needed.
Water Efficiency:
- Pulse Width Modulation (PWM): Implement PWM to control the mister's pump, which can help in reducing water usage by pulsing the water flow instead of a continuous stream.
- Droplet Size Control: Adjust the nozzle to produce finer or larger droplets depending on the application, whether it's for cooling the air or providing moisture to plants.
Connectivity and Monitoring:
- Wi-Fi Connectivity: Connect your mister to your home Wi-Fi network. This will enable you to monitor and control it remotely through a smartphone app.
- Data Logging: Keep track of temperature, humidity, and water usage data. Analyzing this data can help you make your system more efficient over time.
Enhanced User Interface:
- LCD Display: Add an LCD display to your mister's control panel to show real-time data like temperature and humidity levels.
- Touchscreen Controls: For a more interactive experience, integrate a touchscreen that allows you to adjust settings and schedules with ease.
Advanced Nozzle Technology:
- Anti-Drip Nozzles: Use anti-drip nozzles to prevent water wastage and ensure a clean, drip-free operation.
- Variable Pressure Nozzles: Install nozzles that can handle different pressures, allowing for a customizable misting experience.
Implementing these techniques ensures a more efficient, responsive mister and an enjoyable upgrade process. Always prioritize safety with electrical components and water.
Safety Precautions for DIY Mister Projects
When embarking on a DIY mister project, safety should be your top priority. Here are some key safety precautions to keep in mind:
Understand Your Tools:
- Read Manuals: Before using any tools, read the manuals carefully to understand their proper use.
- Inspect Tools: Check your tools for any damage before use to prevent accidents.
Personal Protective Equipment (PPE):
- Eye Protection: Always wear safety goggles to protect your eyes from flying debris.
- Gloves: Use gloves to protect your hands from sharp objects and friction burns.
- Ear Protection: If you're using loud power tools, wear earplugs or earmuffs to protect your hearing.
Safe Work Area:
- Clutter-Free Zone: Keep your work area clean and free of clutter to avoid tripping hazards.
- Adequate Lighting: Ensure your workspace is well-lit to avoid mistakes that could lead to injury.
- Ventilation: Work in a well-ventilated area to avoid inhaling fumes from adhesives or solvents.
Electrical Safety:
- Check Cords: Inspect power cords for fraying or damage and never use them near water.
- Circuit Breaker: Use a circuit breaker or a Ground Fault Circuit Interrupter (GFCI) for an extra layer of protection against electrical shock.
Chemical Safety:
- Read Labels: Always read labels and follow instructions when using chemicals like adhesives or cleaners.
- Storage: Store chemicals in a cool, dry place away from children and pets.
First Aid:
- First Aid Kit: Keep a first aid kit nearby in case of minor injuries.
- Emergency Plan: Have a plan in place for emergencies, including knowing the location of the nearest hospital and having a phone accessible.
Mind Your Health:
- Stay Hydrated: Drink plenty of water, especially if working in hot conditions.
- Take Breaks: Don't overexert yourself; take breaks to rest and recharge.
Follow these safety steps to make sure your DIY mister project is both successful and safe. Preparing and protecting yourself helps avoid accidents and injuries.
FAQs About DIY Mister Systems
Discover answers to common questions about DIY mister systems, including setup, maintenance, and troubleshooting tips to enhance your misting experience.
To install misting nozzles:
Measure and mark the locations for your nozzles on the tubing.
Use a drill with the correct size bit to create holes at these marks.
Screw the misting nozzles into the holes, ensuring a snug fit.
Angle the nozzles slightly towards the area you want to cool.
Yes, you can make a portable mister system using a garden sprayer as a water source. Attach drip irrigation parts and misting nozzles to the sprayer, and use a pump action to pressurize the water and make mist.
For an effective mister system:
Keep the tubing length short to maintain high water pressure.
Use a fine mist nozzle for a cooling effect without drenching.
Install the system above head height to allow the mist to cool the air as it falls.
Regularly clean the nozzles to prevent clogging.
A DIY mister system can be used for:
Cooling outdoor living spaces like patios or decks.
Making a humid environment for plants in a greenhouse.
Providing relief for animals in a barn during hot weather.
Enhancing outdoor parties or events with a cool mist.
Regular maintenance is key to the longevity of your DIY mister system. Here's what you can do:
Clean the nozzles periodically to prevent clogging. Soaking them in vinegar or using an ultrasonic cleaner can be effective.
Inspect the tubing for leaks or damage and replace it if necessary.
Drain the system before winter to prevent water from freezing inside, which could cause damage.
Check the water pressure to ensure it's within the recommended range for your misting nozzles.
Final Thoughts
In conclusion, learning how to build a DIY misting system can be a rewarding and enjoyable project. It helps you beat the heat and adds value to your outdoor spaces. The process is straightforward, cost-effective, and perfect for enhancing comfort during hot weather. So, gather your materials, follow the steps, and soon you'll have an efficient DIY misting fan that keeps you cool all summer long.


