When it comes to maintaining and securing your mobile home, skirting plays a critical role in protecting the foundation and ensuring that rodents and other pests don't take up residence beneath your home. After working on many similar projects, I've found that the process is straightforward with the right materials, but there are a few tricks and techniques that make the job a lot easier. Here's how I approach DIY mobile home skirting, ensuring both aesthetics and functionality, with added rodent-proofing measures to keep your home safe and secure.
Understanding Mobile Home Skirting
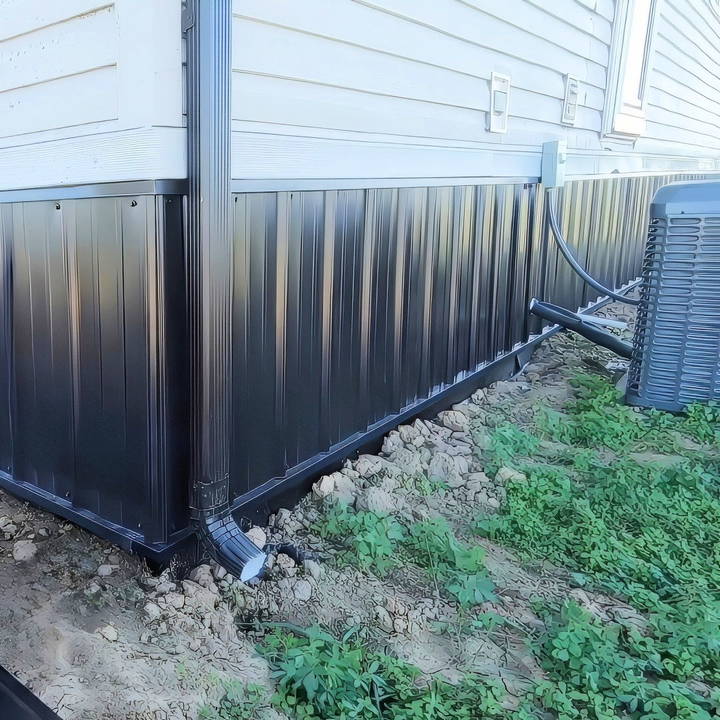
Skirting involves enclosing the space beneath a mobile or manufactured home. It not only enhances the look but also prevents rodents and cold air from entering underneath the home. On my recent job site, I was tasked with installing skirting for a double-wide mobile home, and rodent-proofing it was a key part of the process.
Step by Step Instructions
Learn how to DIY mobile home skirting with easy, step-by-step instructions, from gathering materials to finishing touches.
Step 1: Materials for the Job
For this project, I started by gathering the necessary materials. Here's what I used:
- Treated lumber: This is critical for any part of the skirting that makes contact with the ground. In my case, I used green-treated 2x4s for the bottom boards.
- Regular construction lumber: For sections not in direct contact with the ground, regular 2x4s worked perfectly.
- House wrap: This serves as a barrier to keep air and moisture from penetrating the skirting.
- Aluminum coil: This painted aluminum acts as a rodent-proof layer beneath the ground, ensuring no critters can burrow under the skirting.
- Steel panels: These are the outermost layer, which provides the finished look and adds durability.
From experience, I've found that using treated wood in any areas touching the ground prevents rot and extends the life of the structure, while the house wrap and aluminum make it virtually impossible for pests to infiltrate.
Step 2: Setting Up the Frame
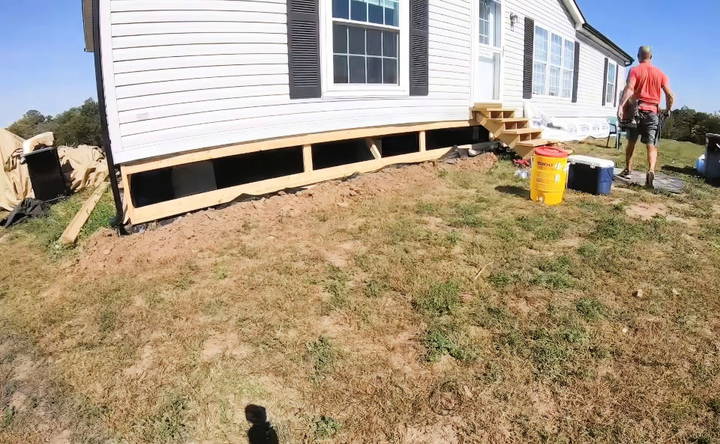
I started by framing the skirting, which involves installing both top and bottom boards. The land around the home was uneven, with a difference in height from the front (24 inches) to the back (36 inches). To ensure the metal panels would fit correctly, I measured both the front and back of the home to maintain uniformity in the panel lengths.
Next, I secured the bottom boards to the foundation using green-treated 2x4s, ensuring they would hold up against ground moisture. For the top boards, I used regular 2x4s since they didn't have any ground contact. Every four feet, I installed vertical studs to support the structure and provide a sturdy base for attaching the steel panels.
One lesson I've learned is that taking the time to ensure your measurements are precise from the start saves a lot of headaches later. The slight incline on the land required me to adjust the panel lengths on the sides, but this is a common challenge when dealing with uneven ground.
Step 3: Reinforcing the Structure
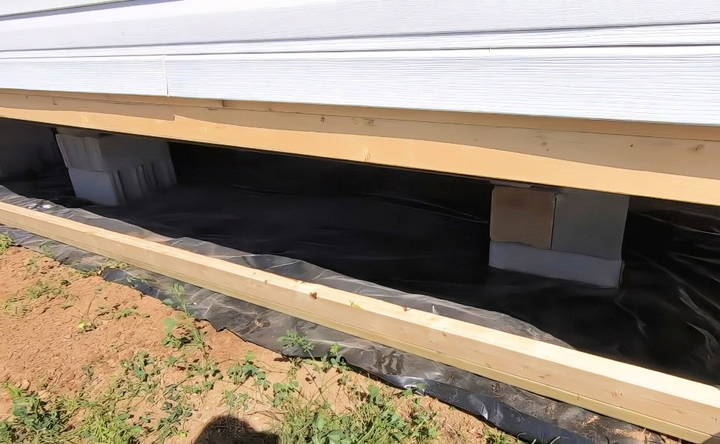
With the framing in place, I moved on to bracing the skirting. To prevent any bowing or shifting over time, especially in high winds, I added angled braces from the bottom boards up to the joists of the home. This not only strengthened the skirting but also helped straighten out any unevenness.
This part of the process can be a bit tricky, especially if you're working alone, but it's crucial for ensuring the longevity of the skirting. I temporarily used a level to ensure the structure was plumb and then secured the braces. If you have a string line handy, this will make the job even easier.
Step 4: Adding the Rodent-Proof Barrier
Once the framework was solid and secure, I turned my attention to rodent-proofing. This is where the aluminum coil comes into play. I dug a small trench around the entire perimeter of the home and ran the aluminum from the bottom board into the trench. This builds a barrier that's not only tough for rodents to penetrate but also helps with moisture control.
The aluminum was painted black to match the steel panels, but since it's mostly buried, color matching isn't as essential. However, it does provide a seamless look between the landscaping rock and the bottom trim.
One of the best tricks I've picked up over the years is to backfill the trench with dirt once the aluminum is installed. This keeps the aluminum firmly in place and eliminates any gaps that pests could potentially exploit.
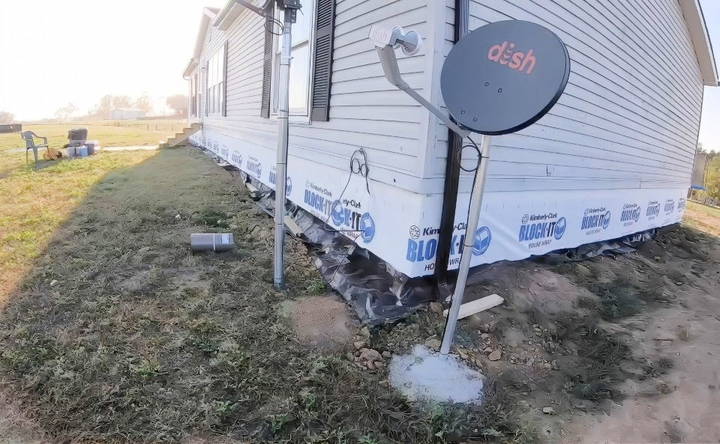
Step 5: Wrapping and Securing the Structure
Next, I wrapped the entire frame with house wrap. This helps to block air from seeping under the home, improving energy efficiency and making it easier to regulate the temperature inside. The house wrap extends from the top to the bottom of the frame, with the aluminum barrier tucked neatly underneath.
Once the house wrap was in place, it was time to install the steel panels. These were cut to size based on the measurements I took earlier, and I attached them securely to the framing. One of the key things I've learned over time is to leave about an inch of overlap between each panel to ensure there are no gaps for wind or pests to sneak through.
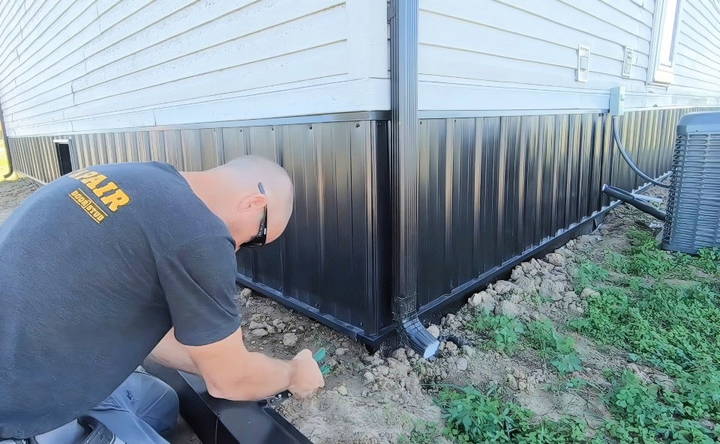
Step 6: Finishing Touches
To complete the look, I installed J-trim around the top and bottom of the steel panels. This trim not only holds the panels securely but also gives the skirting a polished, professional appearance. It's important to make sure your cuts are precise, especially at the corners, to avoid any unsightly gaps.
Finally, I built a small access door to allow entry underneath the home for maintenance. This door was framed and flashed with black aluminum to match the rest of the skirting. One thing I've learned is that having a secure, easy-to-use access door is essential for future repairs or inspections.
Creative Skirting Ideas
Mobile home skirting doesn't have to be just functional; it can also be a way to enhance the look of your home. Here are some creative ideas to make your skirting stand out:
1. Aesthetic Enhancements
Paint and Color:
- Choose a color that complements your home.
- Use weather-resistant paint to ensure longevity.
- Consider a two-tone design for added depth and interest.
Decorative Panels:
- Use panels with decorative patterns or textures.
- Fauxstone or brick panels can give a high-end look without the cost.
- Mix and match different textures for a unique appearance.
Trim and Molding:
- Add trim or molding to the top and bottom edges of the skirting.
- This can build a finished, polished look.
- Use contrasting colors for a striking effect.
2. Seasonal Decorations
Holiday Themes:
- Decorate your skirting with seasonal themes.
- For example, use garlands and lights for Christmas.
- Add pumpkins and hay bales for a fall harvest look.
Garden Integration:
- Plant flowers or shrubs around the base of the skirting.
- Use planters or hanging baskets to add greenery.
- This can make the skirting blend seamlessly with your garden.
3. Functional Enhancements
Storage Solutions:
- Incorporate storage compartments within the skirting.
- Use these spaces to store garden tools or outdoor equipment.
- Ensure the compartments are weatherproof and secure.
Ventilation and Access:
- Add decorative vents to improve airflow.
- Ensure there are access panels for maintenance.
- These can be hidden behind decorative elements.
4. DIY Customization
Personal Touches:
- Add personal touches like family name plaques or house numbers.
- Use stencils to build custom designs or patterns.
- This makes your home feel unique and personalized.
Upcycled Materials:
- Use reclaimed wood or other upcycled materials.
- This is eco-friendly and can add a rustic charm.
- Ensure the materials are treated for outdoor use.
5. Lighting
Under-Skirting Lights:
- Install LED lights under the skirting for a soft glow.
- Solar-powered lights are a great energy-efficient option.
- This can enhance safety and aesthetics at night.
Spotlighting:
- Use spotlights to highlight decorative elements.
- This can build a dramatic effect and improve curb appeal.
- Ensure the lights are weather-resistant and properly installed.
Transform your mobile home skirting into a stylish, functional upgrade that enhances both appearance and value.
Common Mistakes to Avoid
When installing mobile home skirting, it's easy to make mistakes that can affect the durability and appearance of your project. Here are some common mistakes to avoid:
1. Incorrect Measurements
- Measure Twice, Cut Once: Always double-check your measurements before cutting materials. Incorrect measurements can lead to gaps or overlaps that compromise the skirting's effectiveness.
2. Choosing the Wrong Materials
- Consider Climate and Conditions: Select materials that are suitable for your local climate. For example, vinyl may not be the best choice in extremely hot or cold areas. Research the pros and cons of each material before making a decision.
3. Poor Ventilation
- Ensure Proper Airflow: Skirting needs ventilation to prevent moisture buildup and mold growth. Install vents at regular intervals to allow air to circulate. Make sure the vents are not blocked by debris or landscaping.
4. Skipping the Insulation
- Don't Neglect Insulation: Insulation behind the skirting can improve energy efficiency. It helps keep your home warmer in winter and cooler in summer. Use appropriate insulation materials and install them correctly.
5. Inadequate Ground Preparation
- Prepare the Ground: Clear the area of debris, rocks, and vegetation before installing skirting. Level the ground to ensure a smooth installation. Proper ground preparation prevents future issues like shifting or sagging.
6. Ignoring Maintenance
- Regular Inspections: Inspect your skirting regularly for damage or wear. Address any issues promptly to prevent further damage. Clean the skirting to remove dirt, mold, and mildew.
7. Improper Installation
- Follow Instructions Carefully: Read and follow the manufacturer's installation instructions. Use the recommended tools and materials. Improper installation can lead to gaps, warping, and other issues.
8. Overlooking Access Panels
- Include Access Points: Ensure there are access panels for maintenance and repairs. These panels should be easy to open and close. Place them in convenient locations for easy access.
9. Not Securing the Skirting
- Securely Fasten Skirting: Use appropriate fasteners to secure the skirting to the home. Ensure the skirting is firmly attached to prevent it from being blown away by strong winds. Check fasteners regularly and replace any that are loose or damaged.
10. Aesthetic Neglect
- Consider Appearance: Choose skirting that complements the look of your home. Pay attention to color, texture, and design. Aesthetic appeal is important for curb appeal and overall satisfaction.
Avoiding common mistakes ensures your mobile home skirting is functional and attractive. Good planning, material choice, and maintenance are key.
FAQs About DIY Mobile Home Skirting
Discover answers to all your questions about DIY mobile home skirting, from materials to installation tips, in our comprehensive FAQ guide.
Mobile home skirting is a material that covers the space between the ground and the bottom of your mobile home. It improves the home’s appearance, provides insulation, and protects against pests and weather.
Skirting is essential because it helps maintain a stable temperature under the home, preventing pipes from freezing in winter and reducing heat in summer. It also keeps pests and debris out and enhances the home’s curb appeal.
In many areas, skirting is legally required for mobile homes. Check local building codes and regulations to ensure compliance.
Proper ventilation is crucial to prevent moisture buildup. Install vents according to the manufacturer's guidelines, ensuring they are evenly spaced around the perimeter of your home.
Inspect your skirting at least twice a year, ideally in spring and fall. Look for signs of damage, such as cracks or holes, and clean it regularly to prevent mold and mildew.
Lessons Learned and Final Thoughts
After working on many skirting projects, I've found that preparation is everything. Having the right materials, taking the time to measure carefully, and reinforcing the structure properly can make all the difference. Rodent-proofing is an extra step that many people overlook, but in my experience, it's absolutely essential for ensuring your home stays pest-free and well-protected.
If you're tackling this DIY mobile home skirting project yourself, don't rush through it. Pay attention to the small details, especially when it comes to leveling and securing the structure. And remember, using high-quality materials like treated wood and aluminum may cost more upfront, but they'll save you time and money in the long run by reducing maintenance needs.
In the end, the combination of skirting, house wrap, and aluminum not only looks great but also offers peace of mind, knowing that your home is protected from the elements and unwanted pests.


