Starting the day with a tidy desk can do wonders for productivity. The cluttered space in my small home office often made it hard to focus. I decided to build a DIY monitor stand to organize my desk better. With just a few basic materials and tools, I started assembling the stand, following simple steps online.
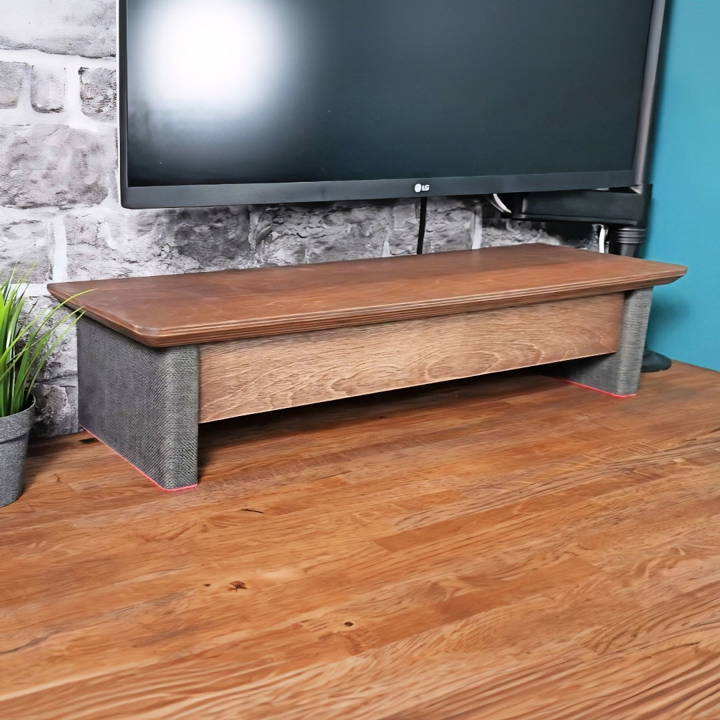
From measuring the wood pieces to screwing them together, I felt proud as my project took shape. The process was surprisingly easy and rewarding. Now, my desk looks cleaner, and my monitor is at a perfect height. By building this stand, I saved money and learned new skills.
I'm helping with this guide so you can experience the same satisfaction and build a more organized workspace, too.
Ergonomic Benefits of a DIY Monitor Stand
Positioning your monitor is key to a comfortable workspace. A DIY monitor stand can improve your workstation's ergonomics, benefiting your posture and health.
- Proper Screen Height: The top of your monitor should be at or slightly below eye level. This positioning helps maintain a natural, neutral neck position, reducing the strain on your cervical vertebrae.
- Optimal Distance: Your monitor should be about an arm's length away. A stand can help position the screen at the correct distance to prevent eye strain and maintain clear vision.
- Customized Viewing Angle: With a DIY stand, you can adjust the tilt and angle of your monitor to minimize glare from lighting or windows, which can cause eye fatigue.
- Increased Desk Space: A monitor stand can elevate your screen, providing additional space underneath for organization, which contributes to a less cluttered and more productive workspace.
- Healthier Work Habits: An adjustable monitor stand encourages you to adjust your position throughout the day, promoting movement and reducing the risks associated with prolonged sitting.
Build your own monitor stand for personalized satisfaction and long-term ergonomic benefits. It will enhance your workspace comfort and productivity.
Materials Needed and Why
- 18mm Thick Birch Plywood: Known for its strength and aesthetic appeal, I chose birch plywood for the main structure. Its quality ensures durability and provides a nice finish.
- MDF (Medium-Density Fibreboard): I used this for the sides of the shelf. It's easy to work with and was perfect for adding fabric to the sides later.
- Fabric: To cover the MDF sides and add a unique touch to the shelf. The linen effect fabric in charcoal black matched my desk's theme.
- Contact Adhesive & Spray Adhesive: For attaching the fabric to the MDF and felt to the bottom of the drawer, respectively.
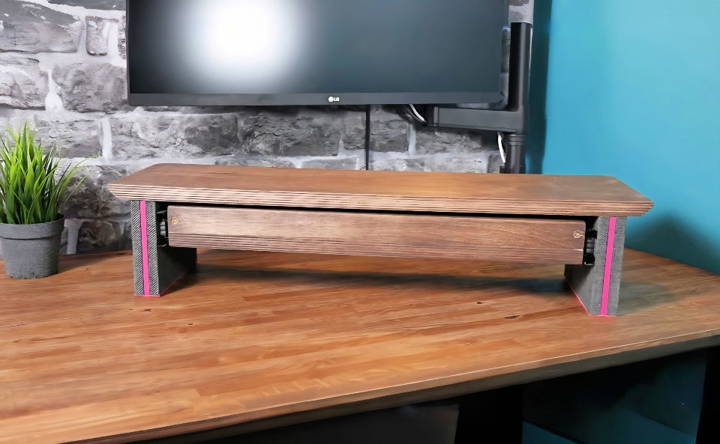
- Felt (Magenta): This was for lining the drawer and the bottom of the shelf to prevent scratches on the desk and reduce noise from items in the drawer.
- Drawer Slides (Full Extension Ball Bearing): These provide smooth operation of the drawer, making items easily accessible.
- Finish (Rubio Monocoat in Chocolate Color): To protect the wood and enhance its natural beauty.
Step by Step Instructions
Learn how to make a DIY monitor stand with our step-by-step instructions. Enhance your workspace with an easy, affordable, and stylish solution.
Measuring and Cutting
- Cutting Plywood: I started by marking and cutting the birch plywood for the drawer sides, bottom, and top-shelf using a track saw for precision.
- Sanding: Before assembly, I sanded the inner parts of the plywood pieces to ensure a smooth finish, which is easier to do at this stage.
Drawer Assembly
- Simple Construction: Using glue and screws, I assembled the drawer. Clamps helped hold everything in place while I drilled pilot holes and secured the pieces.
- Adding The Bottom: After assembling the outer frame, I glued and screwed the bottom piece to it, ensuring it was flush with the edges.
Preparing the Sides
- Cutting MDF: The MDF was cut to size for the sides of the shelf. I decided to cover these in fabric for a unique look.
- Rounding Edges: I added a rounded profile to the MDF using a palm router, which softened the look.
- Adding Fabric: The MDF sides were then covered with fabric using contact adhesive for a seamless application.
Completing the Shelf
- Assembling the Shelf: Using dowels and wood glue, I attached the sides to the top, ensuring everything was aligned correctly.
- Finishing Touches: The top received a round over on the corners and a slight underbevel for a more polished look. Then, I applied a finish for protection.
Drawer Front and Final Touches
- Attaching the Drawer Front: After ensuring a snug fit, I glued and used a combination of wood glue and super glue for immediate hold, along with the aesthetic complement of a chamfered grip underneath for opening.
- Lining with Felt: To complete the drawer, I lined it with a magenta felt, which added a pop of color and kept the contents from sliding around.
Lessons Learned
- Precision Matters: Taking the time to measure and cut each piece accurately ensured that all parts fit together seamlessly, which was crucial for the drawer's functionality.
- Clamps Are Essential: Acting as an extra pair of hands, clamps were indispensable in holding pieces together firmly while drilling and screwing.
- Finishing Before Assembly: Sanding and finishing the interior parts before assembly made the process much smoother, as it was more challenging to sand corners and edges afterward.
Customization Ideas for Your DIY Monitor Stand
Building a DIY monitor stand is not just about functionality; it's also an opportunity to add a personal touch to your workspace. Here are some customization ideas that can make your monitor stand unique and more enjoyable to use:
- Choose Your Materials Wisely: Start by selecting materials that reflect your style. Whether it's sleek metal, rustic wood, or vibrant acrylics, the choice is yours. Consider the durability and the overall aesthetic you want to achieve.
- Adjustable Features: Incorporate adjustable elements such as height or tilt to make your monitor stand versatile. This way, you can ensure it meets your ergonomic needs and can adapt to different situations.
- Cable Management: Add built-in cable organizers or clips to keep your desk tidy. Managing cables not only improves the look of your stand but also prevents tangling and damage to the wires.
- Color and Finish: Paint or stain your monitor stand to match your room's decor or to stand out with a pop of color. A smooth, clear finish can protect the material and make it easy to clean.
- Decorative Elements: Personalize your stand with decals, patterns, or engravings. From geometric designs to your favorite quotes, these details can make your stand one of a kind.
- Multi-functional Design: Think beyond the monitor. Design your stand to hold accessories like speakers, a phone dock, or a storage compartment for office supplies.
- Eco-Friendly Options: If sustainability is important to you, use recycled materials or choose supplies from renewable sources. This choice can reduce environmental impact and give your stand a story to tell.
- Lighting: Integrate LED strips or a small lamp into your stand. This can add ambiance to your workspace and improve visibility during late-night sessions.
By considering these customization ideas, you can build a monitor stand that is not only practical but also reflects your personality and work style.
Troubleshooting Common Issues
When crafting a DIY monitor stand, you might encounter a few hiccups along the way. Here's a helpful guide to troubleshooting common issues, ensuring your project is successful and stress-free.
Unstable Stand
- Solution: Check if all parts are cut to the correct dimensions and assembled squarely. Reinforce any loose joints with additional screws or brackets.
Monitor Doesn't Fit
- Solution: Measure your monitor's base and ensure the stand's surface is slightly larger. If it's too small, extend the surface area with additional material.
Wobbling
- Solution: Ensure the surface where the stand rests is level. Add felt pads or adjust the feet of the stand to balance it out.
Too High or Too Low
- Solution: For a stand that's too high, trim the legs carefully to reduce height. If it's too low, add spacers or legs to achieve the desired elevation.
Scratches on Desk
- Solution: Attach soft material like felt or silicone pads to the bottom of the stand to protect your desk surface.
Difficulty in Cable Management
- Solution: If cables are cluttering, add hooks or clips to the back of the stand. Consider a built-in cable management system in your design.
Material Warping or Damage
- Solution: Use sealants or paints suitable for your material to protect against humidity and wear. Store the stand in a dry, cool place when not in use.
Tools Required Not Available
- Solution: Look for alternative tools that can achieve the same result, or visit a local maker space or hardware store for access to the right tools.
By anticipating these issues and knowing how to address them, you'll be well on your way to making a functional and stylish DIY monitor stand.
FAQs About DIY Monitor Stand
Find answers to faqs about DIY monitor stands, including materials, assembly tips, and ergonomic benefits for a personalized, space-efficient workspace.
To ensure stability, select a design that distributes weight evenly and is proportionate to the size of your monitor. Use sturdy materials and ensure all joints are securely fastened. If you’re building an adjustable stand, make sure the moving parts are tight and can lock in place. Always test the stand with your monitor before regular use.
Yes, there are simple designs available that require minimal skills. For example, a basic stand can be made by attaching legs to a flat piece of wood. There are also ‘no-tool' options, like using sturdy books or pre-made shelves as a makeshift stand. However, for more complex designs, some basic carpentry skills might be helpful.
A DIY monitor stand can help free up desk space, provide a custom height for better ergonomics, and add a personal touch to your workspace. It can also be a cost-effective solution compared to purchasing a pre-made stand. Additionally, building your own stand allows you to tailor it to your specific needs and preferences.
Yes, you can opt for sustainable materials like reclaimed wood or bamboo. You can also repurpose old furniture parts or use recyclable materials like cardboard for a lightweight option. Choosing to DIY rather than buy new can also be considered an environmentally friendly choice.
To customize your DIY monitor stand for better cable management, consider adding a cable tray under the stand or drilling holes in the stand to thread cables through. You can also attach adhesive cable clips to the back or underside of the stand to keep cables organized and out of sight. For a more creative solution, some designs incorporate a hidden compartment within the stand to store cables and adapters.
Final Thoughts
Get started today with this easy and practical DIY monitor stand project. Transform your workspace into an organized, efficient area. Follow the simple steps below and see the difference it makes in your daily routine.


