Building my own DIY motorcycle lift was one of the most fulfilling projects I have ever undertaken. It all began with a bit of online research and realizing that a store-bought lift was out of my budget. Armed with some basic motorcycle lift plans and materials from my local hardware store, I set out to build a homemade motorcycle stand.
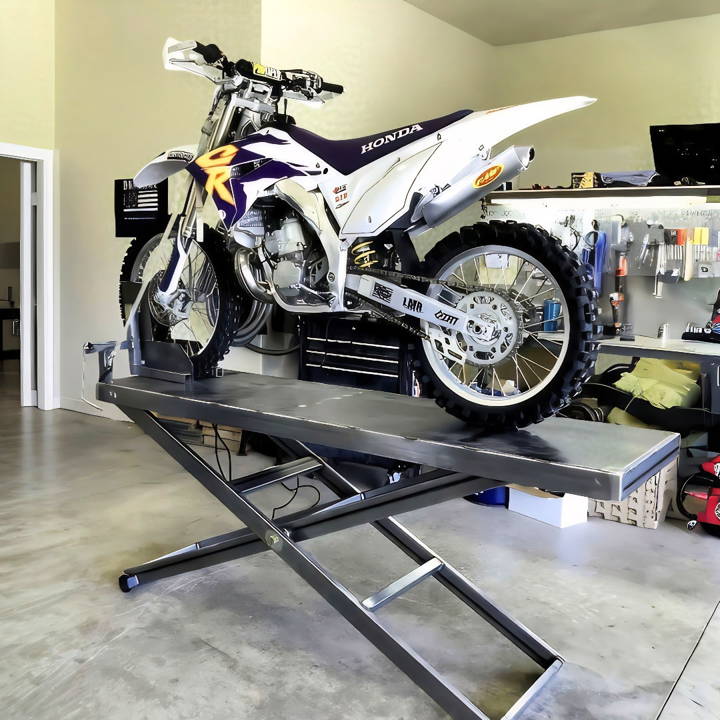
Working through the step-by-step instructions, I learned not only about mechanics but also about my own capabilities. I faced a few tricky moments, yet each challenge was an opportunity to grow. The final product was sturdy and reliable, giving me a deep sense of accomplishment.
Here's my guide to help you craft your own DIY motorcycle lift—it's simpler than you might think and highly rewarding.
Materials Needed
Discover the materials needed for building a robust motorcycle lift: frame, lift mechanism, clamps, and additional tools. Ensure a safe, efficient setup.
For the Frame
- Metal tubing: For the structure's stability and strength.
- Welding machine: To securely join the metal parts.
- Grinder: For smoothing welded joints and ensuring flat surfaces.
For the Lift Mechanism
- Winch (1500 pound): Chosen for its lifting capacity suitable for my motorcycle's weight.
- Wheels: For mobility; to easily move the lift around the garage.
Motorcycle Clamp
- All thread rod & Metal plates: To build a secure clamping system for the front wheel.
Additional Tools and Materials
- Drill and bits, Measuring tape, Metal saw: Essential for making precise cuts and holes.
- Safety equipment (gloves, goggles): Crucial to prevent injuries during work.
Step by Step Instructions
Learn how to build a DIY motorcycle lift with our step-by-step instructions. Perfect for bike enthusiasts looking to save money and space!
Constructing the Frame
- Design Sketching: My first step was to sketch the design with rough dimensions. I aimed for a 7-foot long and 2-foot wide table, considering both my motorcycle's size and the space in my garage.
- Cutting and Welding: After sketching, I cut the metal tubing according to my design specifications. I meticulously welded these pieces together, ensuring the structure was square and sturdy.
- Making It Mobile: To make the lift easy to move, I attached wheels at the base, carefully selecting points that would ensure balance and stability when the lift was both in use and being stored.
Adding the Lift Mechanism
- Choosing the Winch: The winch was central to the lifting mechanism. Mounting it correctly was crucial for the operation of the lift. I placed it towards the front, running a cable back to the table's arm to facilitate the lift.
- Testing and Adjusting: Upon installing the winch and testing the lift, I immediately realized adjustments were necessary. The table needed to be raised slightly to avoid strain on the mechanism and ensure smooth operation.
Crafting the Motorcycle Clamp
- Designing for Stability: I designed a clamp that could be adjusted to securely fit the motorcycle's front wheel. Using metal plates and an all-thread rod, I ensured the clamp was both sturdy and adaptable.
- Assembly and Testing: After assembling the clamp, I tested its holding capability with my motorcycle. This step was crucial for identifying any weaknesses or necessary modifications to ensure the bike's stability on the lift.
Final Touches and Testing
- Welding and Buffing: I went over the frame once more, welding any additional support structures needed and buffing out imperfections. This not only reinforced the lift but also prepared it for finishing.
- Painting and Protective Coating: I opted for a protective paint that would resist rust and wear over time. The choice of color was purely aesthetic, but the protective nature of the coating was a practical necessity.
- Comprehensive Testing: Before declaring the project complete, I conducted several load tests with my motorcycle, looking for any signs of instability or structural weakness that needed addressing.
Lessons Learned
This project was as much about learning and adaptation as it was about building. Some key takeaways included:
- The importance of precise measurements cannot be overstressed. Even minor inaccuracies can lead to significant issues during assembly.
- Testing at each stage ensures that problems are identified and resolved early on, preventing them from becoming more significant issues.
- Flexibility in design and execution allows for improvements and adjustments based on real-world use.
Customization Ideas for Your DIY Motorcycle Lift
When it comes to DIY projects, personalization not only adds a unique touch but also ensures that the end product perfectly fits your needs. Here are some customization ideas for your DIY motorcycle lift that are practical and can enhance your experience.
Adjustable Height Mechanism
- Consider installing an adjustable height feature. This allows you to set the lift to the exact height needed for different tasks, whether it's for cleaning, maintenance, or storage.
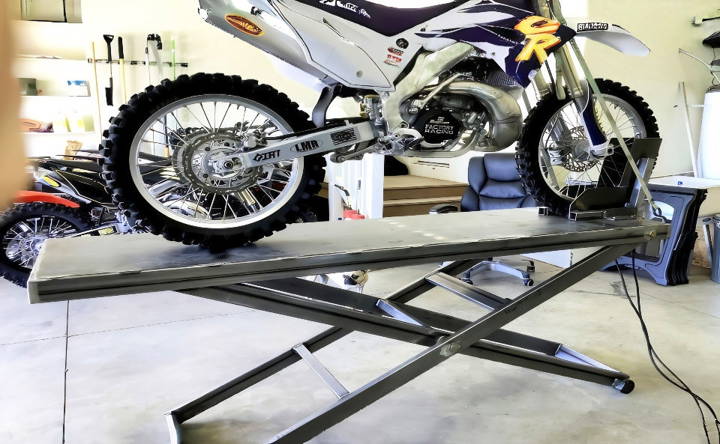
- You can use simple mechanisms like threaded rods or scissor jacks, which are easy to operate and reliable.
Wheel Chocks
- Wheel chocks keep the motorcycle stable on the lift. You can customize the size and the locking mechanism to fit various motorcycle models.
- For added convenience, build a quick-release system so you can easily move the motorcycle on and off the lift.
Tool Trays and Holders
- Attach tool trays or magnetic holders to keep your tools within reach. This small addition can significantly improve the efficiency of your work.
- Design the trays to be detachable for easy cleaning and organization.
Mobility Options
- If you need to move the lift around your garage or workspace, consider adding lockable wheels.
- Ensure the wheels are sturdy enough to handle the weight and provide stability when locked.
Surface Material
- The top surface where the motorcycle sits can be customized with different materials. Rubber padding or non-slip mats can prevent scratches and enhance grip.
- Choose materials that are resistant to oil and easy to clean for long-term durability.
Paint and Finish
- Protect your lift from rust and give it a professional look with a proper paint job. Use paints that are designed for metal and can withstand heavy use.
- Select a color that matches your motorcycle or your personal style.
Hydraulic or Pneumatic Assistance
- For those who are more mechanically inclined, adding a hydraulic or pneumatic system can make lifting the motorcycle effortless.
- This feature is particularly helpful for heavier bikes or if you have physical limitations.
Security Features
- Incorporate a locking mechanism to secure the motorcycle in place when it's lifted. This adds an extra layer of safety.
- You can use simple bolts or build a more complex system with a key for added security.
The key to a successful customization is understanding your needs and the limitations of your design. Always prioritize safety and stability in your customizations.
Advanced Features and Enhancements for Your DIY Motorcycle Lift
Enhancing your DIY motorcycle lift with advanced features can significantly improve its functionality and safety. Here's a detailed guide on incorporating some sophisticated enhancements that are both useful and straightforward.
Electronic Control System
- Upgrade your lift with an electronic control system. This allows for precise height adjustments at the push of a button.
- You can use a simple wired remote or even implement a wireless system for added convenience.
Integrated Hydraulic System
- For smooth and effortless lifting, consider adding a hydraulic system. This can be a game-changer for handling heavy motorcycles.
- Use a manual hydraulic pump or an electric hydraulic cylinder for this upgrade.
Built-in LED Lighting
- Good lighting is essential when working on your motorcycle. Install LED strips under the lift platform to illuminate the underside of the bike.
- LEDs are energy-efficient and provide bright, clear light without adding much heat.
Digital Weight Gauge
- Knowing the weight of your motorcycle can be useful for maintenance and modifications. Incorporate a digital weight gauge into the lift platform.
- Ensure the gauge is calibrated and can handle the weight range of your motorcycle.
Automatic Safety Locks
- Safety should always be a priority. Install automatic locks that engage at various heights to prevent accidental lowering.
- These locks can be mechanical or electronic, depending on your preference and skill level.
Foldable Design for Easy Storage
- If space is a concern, design your lift to be foldable. This allows you to store it against a wall or in a corner when not in use.
- Use hinges and locking pins to ensure the lift remains stable when unfolded.
Adjustable Side Panels
- Add adjustable side panels to accommodate different bike sizes and provide additional support.
- These panels can slide or fold out and should have a locking mechanism to secure them in place.
Power Outlets and USB Ports
- Mount power outlets and USB ports on the lift for easy access to power tools and charging devices.
- Ensure they are safely positioned away from any moving parts and potential pinch points.
Anti-Slip Coating
- Apply an anti-slip coating to the platform to increase grip and prevent the motorcycle from sliding.
- There are various coatings available that are durable and resistant to oil and chemicals.
Sound System Integration
- For those who enjoy music while working, integrate a sound system into your lift. This can be as simple as a Bluetooth speaker shelf or a full-fledged built-in system.
- Make sure the components are protected from the elements and do not interfere with the lift's operation.
Enhance your DIY motorcycle lift with advanced features for improved functionality and safety. Thoroughly test each upgrade to ensure it works properly and safely with your motorcycle.
FAQs About DIY Motorcycle Lift
Discover essential faqs about DIY motorcycle lifts, including safety tips, tools needed, and step-by-step instructions for a smooth lifting process.
A DIY motorcycle lift is a homemade platform designed to elevate a motorcycle off the ground, allowing easier access for maintenance, repairs, or storage. It’s a cost-effective alternative to commercial lifts and can be customized to fit individual needs and preferences.
To build a DIY motorcycle lift, you’ll need materials like metal pipes, wood, or hydraulic components, depending on the design. You can find various plans online that provide step-by-step instructions. It’s important to consider the weight of your motorcycle and ensure the lift is stable and strong enough to support it safely.
Yes, safety is paramount when using a motorcycle lift. Always check the lift for any loose bolts or damaged parts before use. Ensure your motorcycle's weight is within the lift's capacity, and use safety locks if available. When the lift has wheels, lock them in place to prevent movement.
A DIY motorcycle lift can be used for storage, especially if you need to save space in your garage. It keeps the motorcycle off the ground, which can help prevent tire damage and makes it easier to cover the bike to protect it from dust and debris.
The benefits of a DIY motorcycle lift include cost savings, the satisfaction of building it yourself, and the ability to tailor it to your specific motorcycle model and needs. It also makes maintenance tasks more comfortable and can help prevent back strain from bending over the bike.
Conclusion
I'm sharing this to help you build your own DIY motorcycle lift at home and feel the same sense of achievement. Dive into the plans and see what you can build.


