Starting your own DIY mouse pad project is a fun and practical way to add a personal touch to your workspace. I once made my own mouse pad using some simple materials I found around the house. It's quite easy, and you can customize it any way you like. Plus, it's a great way to recycle old fabrics or upcycle outdated items.
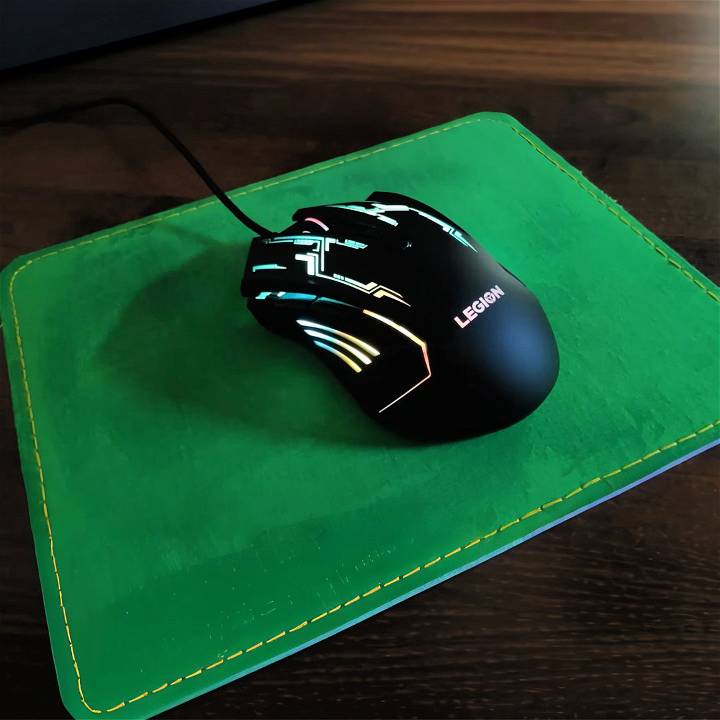
Making your own mouse pad allows you to choose the size, shape, and design that perfectly fits your style. All you need are a few basic supplies like fabric, adhesive, and a cutting tool.
This project is not only enjoyable but also gives you a sense of accomplishment. I felt so proud every time I used my customized mouse pad.
Why Make Your Own Mouse Pad?
Before we dive into the steps, you might wonder, "Why bother making your own mouse pad when you can easily buy one?" For me, it was about making something unique that matched my desk setup's aesthetic. Plus, using materials I already had at home added a layer of sustainability and customization that I couldn't get from a store-bought one.
Materials Needed and Their Purpose
- Foam Sheet (5mm thick) - The base of the mouse pad. It's soft yet firm enough to provide a good surface for your mouse.
- Cloth - This will cover the foam, providing the actual surface that your mouse will glide over. I chose a piece of fabric that not only felt smooth but also had a design I loved.
- Scissors - To cut the foam and fabric to the desired size.
- Sandpaper - This is used to smooth out the edges of the foam, making it more comfortable for your wrists.
- Adhesive - To stick the cloth onto the foam securely.
- Sewing Kit (optional) - If you, like me, want to add stitching around the edges for durability and aesthetics.
Step by Step Instructions
Learn how to make your own custom DIY mouse pad with our easy, step-by-step instructions. Perfect for personalization and unique designs!
Step 1: Cutting the Foam
I began by cutting the foam sheet into my desired size. I wanted a larger mouse pad, giving me ample room for mouse movement, so I cut out a piece measuring 25cm by 35cm. It's important to decide this based on your own desk space and preferences.
Step 2: Smoothing the Edges
Using sandpaper, I gently rounded off the edges and corners of the foam. This step made a significant difference in the comfort level of the mouse pad, especially after long hours of use, preventing any sharp edges from digging into my wrists.
Step 3: Preparing the Cloth
Next, I cut my chosen fabric slightly larger than the foam, allowing about an extra centimeter on each side. This would enable me to wrap it neatly around the foam.
Step 4: Sticking Fabric to Foam
I applied a thin layer of adhesive on one side of the foam and carefully placed the cloth on top, smoothing out any bubbles or wrinkles. Ensuring the cloth adhered well to the foam was crucial for the mouse pad's longevity.
Step 5: Trimming and Finishing
Once the adhesive dried, I trimmed the excess fabric, leaving just enough to make a small hem around the edges. As an optional step, I added some stitches around the edges. This not only secured the fabric but also added a homemade charm to the mouse pad.
Personalization Tips for DIY Mouse Pads
Making a DIY mouse pad gives you the freedom to tailor it to your personal taste and needs. Here are some tips to help you personalize your mouse pad:
- Choose Your Base Material: Start with a base that suits your preference. Foam, rubber, or cork are great for comfort. For a sleek look, consider a piece of leather or vinyl.
- Select the Top Layer: Fabric is commonly used for the top layer of a mouse pad. Pick a pattern or color that you love. You can also use paint or markers on a plain fabric to make your own design.
- Add a Personal Touch: Use stencils or freehand techniques to draw your favorite quotes, characters, or patterns. Iron-on patches or decals can also add a unique flair.
- Consider Texture: If you're into gaming or graphic design, the texture of your mouse pad can affect the mouse's responsiveness. Smooth surfaces are generally better for quick movements, while a textured surface might provide better control.
- Ergonomics Matter: If you spend a lot of time at your computer, consider adding a wrist rest to your mouse pad design. This can be made from a soft material like gel or memory foam.
- Seal and Protect: Once you're happy with your design, protect it. You can use a clear spray sealant for painted designs or a fabric protector for cloth surfaces to make your mouse pad last longer.
- Non-slip Backing: Ensure your mouse pad stays in place by attaching a non-slip material, like silicone or rubber, to the bottom.
The key to a great DIY project is to have fun and let your creativity shine. Your mouse pad should be a reflection of what you love and what makes you comfortable while using your computer.
Advanced Techniques for Crafting DIY Mouse Pads
When you're ready to take your DIY mouse pad to the next level, these advanced techniques can help you make a professional-looking and highly functional accessory for your desk.
- Layering Materials: Combine different materials to achieve the perfect balance of comfort and precision. For instance, a thin layer of neoprene topped with microfiber cloth can provide a smooth surface with just enough resistance for accurate mouse tracking.
- Sewing for Durability: If you're using fabric, sewing the edges can prevent fraying and give your mouse pad a polished look. You can use a simple running stitch or a zigzag stitch for extra strength.
- Custom Printing: For a truly personalized touch, consider custom printing your design onto the mouse pad surface. You can use services that print your artwork onto fabric, which you can then adhere to your base material.
- Laminating for Protection: If you've maked a paper-based design or used photos, laminating the top layer will protect it from wear and tear. This also makes it easy to clean.
- Making a Molded Wrist Rest: Use silicone putty to make a mold of your wrist in a comfortable position. Then, fill the mold with a soft material like gel to make a wrist rest that perfectly fits your hand.
- Edge Lighting: For a modern look, embed LED lights along the edge of your mouse pad. This requires some electrical knowledge to wire the LEDs and power them safely.
- Heat Transfer Vinyl (HTV): HTV can be cut into intricate designs and applied to your mouse pad with heat. It's durable and comes in various colors and finishes, including glow-in-the-dark options.
Using these techniques, you'll have a unique, durable mouse pad. Take your time and enjoy making something functional and stylish.
Troubleshooting Common Issues
When crafting a DIY mouse pad, you might encounter a few hiccups along the way. Here's how to solve some common issues with simple, clear solutions:
- Material Fraying: If the edges of your fabric are fraying, try applying a thin layer of clear nail polish or fabric glue along the edge. Let it dry completely before using the mouse pad.
- Surface Bubbling: Bubbles can form under the surface if the top layer isn't properly adhered to the base. To fix this, gently lift the fabric and apply even pressure as you smooth it back down.
- Wrinkles in the Fabric: Iron out any wrinkles before attaching the fabric to the base. Use a low heat setting and place a thin cloth between the iron and the fabric to protect it.
- Mouse Pad Slipping: If your mouse pad isn't staying in place, attach a non-slip material like silicone backing to the bottom. Make sure the surface of your desk is clean before placing the mouse pad down.
- Ink Smearing: When drawing or printing on your mouse pad, give the ink ample time to dry. If you're using an inkjet printer, consider spraying a fixative over the design to prevent smearing.
- Uneven Surface: For a smooth surface, ensure that your base material is flat and free of debris before adding the top layer. Use a roller to press out any air pockets.
- Wrist Rest Discomfort: If your wrist rest is too hard or too soft, adjust the filling. Memory foam or gel inserts can be cut to size for the perfect firmness.
Addressing these issues will ensure that your DIY mouse pad is both functional and durable. Patience and attention to detail will yield the best results.
Maintenance and Care
Keeping your DIY mouse pad in top condition is key to ensuring it remains effective and looks good over time. Here's how to care for your mouse pad:
- Regular Cleaning: Gently wipe the surface with a damp cloth to remove dust and dirt. For fabric tops, use a mild soap and water solution, then let it air dry.
- Stain Removal: If you get a stain, act quickly. Blot the area with a mixture of water and a small amount of dish soap. Avoid scrubbing, which can damage the surface.
- Avoiding Heat and Sunlight: Don't leave your mouse pad in direct sunlight or near heat sources, as this can cause the materials to degrade or the colors to fade.
- Storage: When not in use, store your mouse pad flat in a cool, dry place. If you must roll it, do so loosely and with the top layer facing outward to avoid creases.
- Surface Protection: If you've added a design, consider covering it with a clear desk mat or a custom-cut piece of clear vinyl to protect it from wear.
- Refresh the Non-Slip Base: Over time, the non-slip base may lose its grip. Clean it with a lint-free cloth and a little water. Let it dry completely before using it again.
By following these simple care instructions, you can extend the life of your DIY mouse pad and keep it looking as good as new. A little maintenance goes a long way!
FAQs About DIY Mouse Pad
Discover all you need in our faqs about DIY mouse pads. Learn about materials, steps, and tips to make your own personalized mouse pad at home.
To prevent your mouse pad from sliding around, consider using:
A non-slip shelf liner is cut to the size of your mouse pad base.
Double-sided tape or adhesive pads on the corners of your pad.
A piece of rug liner or foam with an adhesive backing.
Absolutely! Personalization is one of the best parts of making your own mouse pad. You can:
Choose colors and patterns that match your style.
Use photographs or images that you love.
Add text or quotes that inspire you.
Yes, it is. Making your own mouse pad can be very cost-effective because:
You can use affordable materials or upcycle items you already have.
It eliminates the need to purchase commercially-made mouse pads.
Making a DIY mouse pad offers several advantages:
It's a fun crafting project that adds a personal touch to your workspace.
You can make it comfortable and ergonomically friendly with extra cushioning or a wrist rest.
It's an eco-friendly choice that helps reduce waste by upcycling materials.
When deciding on the size of your DIY mouse pad, consider the following:
Desk space: Measure the area where you'll place the mouse pad to ensure it fits comfortably.
Mouse usage: If you use your mouse for graphic design or gaming, you might prefer a larger pad for broader movements.
Portability: If you plan to carry it with you, a smaller size might be more practical.
Final Thoughts
Wrapping up, making a custom DIY mouse pad is a rewarding project. It allows personal expression and improves your workspace comfort. By following this step-by-step guide, you can make your own mouse pad easily. Enjoy the process and the unique result it yields.


