Building a DIY murphy desk Is a fantastic way to add a versatile and convenient workspace to your home. These fold-away desks save space and can be installed in various rooms, making them perfect for small apartments or cozy corners. With step-by-step instructions, you can build your own DIY murphy desk using simple materials and tools.
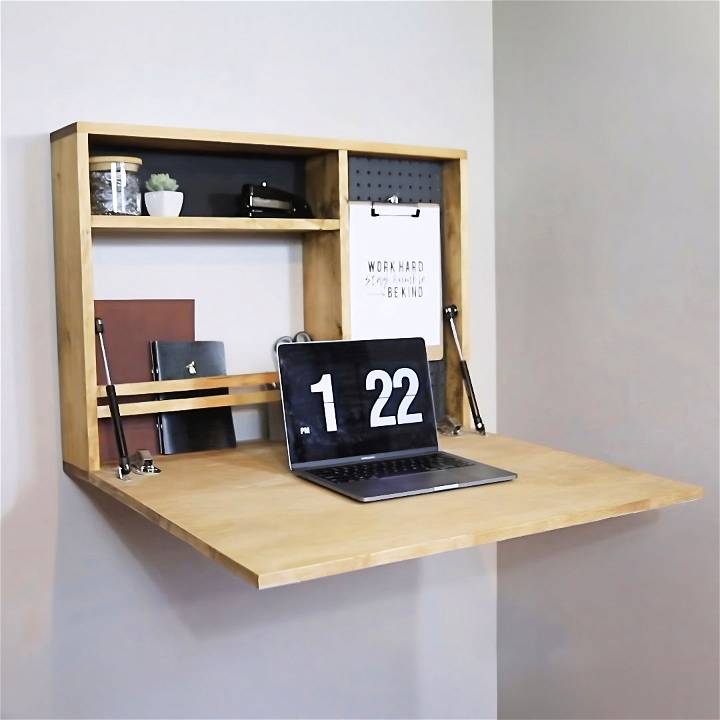
Making a DIY wall desk Is an exciting project that combines functionality with a stylish design. These desks fold neatly against the wall when not in use, freeing up valuable floor space. Whether for work, study, or craft projects, a DIY wall desk can provide the practical and aesthetic benefits you need for a productive home environment.
Discover how to build a DIY Murphy desk with our step-by-step guide. Maximize your space and build a functional, stylish workspace easily!
Materials Needed and Their Purpose:
- 1x6 Pine Boards: To construct the desk frame, offering sturdiness and aesthetic appeal.
- Dowels & Wood Glue: This is used to assemble the frame pieces together discreetly.
- Plywood: For the desk's front panel and support pieces, providing a flat surface and structural support.
- Edge Banding: To give the plywood edges a finished look.
- Stain & Paint: To beautify and protect the wood.
- Hinges & Pistons: Essential for the fold-down mechanism, allowing the desk to open and close smoothly.
- Pegboard: For a customizable organization space.
- 1x2s for Frame: To build a recess for the pegboard, allowing for accessory hanging.
- Assorted Painting Supplies: Brushes, painter's tape, etc., for applying paints and stains.
Step by Step Instructions
Learn how to build a DIY murphy desk with our step-by-step instructions, from constructing the frame to mounting the desk. Perfect for small spaces!
Step 1: Constructing the Frame
I started by cutting the 1x6 pine boards to size for the sides, top, and bottom of the desk frame. Using dowels for joinery added complexity but ensured a clean look. It required precise drilling, gluing, and clamping until the wood glue dried. This joinery method, although time-consuming, resulted in a robust and visually pleasing structure.
Step 2: Adding Internal Structures
Next, I focused on the internal features, including a shelf and a divider for the pegboard section. Pocket holes and wood glue secured the divider, while brad nails and glue fastened the shelf. These additions not only enhanced the desk's functionality but also its aesthetics.
Step 3: Preparing the Front Panel
After constructing the frame, I turned my attention to the plywood front panel. Applying edge banding to its edges transformed it into a solid-looking piece. I then stained the frame and front panel with a golden oak stain, achieving a harmonious and natural wood finish.
Step 4: Crafting the Artistic Design
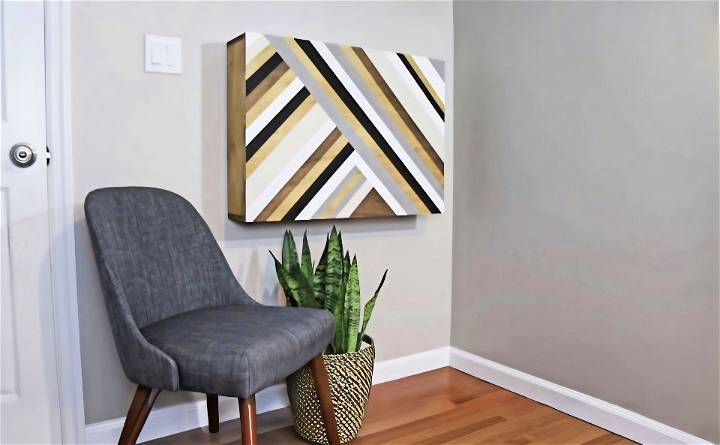
The most engaging part was designing the front panel. Unrestricted creativity led me to cover it with an array of geometric patterns using painter's tape and various paint colors. This process was iterative, with layers of tape and paint building a complex and visually stunning design. This artistic endeavor, while time-intensive, was immensely satisfying and personalized the desk to my taste.
Step 5: Installing the Hardware
Choosing the right hardware was crucial for functionality. Full overlay hinges allowed the desk to swing down smoothly, while pistons helped to control the movement, ensuring it opened and closed gently. Proper alignment and installation were key to ensuring the desk operated smoothly and safely.
Step 6: Mounting the Desk
Mounting the desk to the wall was the final hurdle. I ensured it was set at an armchair-friendly height for versatility. Finding and drilling into studs provided the necessary support, and I carefully aligned the desk to ensure it was both aesthetically pleasing and functional.
Throughout the project, I encountered a few challenges, such as the dowel joinery taking longer to dry and having to adjust the internal dowels for the hinge and piston installation. However, these obstacles were valuable learning experiences, emphasizing the importance of flexibility and problem-solving in DIY projects.
Customization Ideas for Your Murphy Desk
When it comes to personalizing your Murphy desk, the possibilities are as unique as you are. Here are some ideas to inspire your creativity and help you tailor your space-saving desk to your needs and style:
- Choose Your Theme: Start by deciding on a theme that reflects your personality or the room’s decor. Whether it’s minimalist, industrial, rustic, or modern, your Murphy desk can be a seamless extension of your interior design.
- Paint and Finishes: A fresh coat of paint can transform your desk. Opt for chalkboard paint to jot down notes and ideas, or use magnetic paint to hang tools and notes. Consider a stain or varnish for a natural wood look that complements your space.
- Hardware Upgrades: Swap out standard hinges and handles for something that stands out. Brass fittings can add a touch of elegance, while sleek, stainless steel hardware can give a modern vibe.
- Surface Work: If you’re crafty, consider adding a custom inlay to the desk surface. For a simpler upgrade, adhesive vinyl patterns or a protective glass top can add both style and functionality.
- Storage Solutions: Integrate hidden compartments or magnetic strips to keep your stationery organized. Use foldable or sliding trays to store your keyboard and mouse when not in use.
- Lighting: Good lighting is crucial. Install LED strips under the desk or add a clip-on desk lamp to ensure you have the light you need without taking up extra space.
- Tech Integration: Make your desk smart by adding built-in USB ports or wireless charging pads. Consider cable management solutions to keep your space tidy and efficient.
- Comfort Add-ons: Attach a soft wrist rest along the edge or add a standing desk converter to switch between sitting and standing as you work.
- Personal Touches: Finally, make it yours. Decorate with personal items like photos, a vase for fresh flowers, or a small plant. These touches make the space inviting and truly your own.
The key to a successful DIY project is not just following instructions but also injecting your personality into what you build.
Troubleshooting Common Issues with Murphy Desks
Building a Murphy desk can be a rewarding DIY project, but it’s not without its challenges. Here are some common issues you might encounter and how to solve them:
The Desk Won’t Stay Up
- Solution: Check the tension of the springs or pistons. Adjust them according to the manufacturer’s instructions to ensure they provide enough force to keep the desk in place.
Desk is Difficult to Lower
- Solution: This could be due to over-tightened springs or pistons. Loosen them slightly, but be careful not to make them too loose, or the desk won’t stay up.
The Desk Sags or is Unstable
- Solution: Reinforce the mounting points where the desk attaches to the wall. Make sure you’re using the right type of anchors for your wall material, and consider adding additional brackets for support.
Difficulty Aligning the Desk
- Solution: Use a level to ensure everything is straight during installation. Measure twice and drill once to avoid misalignment.
Scratches or Damage to the Surface
- Solution: Apply a protective layer such as a desk pad or acrylic sheet. For existing scratches, a furniture marker or touch-up kit can help conceal minor damage.
Squeaky Hinges
- Solution: Lubricate the hinges with a silicone-based lubricant. Avoid oil-based products, which can attract dust and dirt.
The Desk Doesn’t Fit the Space
- Solution: Double-check the measurements of your space before cutting any materials. If you’ve already built the desk, look for ways to modify the surrounding area or the desk itself to make it fit.
Difficulty Installing or Using Hardware
- Solution: Review the installation instructions for each piece of hardware. If you’re stuck, look for online tutorials or contact the manufacturer for help.
The Finish Doesn’t Look Right
- Solution: Sand down the finish and try again, making sure to apply even coats and allow adequate drying time between layers.
Patience and planning are essential. Don’t rush and prioritize safety with tools and materials.
Maintenance and Care for Your Murphy Desk
Keeping your Murphy desk in top condition is essential to ensure it serves you well for years to come. Here’s how you can maintain and care for your desk with ease:
- Regular Cleaning: Dust your desk regularly with a soft, dry cloth. For deeper cleans, use a damp cloth with mild soap, but avoid harsh chemicals that can damage the finish.
- Protect the Surface: Use coasters for drinks and placemats for any items that might scratch the surface. Consider a desk pad to prevent wear and tear from daily use.
- Check Moving Parts: Periodically inspect the hinges, springs, or pistons that help your desk fold up and down. Tighten any loose screws and replace parts that show signs of wear.
- Avoid Overloading: Don’t place too much weight on your Murphy desk. Stick to the recommended load capacity to prevent strain on the mechanisms and the wall mount.
- Mind the Mechanism: When lowering or raising the desk, do so gently. Forcing the desk can damage the mechanism and the wall it’s attached to.
- Climate Control: Keep your desk away from direct sunlight, heaters, and air conditioners to prevent warping or discoloration of the wood.
- Touch-Ups: If you notice chips or scratches, touch them up promptly with a matching wood marker or paint. This not only keeps your desk looking good but also protects the wood.
- Lubrication: If you hear squeaking, apply a silicone-based lubricant to the moving parts. This will keep the action smooth and quiet.
- Stay Organized: Use organizers or built-in storage to keep your desk clutter-free. This makes cleaning easier and ensures you have space to work.
- Handle with Care: Always use the handle or designated area to pull down or stow away your desk. This ensures even pressure and reduces the risk of damage.
By following these simple steps, you’ll keep your Murphy desk functional and beautiful, making your space-saving solution a lasting part of your home.
FAQs About DIY Murphy Desk
Discover answers to faqs about DIY murphy desk. Learn how to build, install, and maximize space efficiently with this versatile furniture piece.
A DIY Murphy Desk is a space-saving furniture piece that can be folded up against the wall when not in use. It’s designed to provide a work surface in small living spaces or multi-functional rooms. When folded down, it serves as a desk with potential storage options, and when not in use, it tucks away neatly to free up floor space.
Absolutely! You can customize your Murphy Desk by choosing different sizes, finishes, and additional features like shelves or pegboards for organization. Some people even add artistic elements to the desk front to make it double as wall art when folded up.
Yes, it’s important to ensure the desk is securely mounted to wall studs for stability. Use a stud finder to locate the studs and mount the desk at a comfortable height for use. Additionally, consider the weight capacity of the hinges and the wall structure to ensure safety and functionality.
The ideal space for a Murphy Desk is one where floor area is limited, such as small apartments, tiny homes, or multi-use spaces. It’s best to choose a wall without obstructions where the desk can fold down flat. Ensure there’s enough room to sit comfortably when the desk is in use, and consider the height of the wall where it will be mounted to accommodate standing or seated work.
Safety is paramount when installing a Murphy Desk. Make sure to secure the desk to wall studs, not just drywall, to support the weight. Use appropriate anchors and hardware for the wall material, whether it’s brick, concrete, or wood. Regularly check all hinges and mounts for wear and tear, and ensure the desk surface is balanced and stable when deployed. If you’re using a latch system, make sure it’s strong enough to hold the desk securely when not in use.
Conclusion:
Wrapping up, making a DIY murphy desk for a fold-away workspace can greatly enhance your home office or study area. By building a DIY wall desk, you can maximize space and maintain an efficient work environment. This project is both practical and satisfying, offering a perfect blend of creativity and functionality. We hope these tips and instructions have inspired you to get started on your own DIY murphy desk project.


