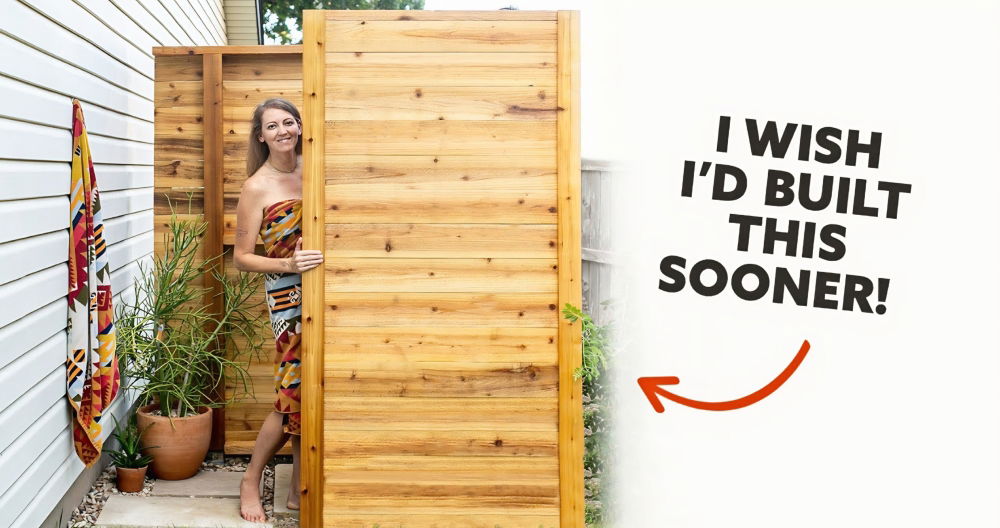
Building a DIY outdoor shower enclosure was a fun and rewarding project for my family. We wanted to enjoy the summer outdoors without tracking dirt into the house. Using simple and affordable materials, we managed to build a cozy and functional shower space in our backyard. It was easier than we thought and added a unique touch to our garden.
If you want to add a practical and enjoyable element to your garden, building an outside shower enclosure can be a fantastic choice. I'm excited to share these tips and tricks that will guide you through the process. These will help you start your own project effortlessly and save money while making your summer even more refreshing.
Choosing the Perfect Location
The first step involved selecting the ideal spot for my outdoor shower. My choice was driven by the proximity to a water source. In my case, a convenient vacuum on the other side of a chosen wall provided easy access to water. It's crucial to consider aspects such as water spigot availability or even rainwater collection systems when planning your shower's locale.
Laying the Foundation
The groundwork began with laying pavers at the four corners of the shower's footprint. For those dealing with grass, removing it is necessary to reach a more solid base like compacted dirt or to lay a gravel base if dealing with soft ground. Ensuring each paver was leveled in both directions was a meticulous task, but crucial for the overall stability of the structure.
Materials and Their Importance
- Pressure-Treated Wood: Chosen for its resistance to moisture, making it perfect for the deck's framing.
- Pavers: Provided a solid and level base for the structure to stand on.
- Cedar Panels: Selected for their aesthetic appeal and natural resistance to outdoor elements, making them ideal for the privacy screens.
- Biodegradable Products: Encouraged for environmental responsibility, ensuring any runoff is eco-friendly.
- Composite Decking: Used for its durability and ease of maintenance, providing a clean and safe floor for the shower area.
Step by Step Instructions
Learn how to build a DIY outdoor shower enclosure step by step, from framing the deck to adding final touches like panels and benches for comfort.
Framing the Deck
After the pavers were set, cutting pressure-treated boards for the deck framed the next chapter of my project. Each cut was precise, aiming for a snug fit. I found that doubling up boards and marking them together saved a lot of time. Nailing the joists in place provided the support needed for the deck, a foundation I could reliably build upon.
Elevating with Posts and Painting
Attaching the posts securely brought the shower to a new height, quite literally. Tacking them in place before making them plum and securing them with screws added the necessary stability. Choosing to pause here and apply a protective coat of paint to the pressure-treated material was a decision driven by both aesthetics and the add-on protection against the elements.
Final Touches: Decking, Panels, and Painting
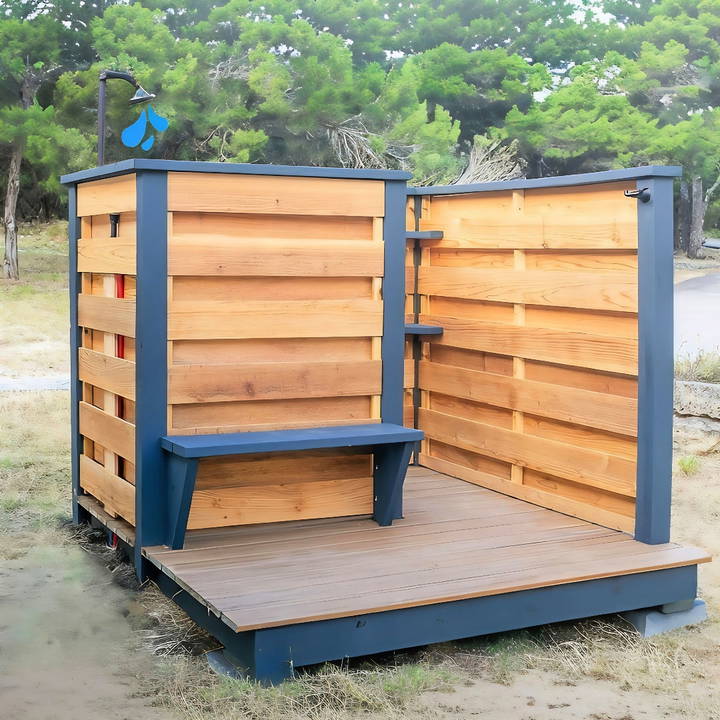
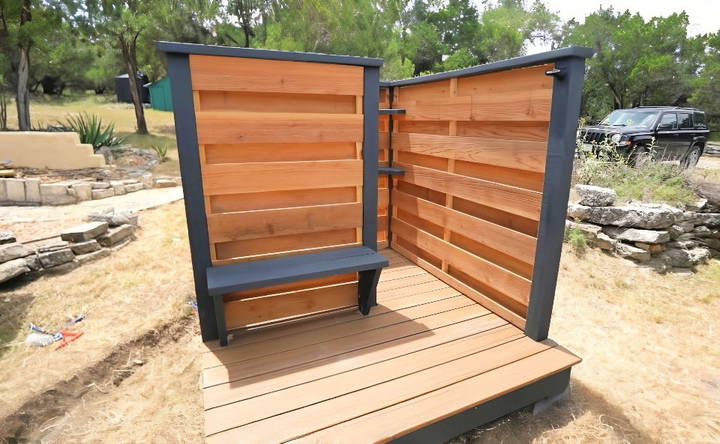
The decking process was straightforward, especially with the leftover composite decking from a previous project. Each board was cut, laid out, and attached with color-matched screws, ensuring a neat finish. Planning for expansion and contraction, spacers were used between each board.
The horizontal cedar panels added next were the true game-changers, bringing in both privacy and style. Cutting and attaching rails for the panels, then nailing the cedar slats in place transformed this structure into a shower area.
A coat of protective varnish on the cedar ensured the longevity and maintained the fresh look of the wood. I opted for a water-based varnish that highlighted the natural beauty of the cedar while offering protection from the sun's harsh rays.
From Utility to Comfort: Shelves, Hooks, and Benches
No shower would be complete without some conveniences. Installing simple shelves for shower essentials, hooks for towels and clothing, and a small bench made the outdoor shower not just a place to rinse off but a comfortable retreat.
This project was about making a sanctuary with an outdoor shower. Every step, from location to pavers, was a learning process. Using durable materials ensured it would withstand time and the elements.
Building an outdoor shower offers great learning and satisfaction. Perfect for rinsing off, cooling down, or enjoying fresh air, it adds luxury and practicality to any home.
Customization Tips for Your DIY Outdoor Shower Enclosure
Building a DIY outdoor shower enclosure is not just about functionality; it's also an opportunity to express your personal style and make the space truly your own. Here are some tips to help you customize your outdoor shower:
- Choose a Theme: Start by deciding on a theme that reflects your taste. Whether it's tropical, beachy, rustic, or modern, let your theme guide your choices in materials and design.
- Select a Color Scheme: Colors can set the mood for your shower enclosure. Choose a palette that complements your home and garden. Soft, natural tones can build a serene space, while bright colors can make a vibrant and energizing area.
- Incorporate Nature: Consider using natural elements like stone, wood, or bamboo. These materials can blend seamlessly with the outdoor environment and add a touch of elegance.
- Add Personal Touches: Decorate with items that reflect your interests or travels. This could be anything from shells collected on the beach to a piece of driftwood that serves as a towel rack.
- Consider Lighting: Good lighting can enhance the ambiance of your shower enclosure. Solar-powered lights are a great eco-friendly option that can provide a soft glow in the evening.
- Think of Privacy: Ensure your shower enclosure offers the right level of privacy for comfort. You can use lattice panels, tall plants, or a privacy screen to build a secluded space.
- Functional Accessories: Add shelves for toiletries, hooks for hanging towels, and benches for seating. These practical additions can also be stylish elements of your design.
- Flooring Matters: Choose a flooring material that is slip-resistant and comfortable underfoot. Pebble tiles, for example, are both attractive and functional.
- Make it Accessible: If you or your family members have mobility concerns, consider accessibility in your design. This could mean a barrier-free entrance or a hand-held showerhead.
- Seasonal Flexibility: If you live in a region with changing seasons, think about how you can use the shower year-round. This might involve installing a removable enclosure or a heated water source.
Use these tips to build a practical outdoor shower enclosure that reflects your style. Plan carefully, and don't hesitate to add your personal touch.
Maintenance and Upkeep of Your DIY Outdoor Shower Enclosure
Keeping your DIY outdoor shower enclosure in top shape is crucial for its longevity and your enjoyment. Here's a straightforward guide to maintaining your outdoor shower:
- Regular Cleaning: Rinse off your shower area after each use to prevent soap buildup and water spots. For a deeper clean, use a mild soap and a soft brush every few weeks.
- Check for Wear and Tear: Inspect your shower enclosure regularly for any signs of damage, such as cracks or rust. Address these issues promptly to prevent further deterioration.
- Protect Wood Surfaces: If your shower includes wooden elements, treat them with a water-resistant sealant once a year. This will help prevent rot and maintain the wood's appearance.
- Winterize Your Shower: If you live in a cold climate, it's important to winterize your outdoor shower. Drain all pipes and hoses to prevent freezing and potential damage.
- Keep Fixtures Shiny: Chrome or stainless steel fixtures can be kept shiny and free from water stains by wiping them down with a vinegar solution.
- Manage Mold and Mildew: In damp environments, mold and mildew can be a problem. Keep the area well-ventilated and consider using mold-resistant materials when building your shower.
- Refresh Caulking: Check the caulking around fixtures and repair any that has become worn or is peeling to ensure a watertight seal.
- Monitor Plumbing: Make sure all plumbing connections are secure and leak-free. A small drip can lead to bigger problems if not fixed early.
- Update Accessories: Over time, you might find that your needs change. Don't hesitate to update or add accessories like soap dishes, shelves, or hooks to improve functionality.
- Seek Professional Help: For any maintenance issues that are beyond your expertise, don't hesitate to call in a professional. It's better to invest in proper repairs than to risk further damage.
Follow these tips to keep your outdoor shower refreshing and functional for years. Maintenance preserves the structure and enhances your experience.
Legal Considerations for Building a DIY Outdoor Shower Enclosure
When planning to build a DIY outdoor shower enclosure, it's essential to be aware of the legal aspects to ensure your project complies with local laws and regulations. Here's what you need to know:
- Research Local Codes: Before starting, check your local building codes and zoning ordinances. These rules can affect the design, placement, and plumbing of your outdoor shower.
- Permits: Depending on where you live, you may need to obtain permits before construction begins. This is especially true if you're planning to install new plumbing or make significant structural changes.
- Homeowners Association (HOA) Rules: If you're part of an HOA, you'll need to get approval for your project. HOAs often have specific guidelines about the appearance and location of outdoor structures.
- Drainage: Proper drainage is crucial. Some areas may allow the shower to drain into the ground, while others require a connection to the municipal sewage system. Make sure your plan meets these requirements.
- Privacy: Ensure your shower design provides adequate privacy. This isn't just a courtesy; in some places, it's a legal requirement to prevent public exposure.
- Water Usage: Be mindful of water usage regulations. In some regions, there are restrictions on water use, especially if you're in an area experiencing drought.
- Accessibility: Consider accessibility laws. If your shower is open to the public or used by people with disabilities, it must comply with accessibility standards.
- Environmental Protection: If you're near protected land, such as a beach or wetland, additional regulations may apply to protect the environment.
- Safety: Safety regulations may dictate certain features of your shower, like non-slip surfaces and safe electrical installations.
Understanding legal rules ensures your DIY outdoor shower is fun, functional, lawful, and community-friendly. Always check with local authorities if unsure.
FAQs About DIY Outdoor Shower Enclosure
Discover answers to common questions about DIY outdoor shower enclosures. Get tips, materials, and installation advice for your perfect outdoor shower.
Privacy for your outdoor shower can be ensured by:
Location: Choose a discreet area of your yard.
Height: Enclosures should be at least 6 feet tall.
Design: Use solid panels or lattices with climbing plants.
Door: Install a door or a shower curtain for entry.
While plumbing experience is helpful, it's not necessary for simple setups. You can:
Use existing outdoor spigots to connect a flexible shower hose.
Opt for solar-powered showers that heat water using sunlight.
Consider portable showers that can be connected to a garden hose.
The best base for an outdoor shower should be:
Stable: It must support the weight of users and be slip-resistant.
Drainable: It should allow water to drain away quickly to prevent pooling.
Durable: Materials should withstand outdoor conditions.
Maintaining your outdoor shower enclosure involves:
Regular cleaning: Rinse off soap residue and debris.
Treating wood: Apply a water-repellent sealer annually.
Winterizing: Drain pipes and cover the shower head to protect from freezing.
Absolutely! If you prefer a less permanent solution or have limited space, consider these options:
Portable shower stalls: These can be set up and taken down as needed.
Freestanding designs: Use a tripod stand with a shower head that connects to a garden hose.
Natural enclosures: Utilize existing trees or tall plants to hang a shower head and curtain for privacy.
Looking Ahead
Starting your own DIY outdoor shower enclosure project can be fun and fulfilling. With the right guidance, you can build a refreshing outdoor space on a budget. These tips will surely help you get started!


